If you couldn’t tell from my last couple posts, I absolutely LOVE my house. Everything was perfectly updated before we moved in. However, the problem with moving into a “renovated” home instead of a brand new one, is that there are going to be some things that are aesthetically unpleasing.
For starters, I mentioned color of the kitchen cabinetry was hideous. That was the first thing to go. Secondly, the paint color of a few rooms just didn’t compliment the space. That was easy enough to fix (fun idea: if you want a cool design how-to, check out my tutorial for the stripes I painted in our home office).
Then, by adding some chic furniture, accents, and a couple gallery walls, our new house seemed like a home. But something still wasn’t right.
Maybe it’s the crafter in me, or maybe it’s my desire to constantly be renovating, but our living room just seemed off. We had this great sectional couch, our newly painted wet bar, and our stellar big screen TV… all surrounding the focal point of this 70’s style fireplace and Ikea shelves. I desperately needed a good fireplace makeover- STAT!
Don’t Watch HGTV for your Fireplace Makeover
Now, don’t get me wrong, I love a good deal at Ikea. In fact, this tutorial has Ikea written all over it. What I didn’t love were our black/brown shelves we had carried with us through 3 apartments and looked like they belonged in a dorm room. They most certainly did not belong in our nicely renovated home.
What I longed for were beautiful white built-ins. The kind you see on HGTV’s “Property Brothers”, where they cover the ugly brick fireplace with something more chic and modern. It would tie the whole room together and give it the upscale feel I wanted.
However, custom built-ins are not cheap. They range anywhere from $5-10K, which was money I was NOT willing to spend. Being the frugal finder I am, I decided to hack my way to the living room I wanted. If I wasn’t going to get my dream custom built ins- I was going to make it look like I did (as much as I could).
The first thing I did was, naturally, search on Pinterest. I found a BUNCH of tutorials on how to make Ikea furniture look like fireplace built ins. But those ALL required heavy machinery, wood, saws, nail guns, etc. The cost of making my fireplace look like it had built-ins was almost going to cost me as much as hiring someone to do the built-ins for me. So unless I was planning on doing some other woodworking in my home (which I wasn’t) those tutorials were OUT.
What I ended up doing for my fireplace makeover is a genius hack (in my humble opinion). It’s great for both homeowners, as well as renters. Because honestly, whether you own or rent, nobody wants to live in a dated, sad space. Nobody!
The Fireplace Built-In Hack
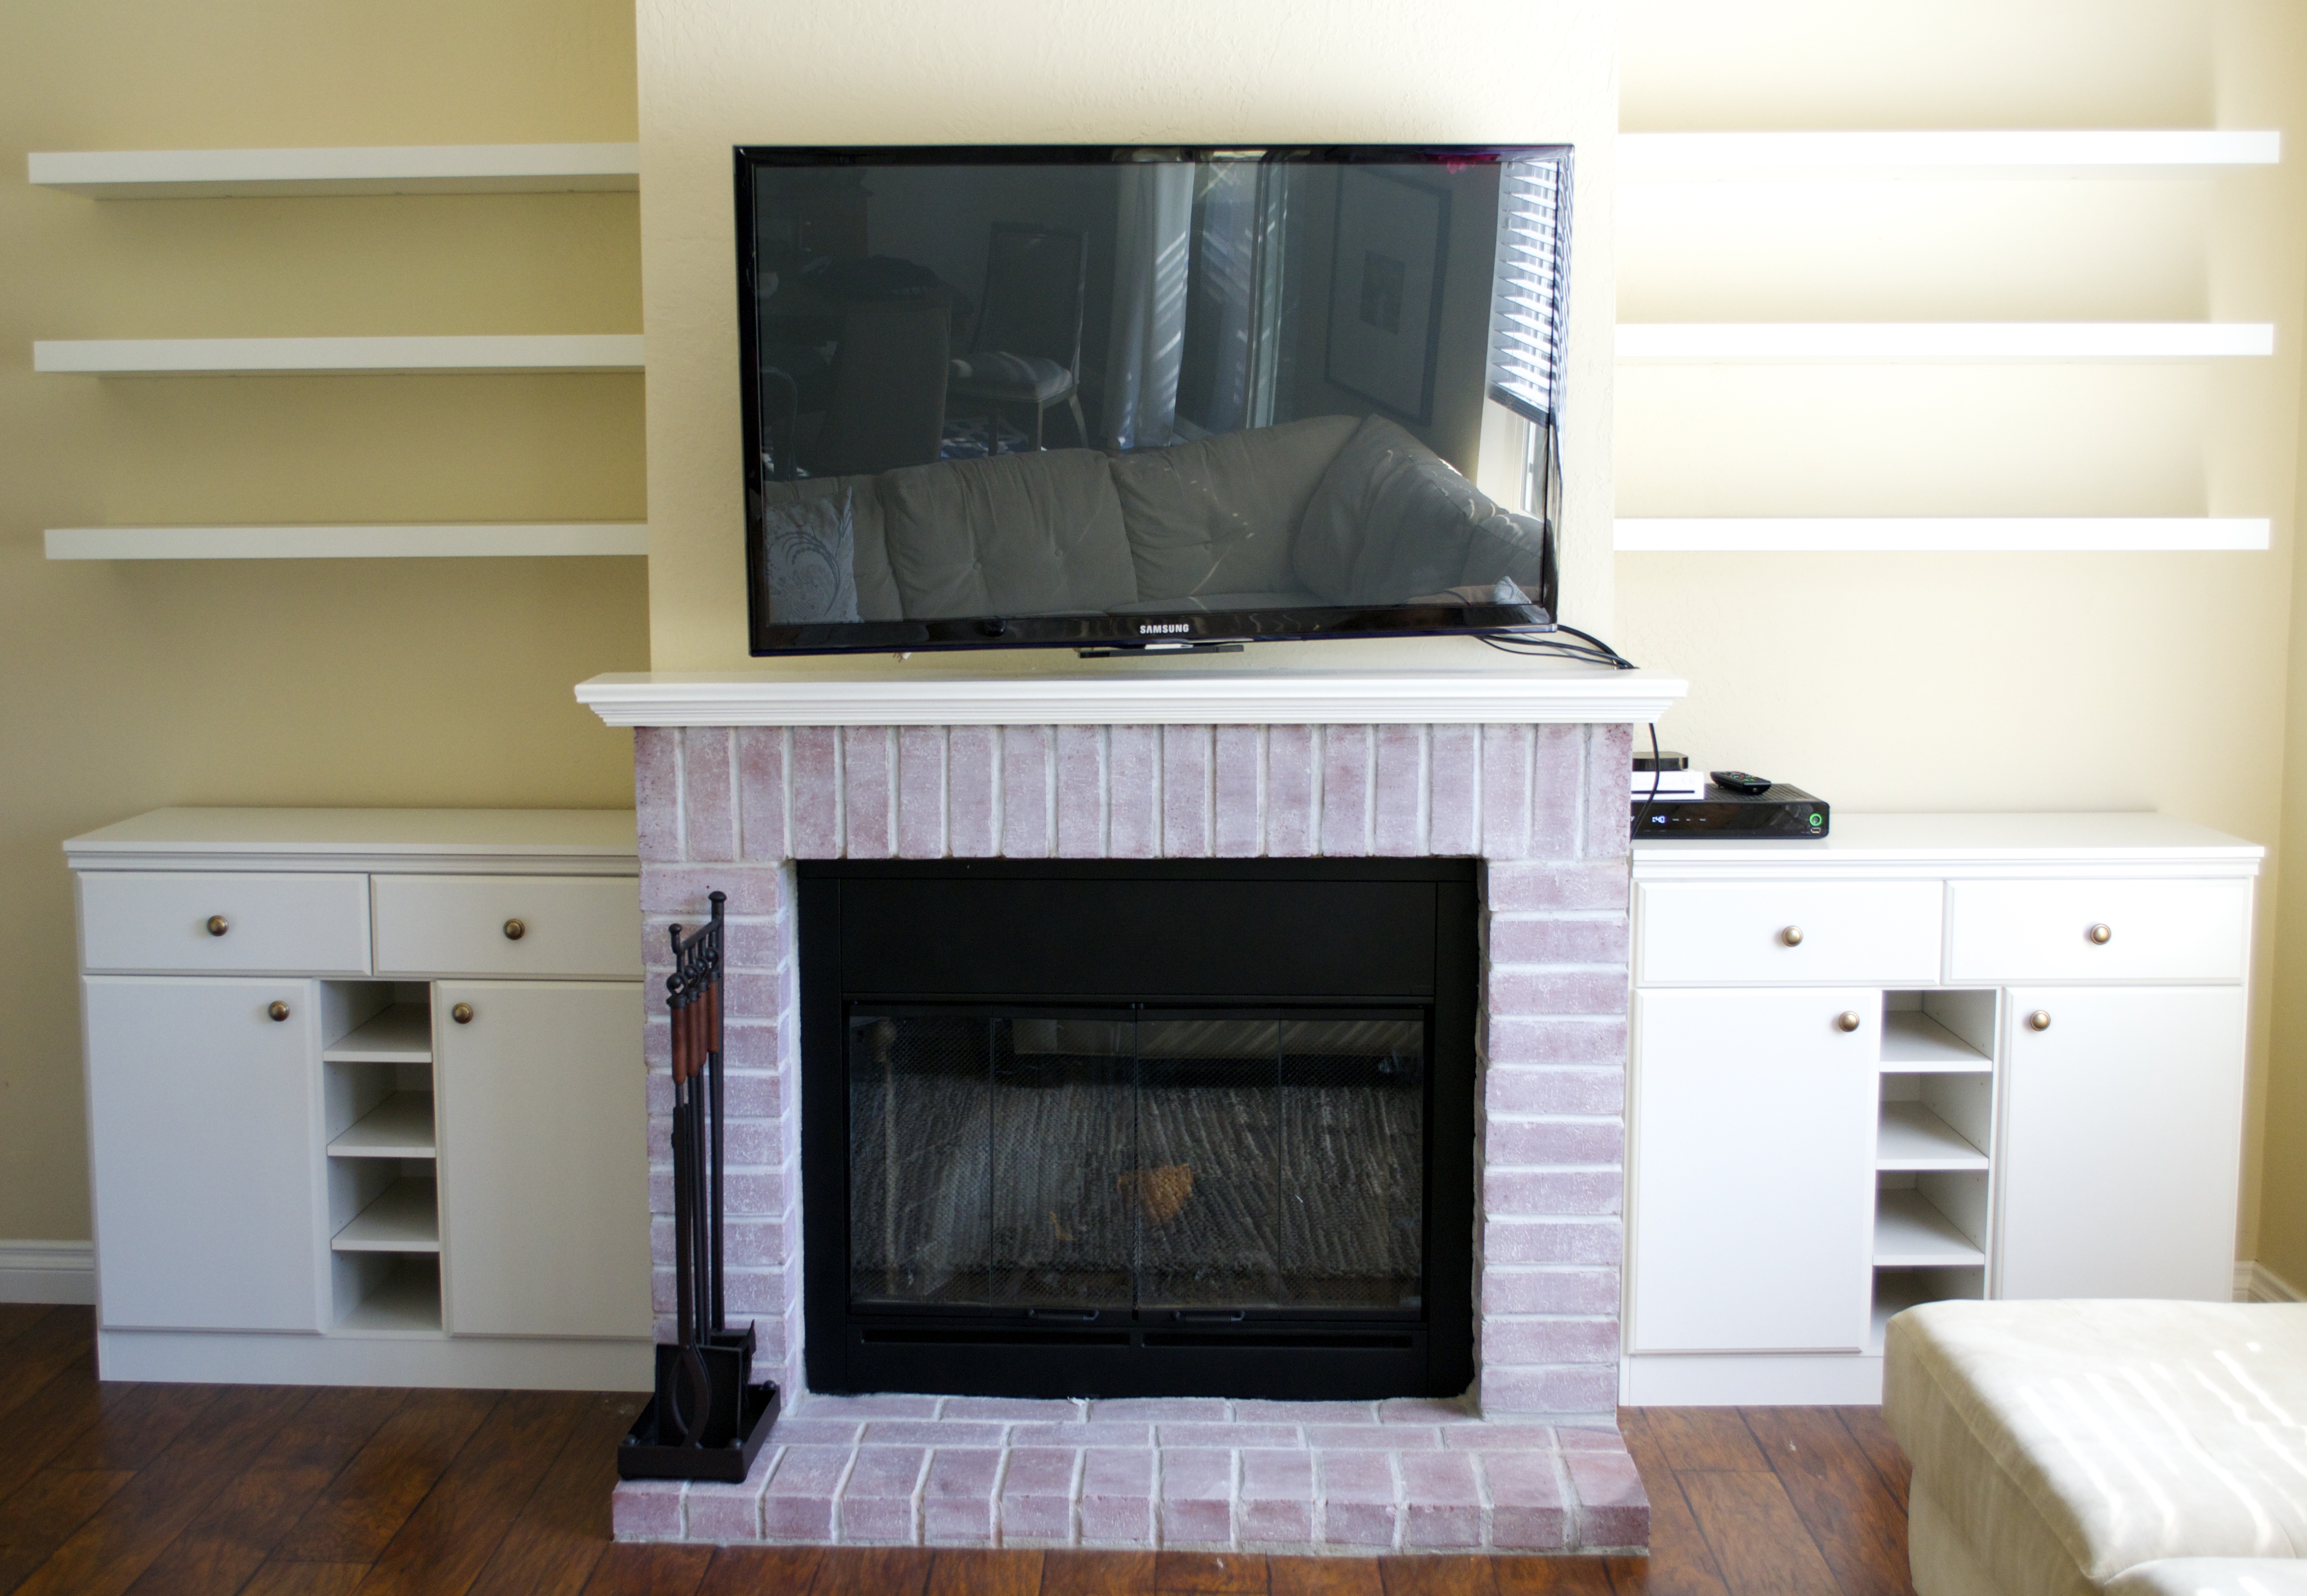
What I did was I ended up whitewashing my fireplace brick, to get rid of the total 70’s look and feel. Then I added matching white cabinets on each side, with white floating shelves above, to give the look of built-ins. Here is my before and after:
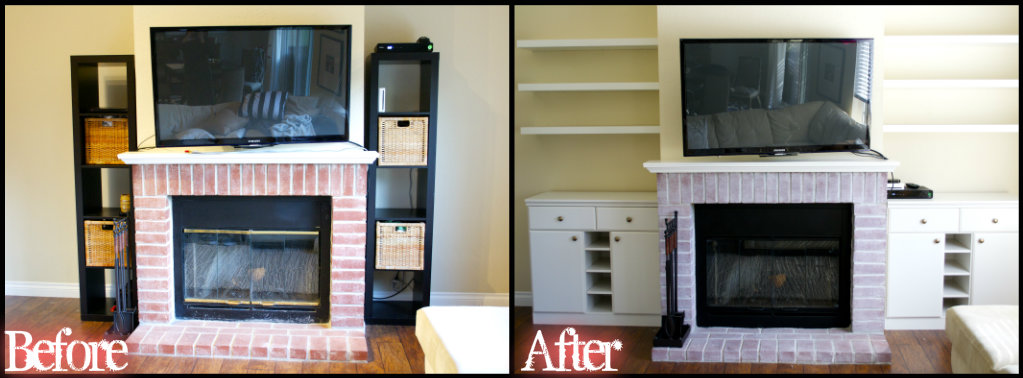
I still have to accessorize it with picture frames, accents, etc. But even without that all, it’s still a HUGE improvement, right? I know, I should have thought of this 2 years ago. It would have saved me a lot time debating what to do with the space.
Below, I give you the materials needed, and step by step instructions to get this exact look yourself!
Steps for Your Fireplace Makeover
Whitewashing Your Fireplace
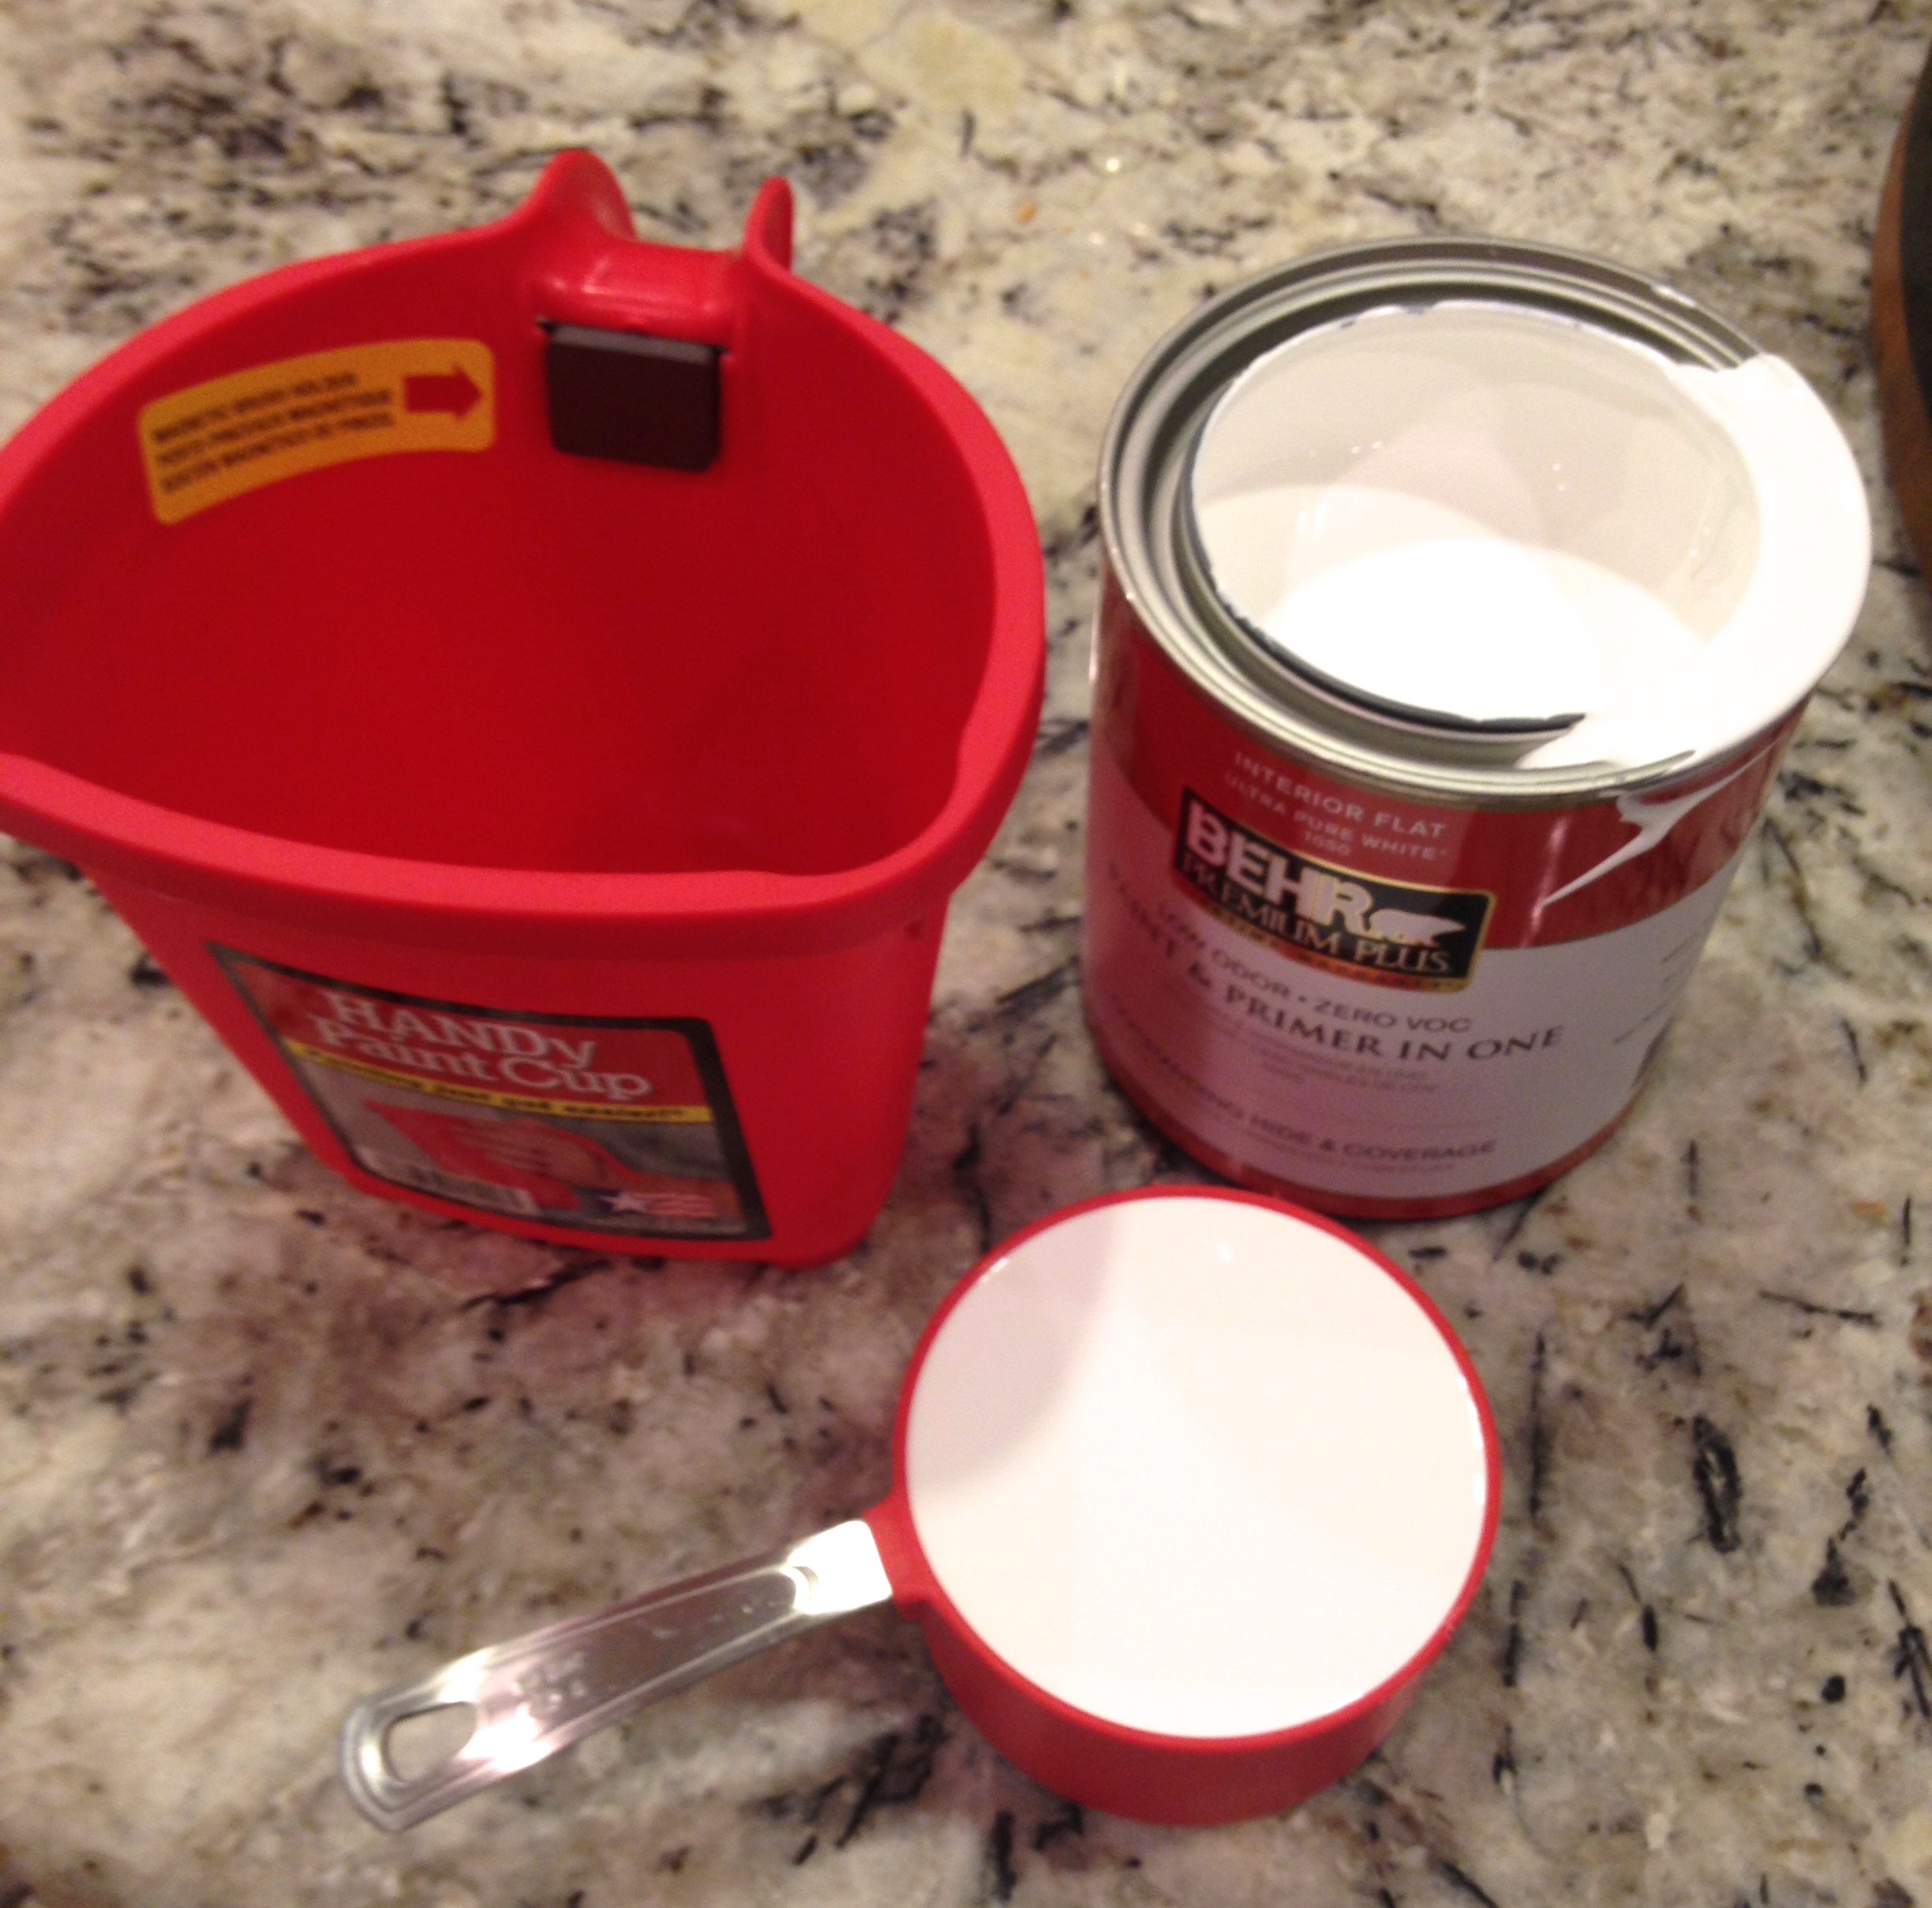
The Necessary Supplies:
- Pint of White Paint
- Cheap paint brush
- Rags (ones you don’t mind throwing away after)
- Bucket
- Water
- Kraft Paper (or plastic drape)
- 3M Edge Lock Painter’s Tape
- Black spray paint (optional)
Step 1:
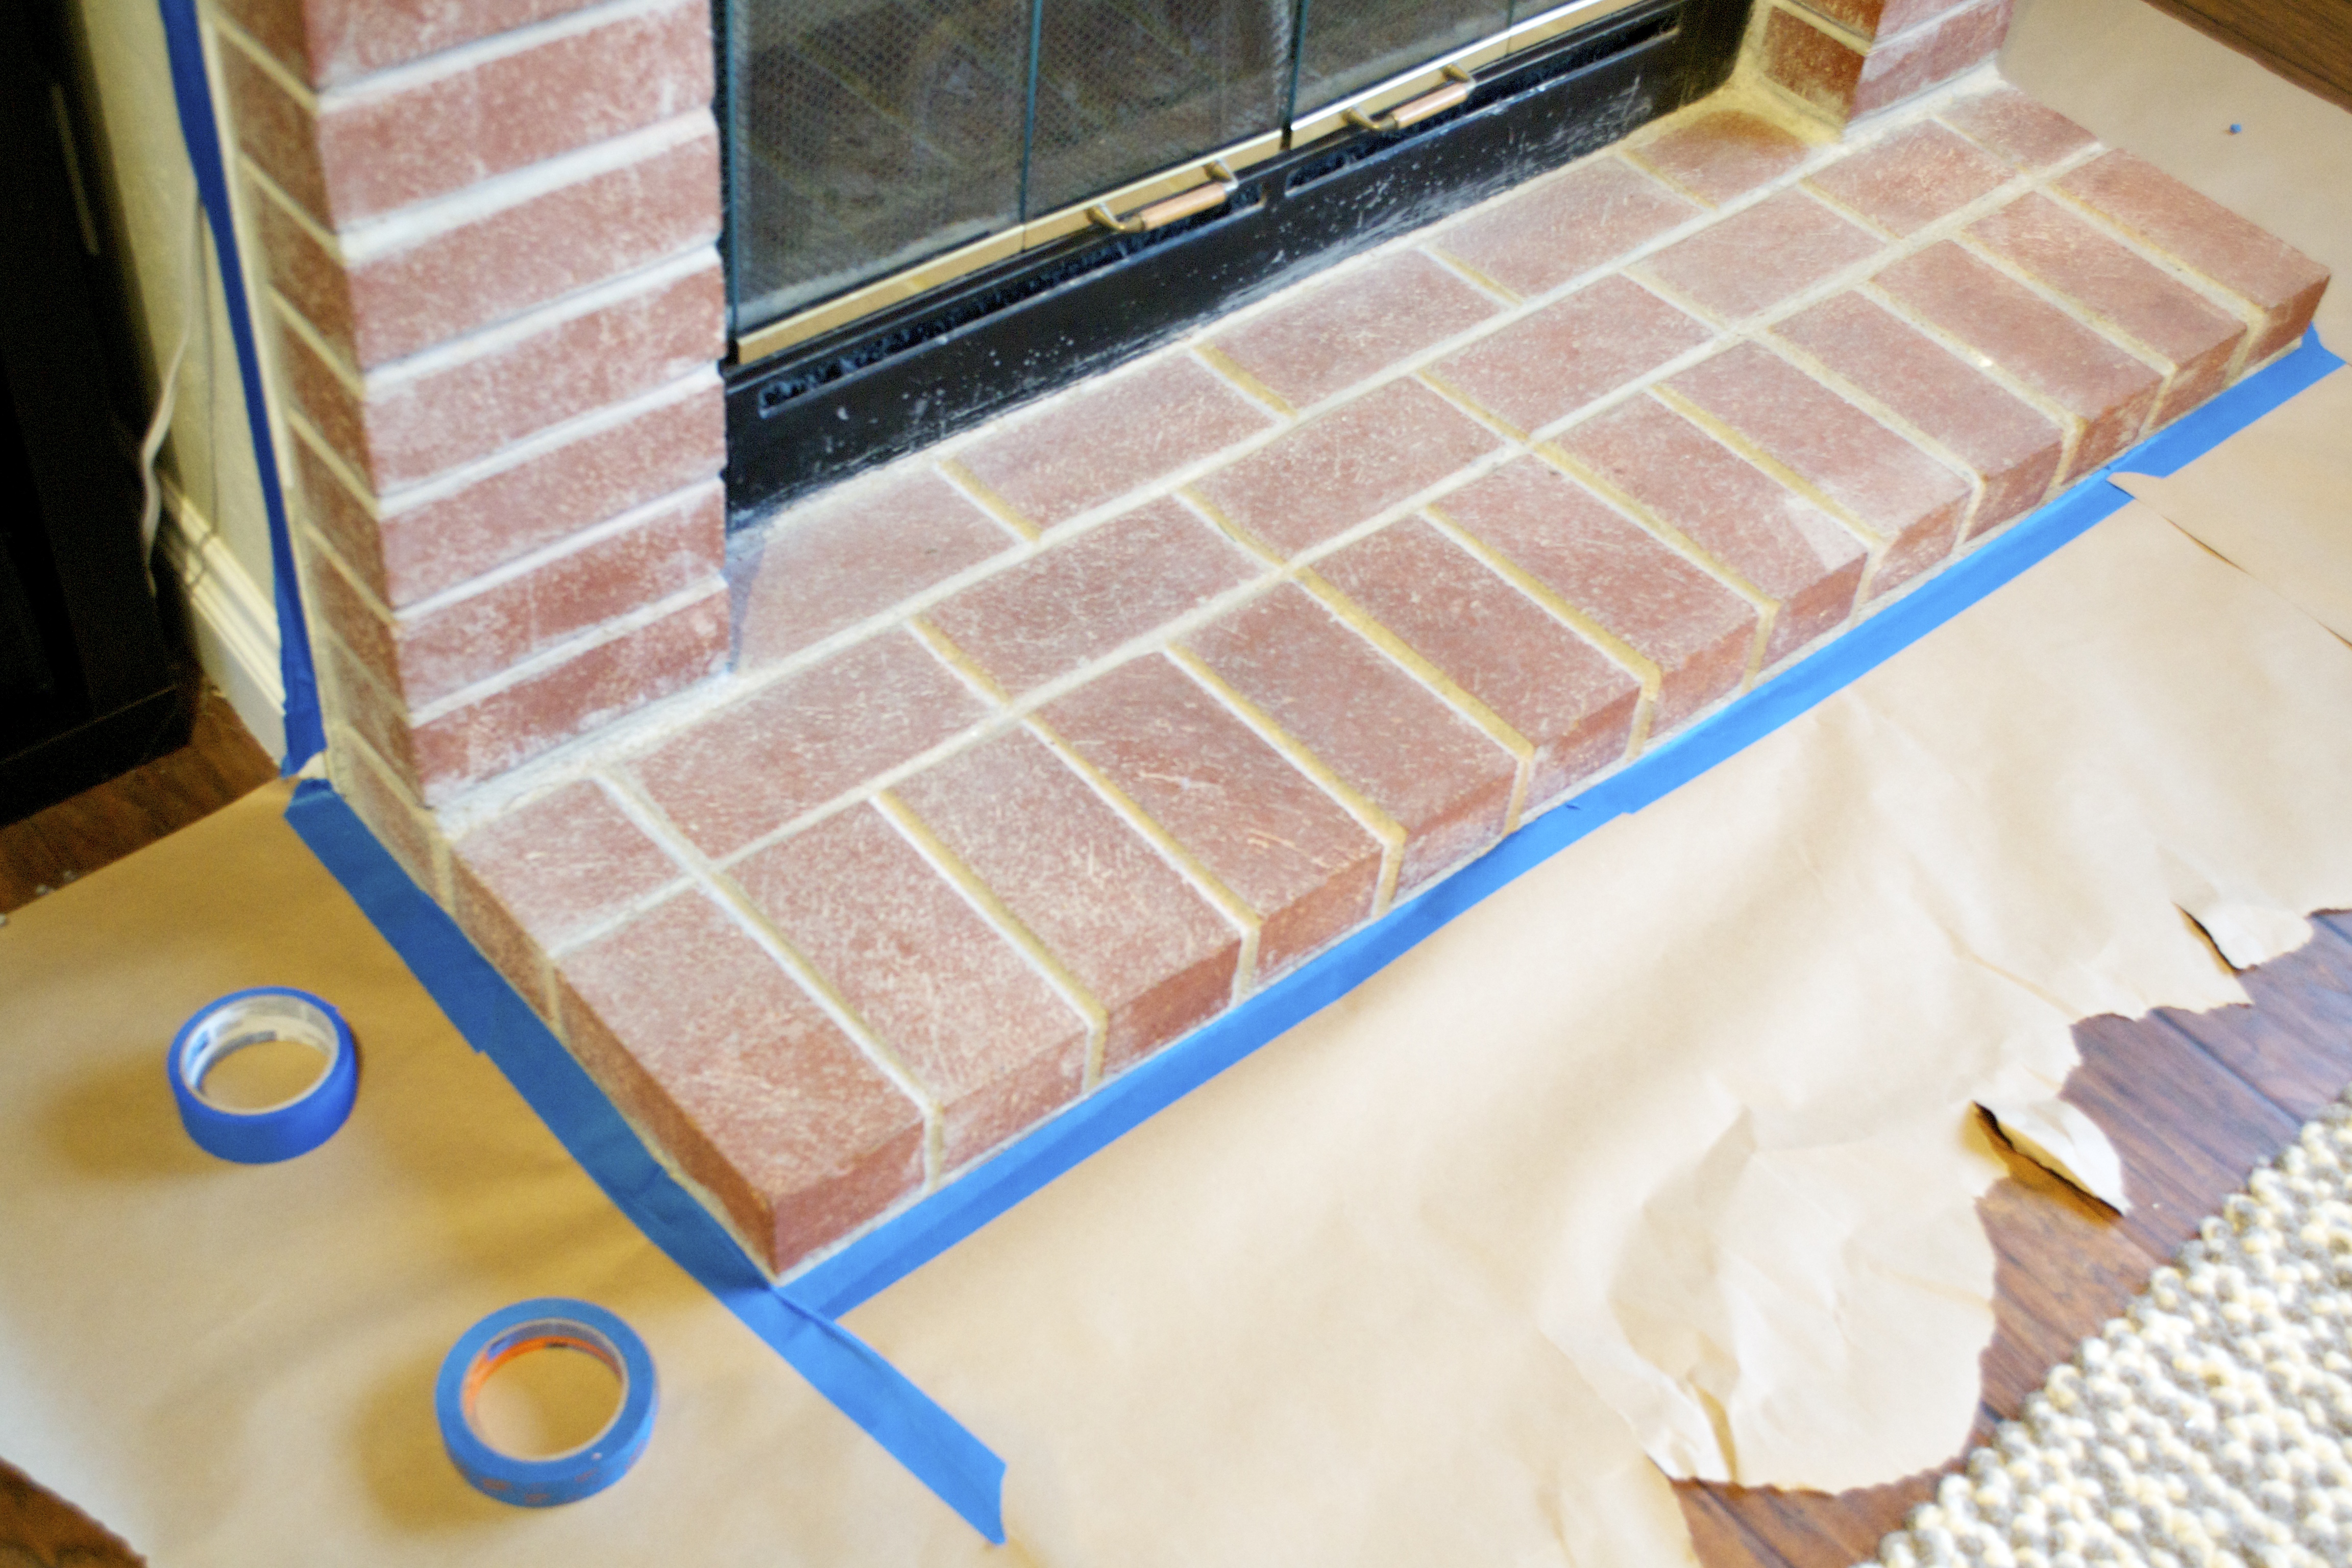
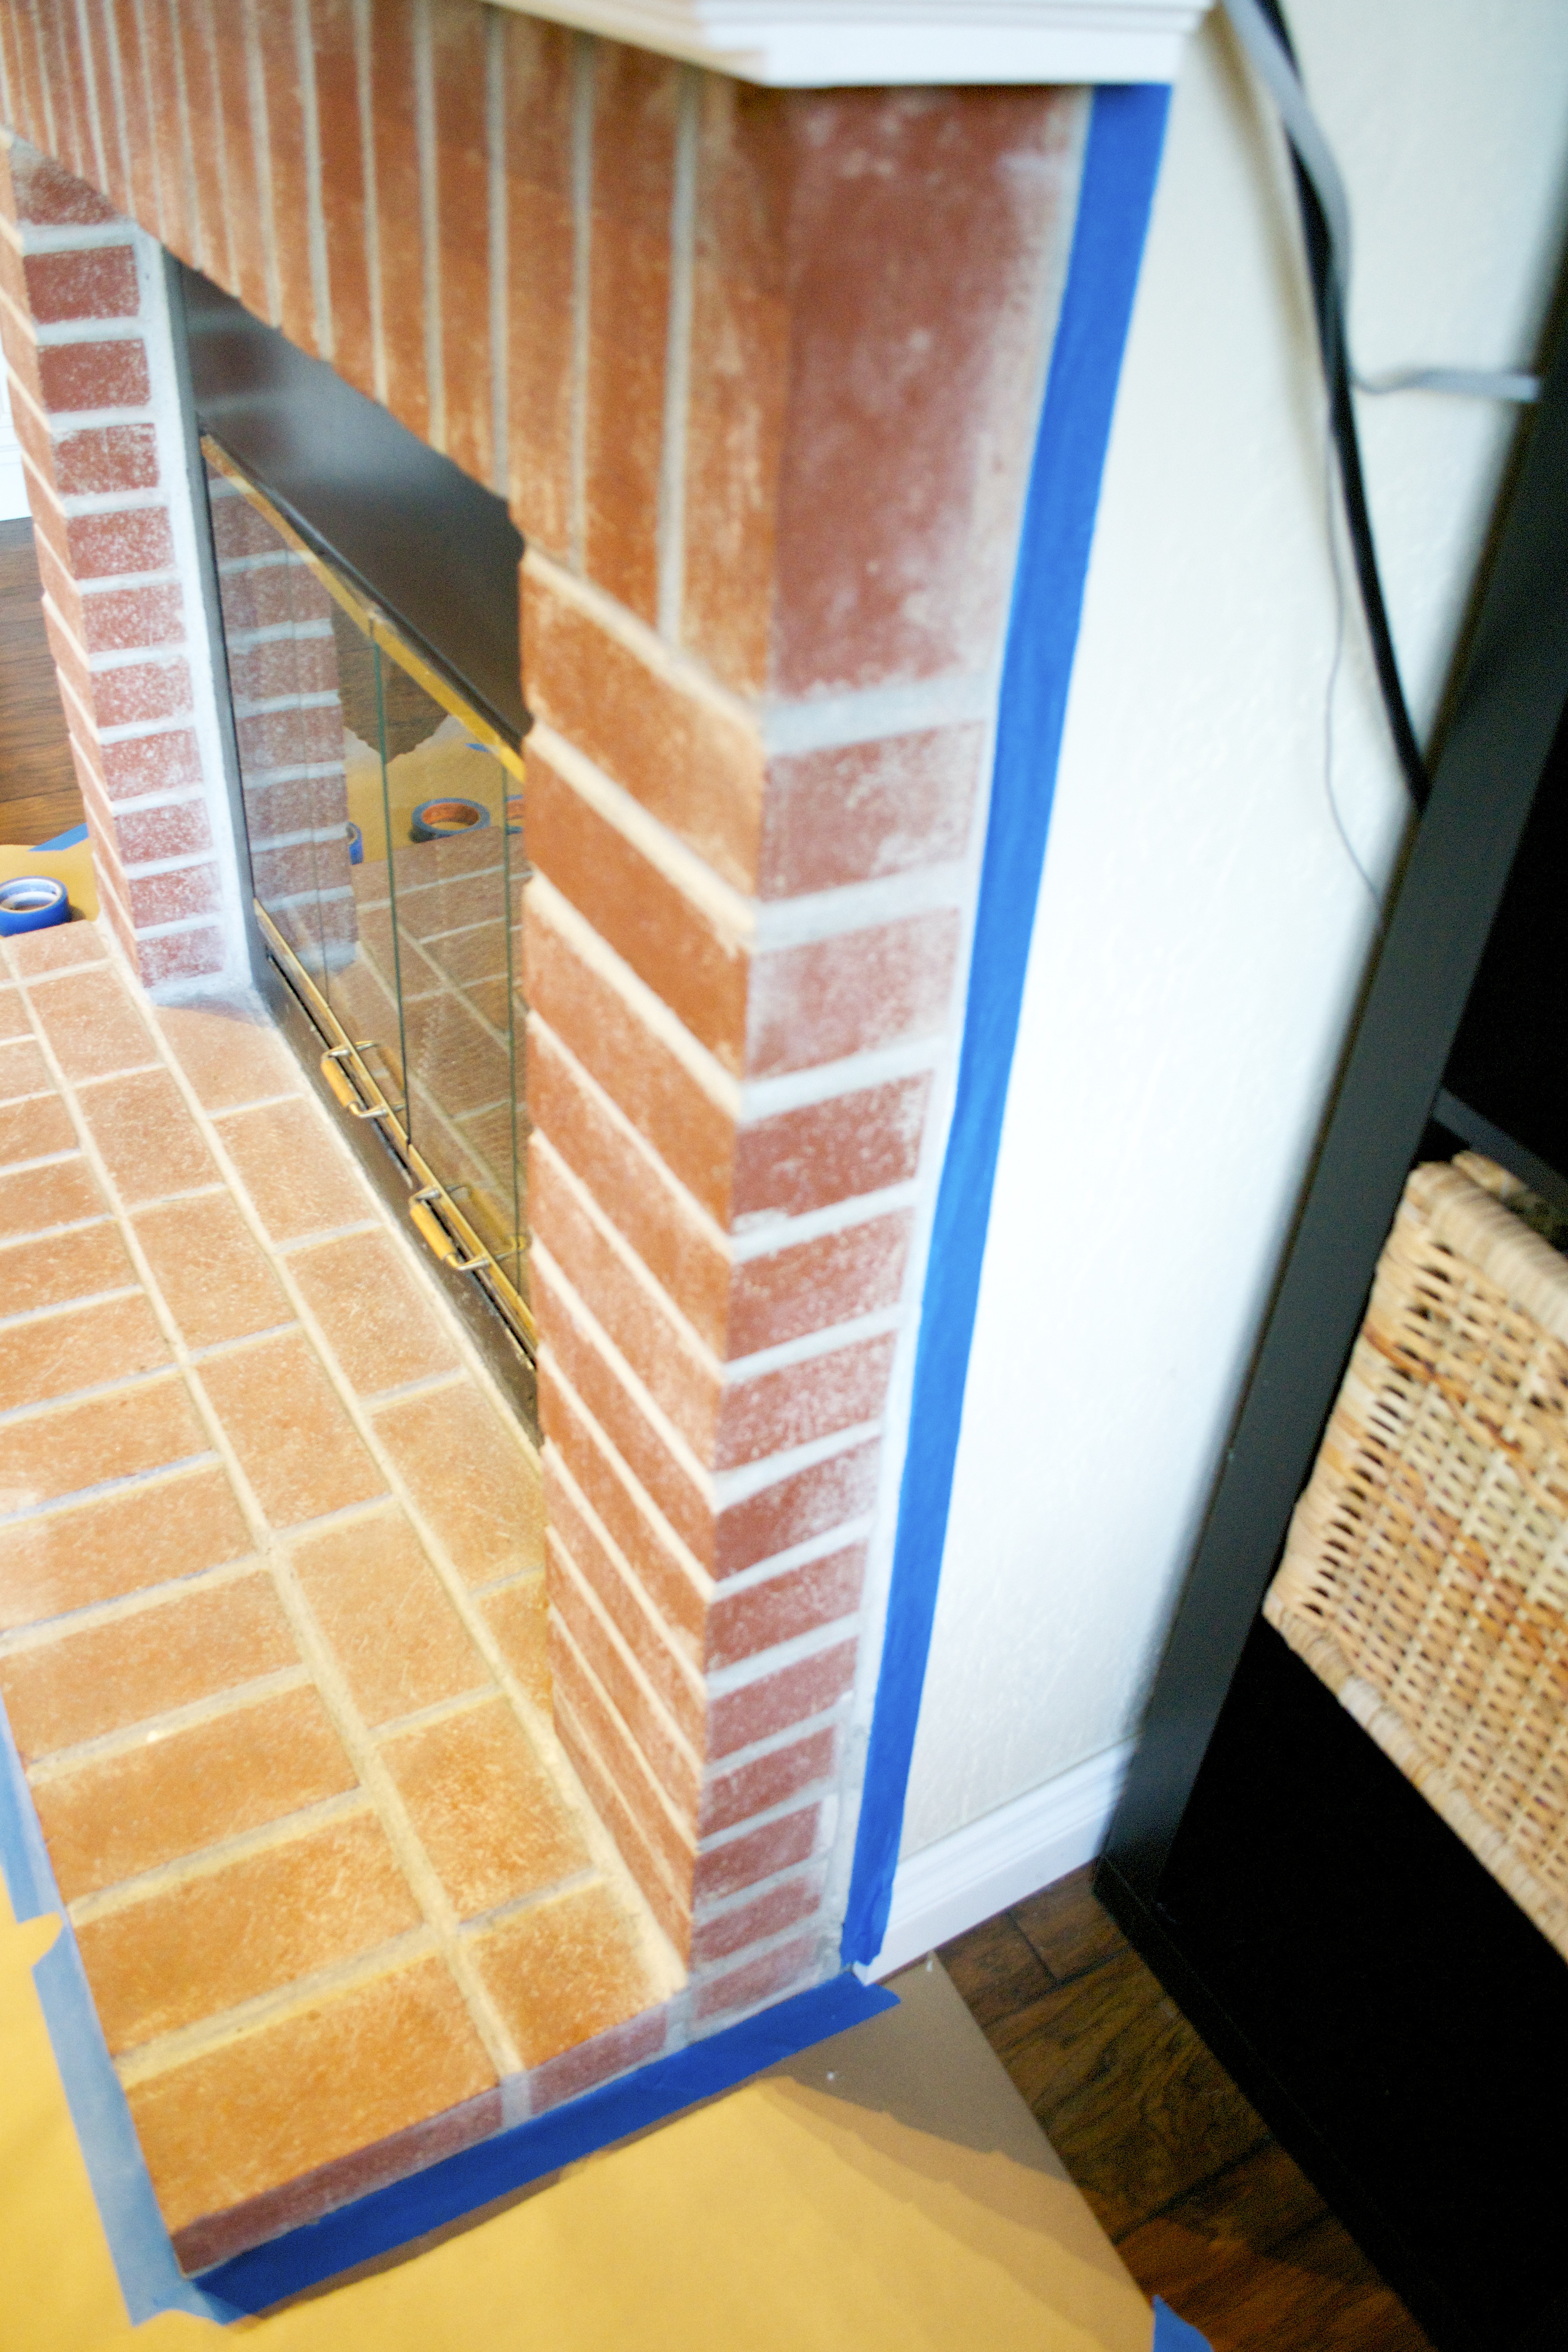
- Use your kraft paper or plastic drape and put it on the areas around the fireplace you want to protect from potential paint spills. Secure it in place with your painter’s tape.
Step 2:
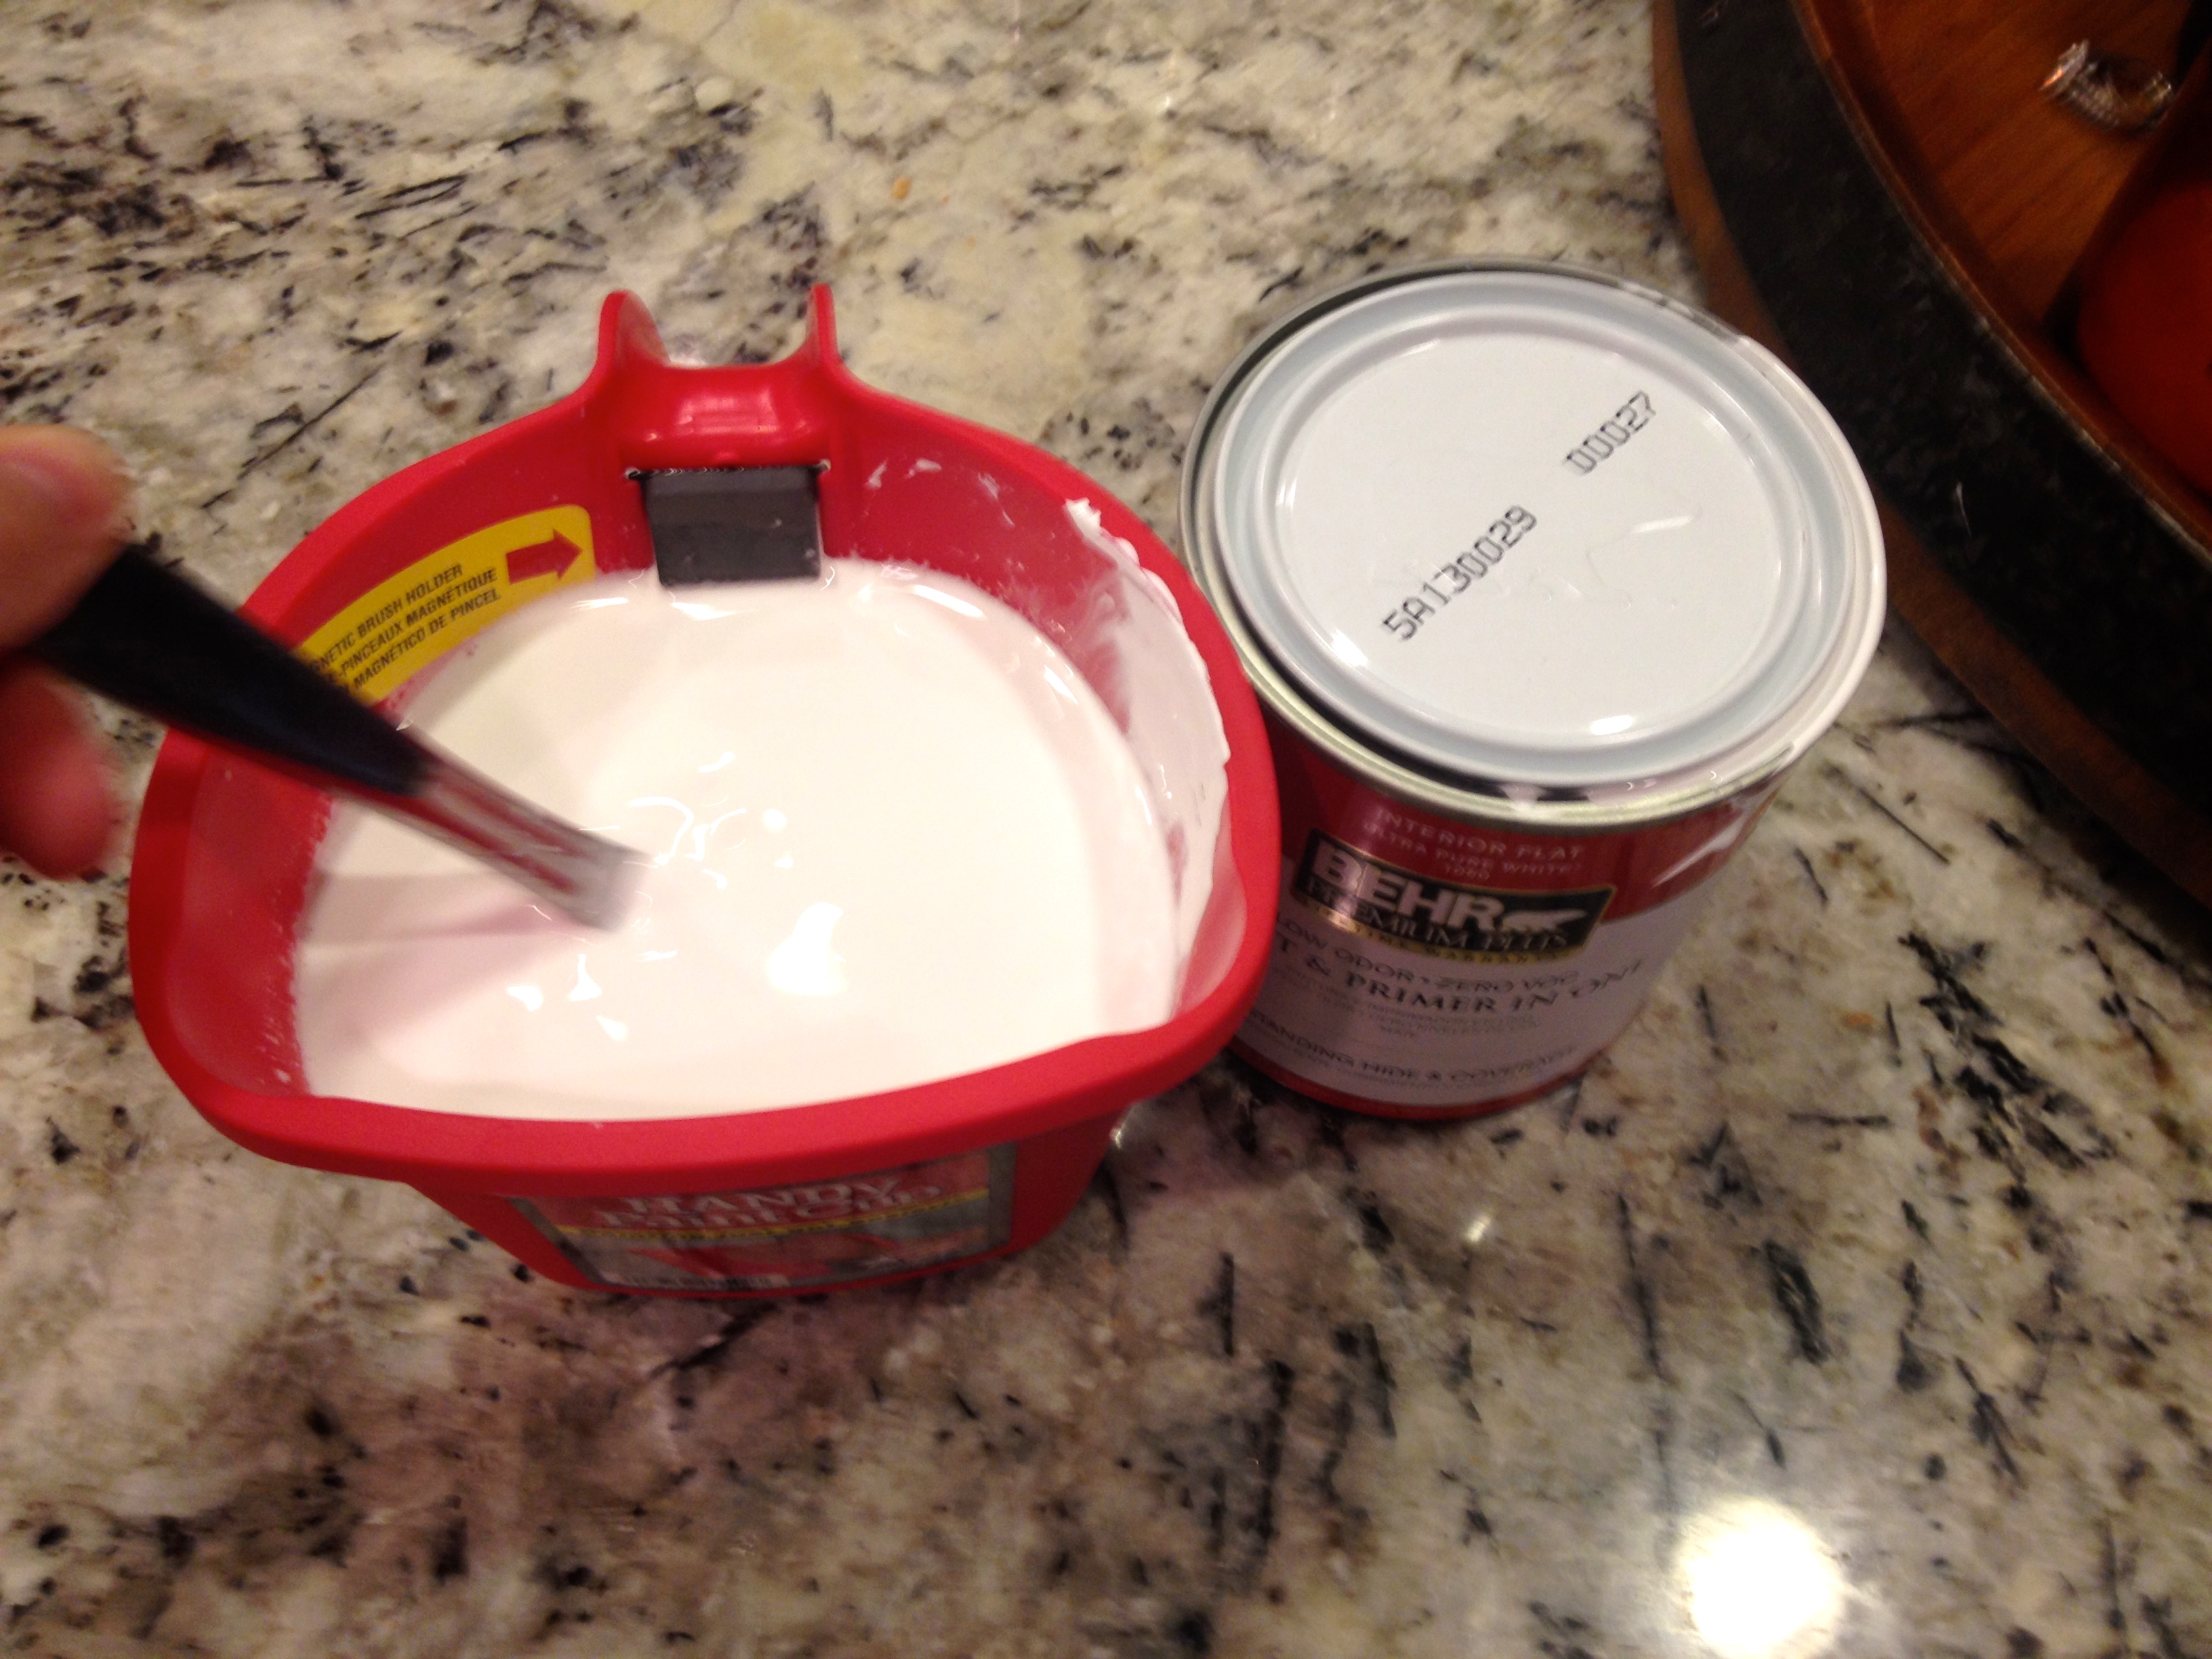
- Take your paint and mix it in your bucket with water.
- I used ⅓ paint to ⅔ water in my mixture, and I only used a cup of paint in total.
- Feel free to make your mixture with more paint if you want your fireplace whiter than mine, or with less paint if you want it less white.
- Recommended tip: Keep the ratio the same, and go over your brick multiple times if you want your brick whiter than it originally appears.
- Mix it well
Step 3:
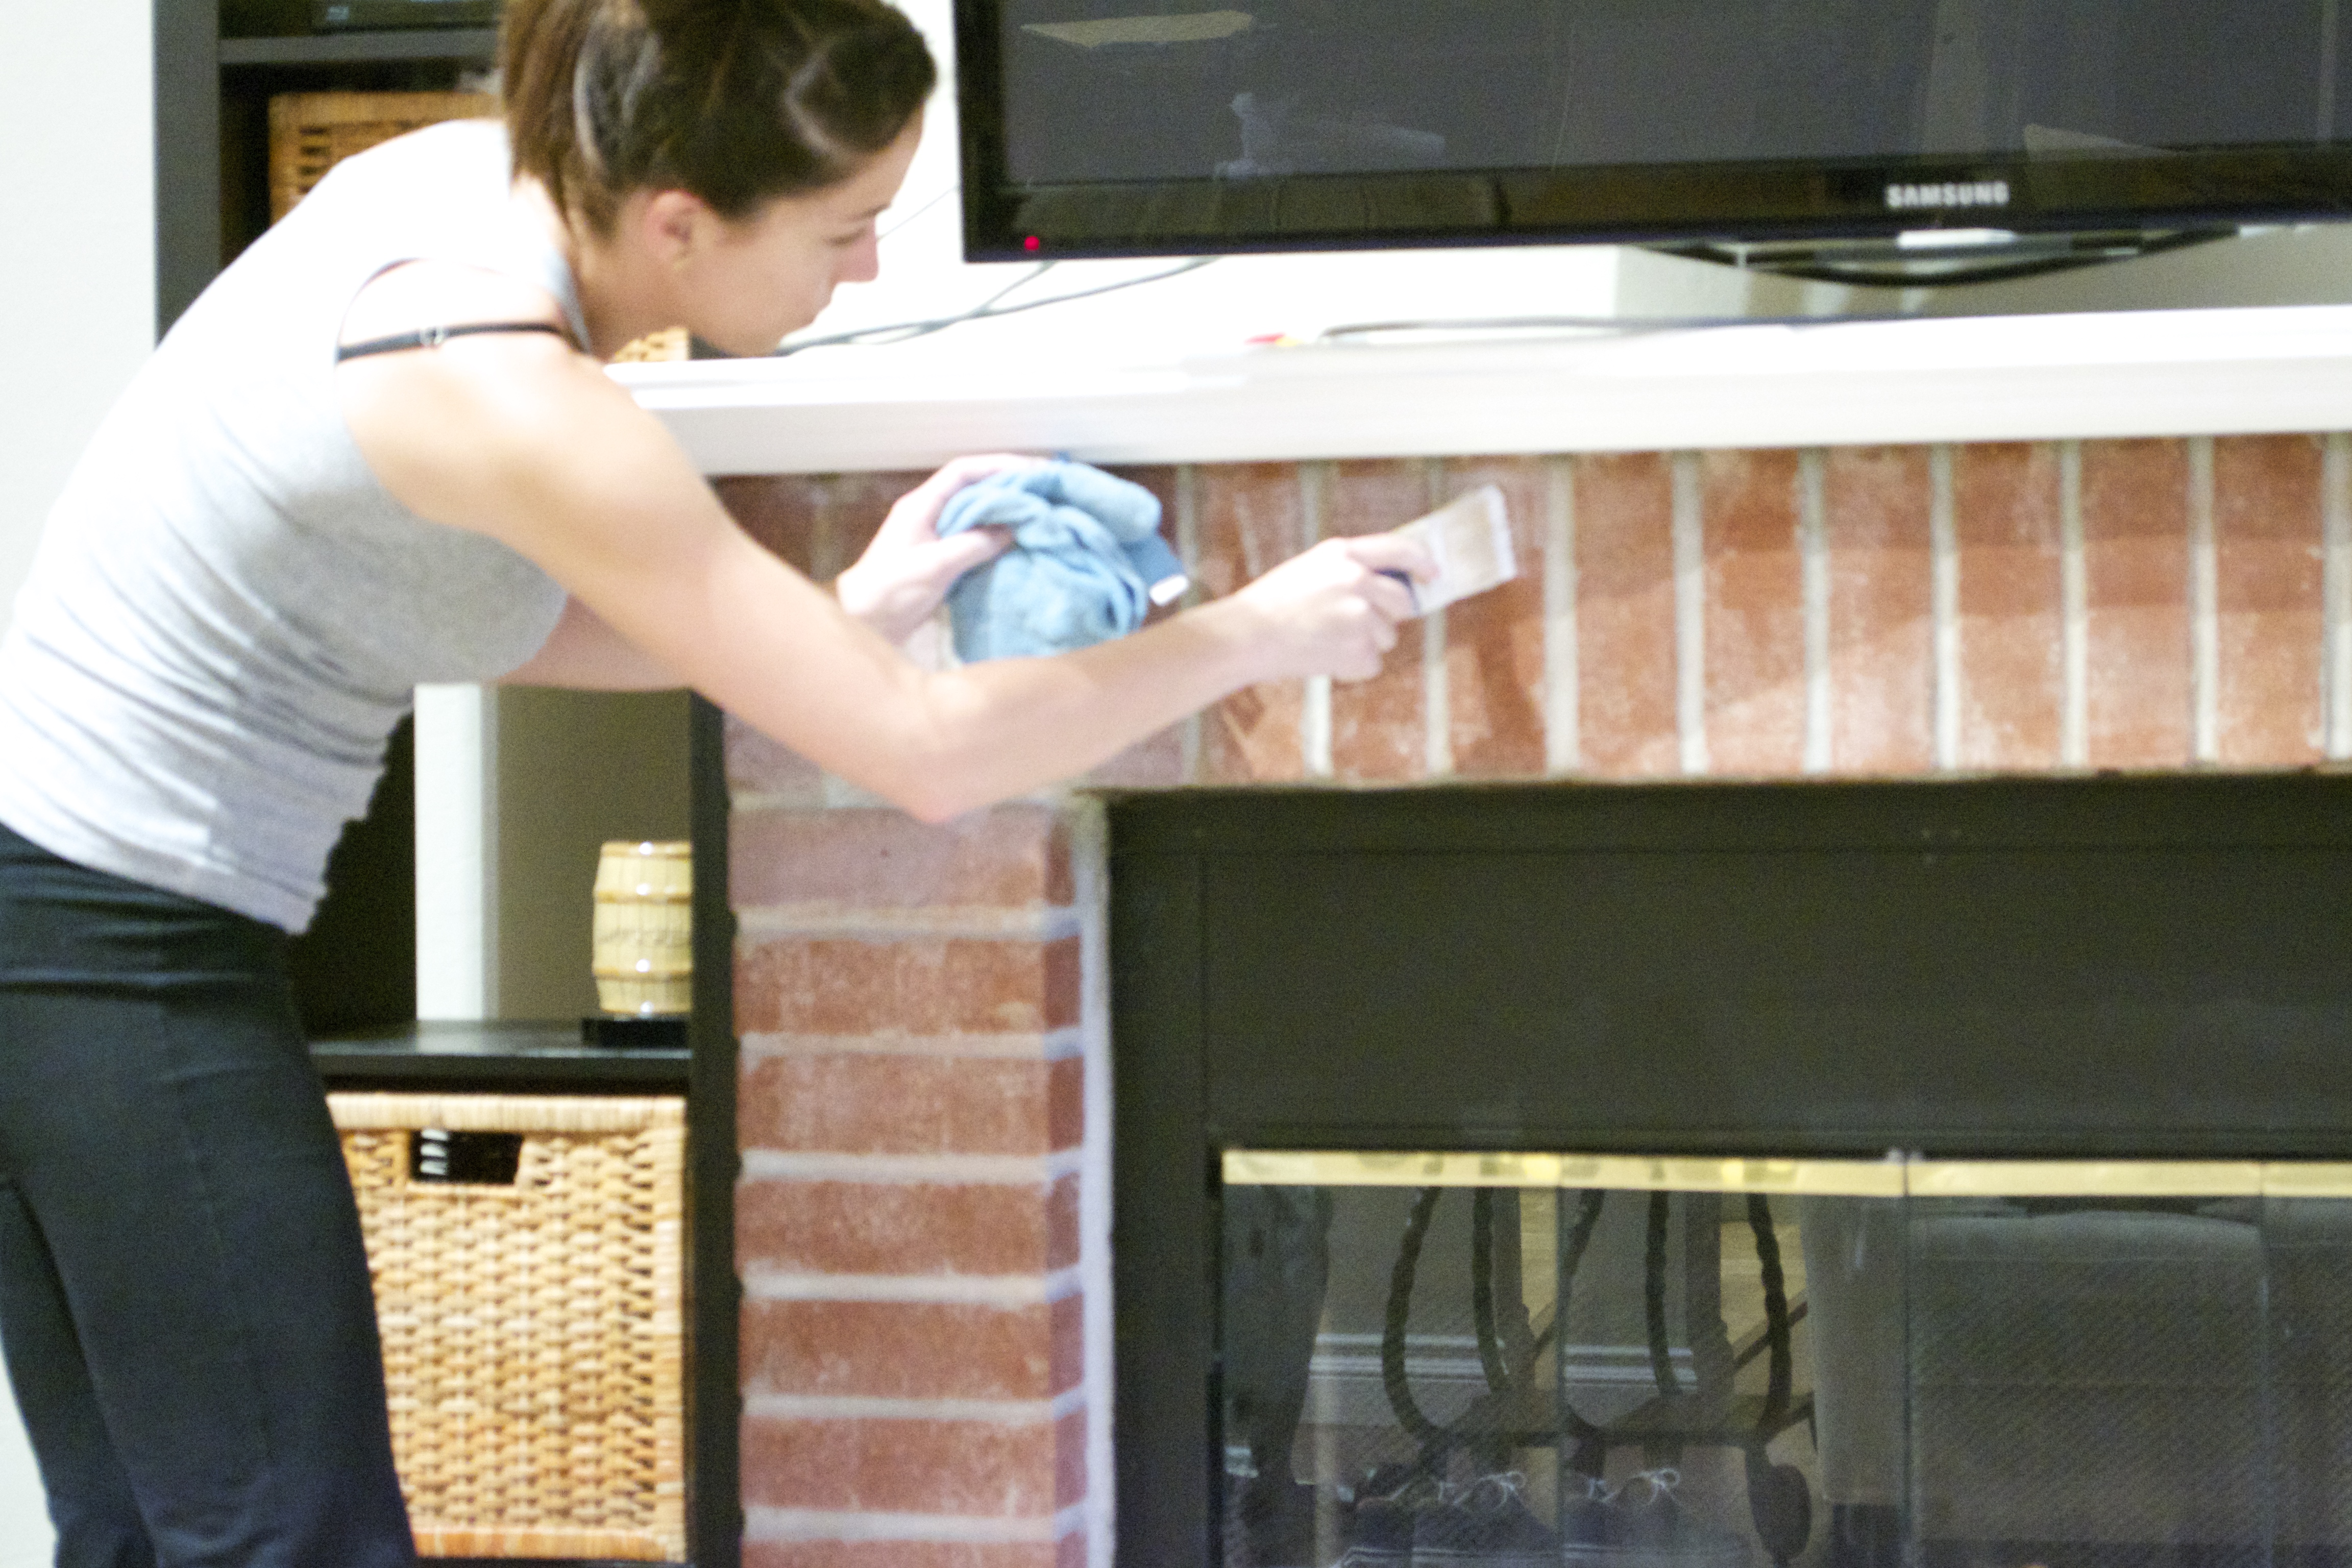
- Take your paint brush and paint your mixture onto your brick, one brick at a time.
- Follow your paint stroke with your rag and wipe as you go. The mixture is runny, and will drip all over and be blotchy if you don’t follow your paint stroke with your rag.
Step 4:
- Cover your entire fireplace brick with the wash, once over. Take a look at it. If you want it a more vibrant white, go over the brick once again, with the same technique.
- Once dry, remove the paper and tape.
Step 6 (Optional):


- The grate on my fireplace was worn and discolored. I decided to then cover my newly painted brick with kraft paper and tape, and spray paint the entire grate black (to get rid of the dated gold color and years of rust).
- Once dry, I then removed the paper and tape.
Ta da! You now have a totally redone fireplace. This simple whitewash technique gives your brick a whole new look, without having to use the crazy contractors techniques you see on TV. Now, it’s time to install your floating shelves….
Installing Your Floating Shelves
The Necessary Supplies:
- Ikea Lack Floating Shelves (43” wide) in White
- Similar available online here.
- Stud Finder
- Drill (You can use a screwdriver but you’ll want to die after – I do NOT recommend)
- Wood Screws
- Marker
Step 1:
- MEASURE! I knew my cabinets I was putting below my shelves were 36.25” high, and I wanted my first shelf to start 20” above the top of my cabinets. So I measured 56.25” from the floorboards, and put a mark.
- Then, measure 13” above that mark (or more if you want your shelves further apart), and make another park.
- Again, measure 13” (or more) above that mark, to make one last mark
- In the end, you should have 3 marks for your 3 shelves. For short women like me, you’ll need a step stool or ladder for this).
Step 2:
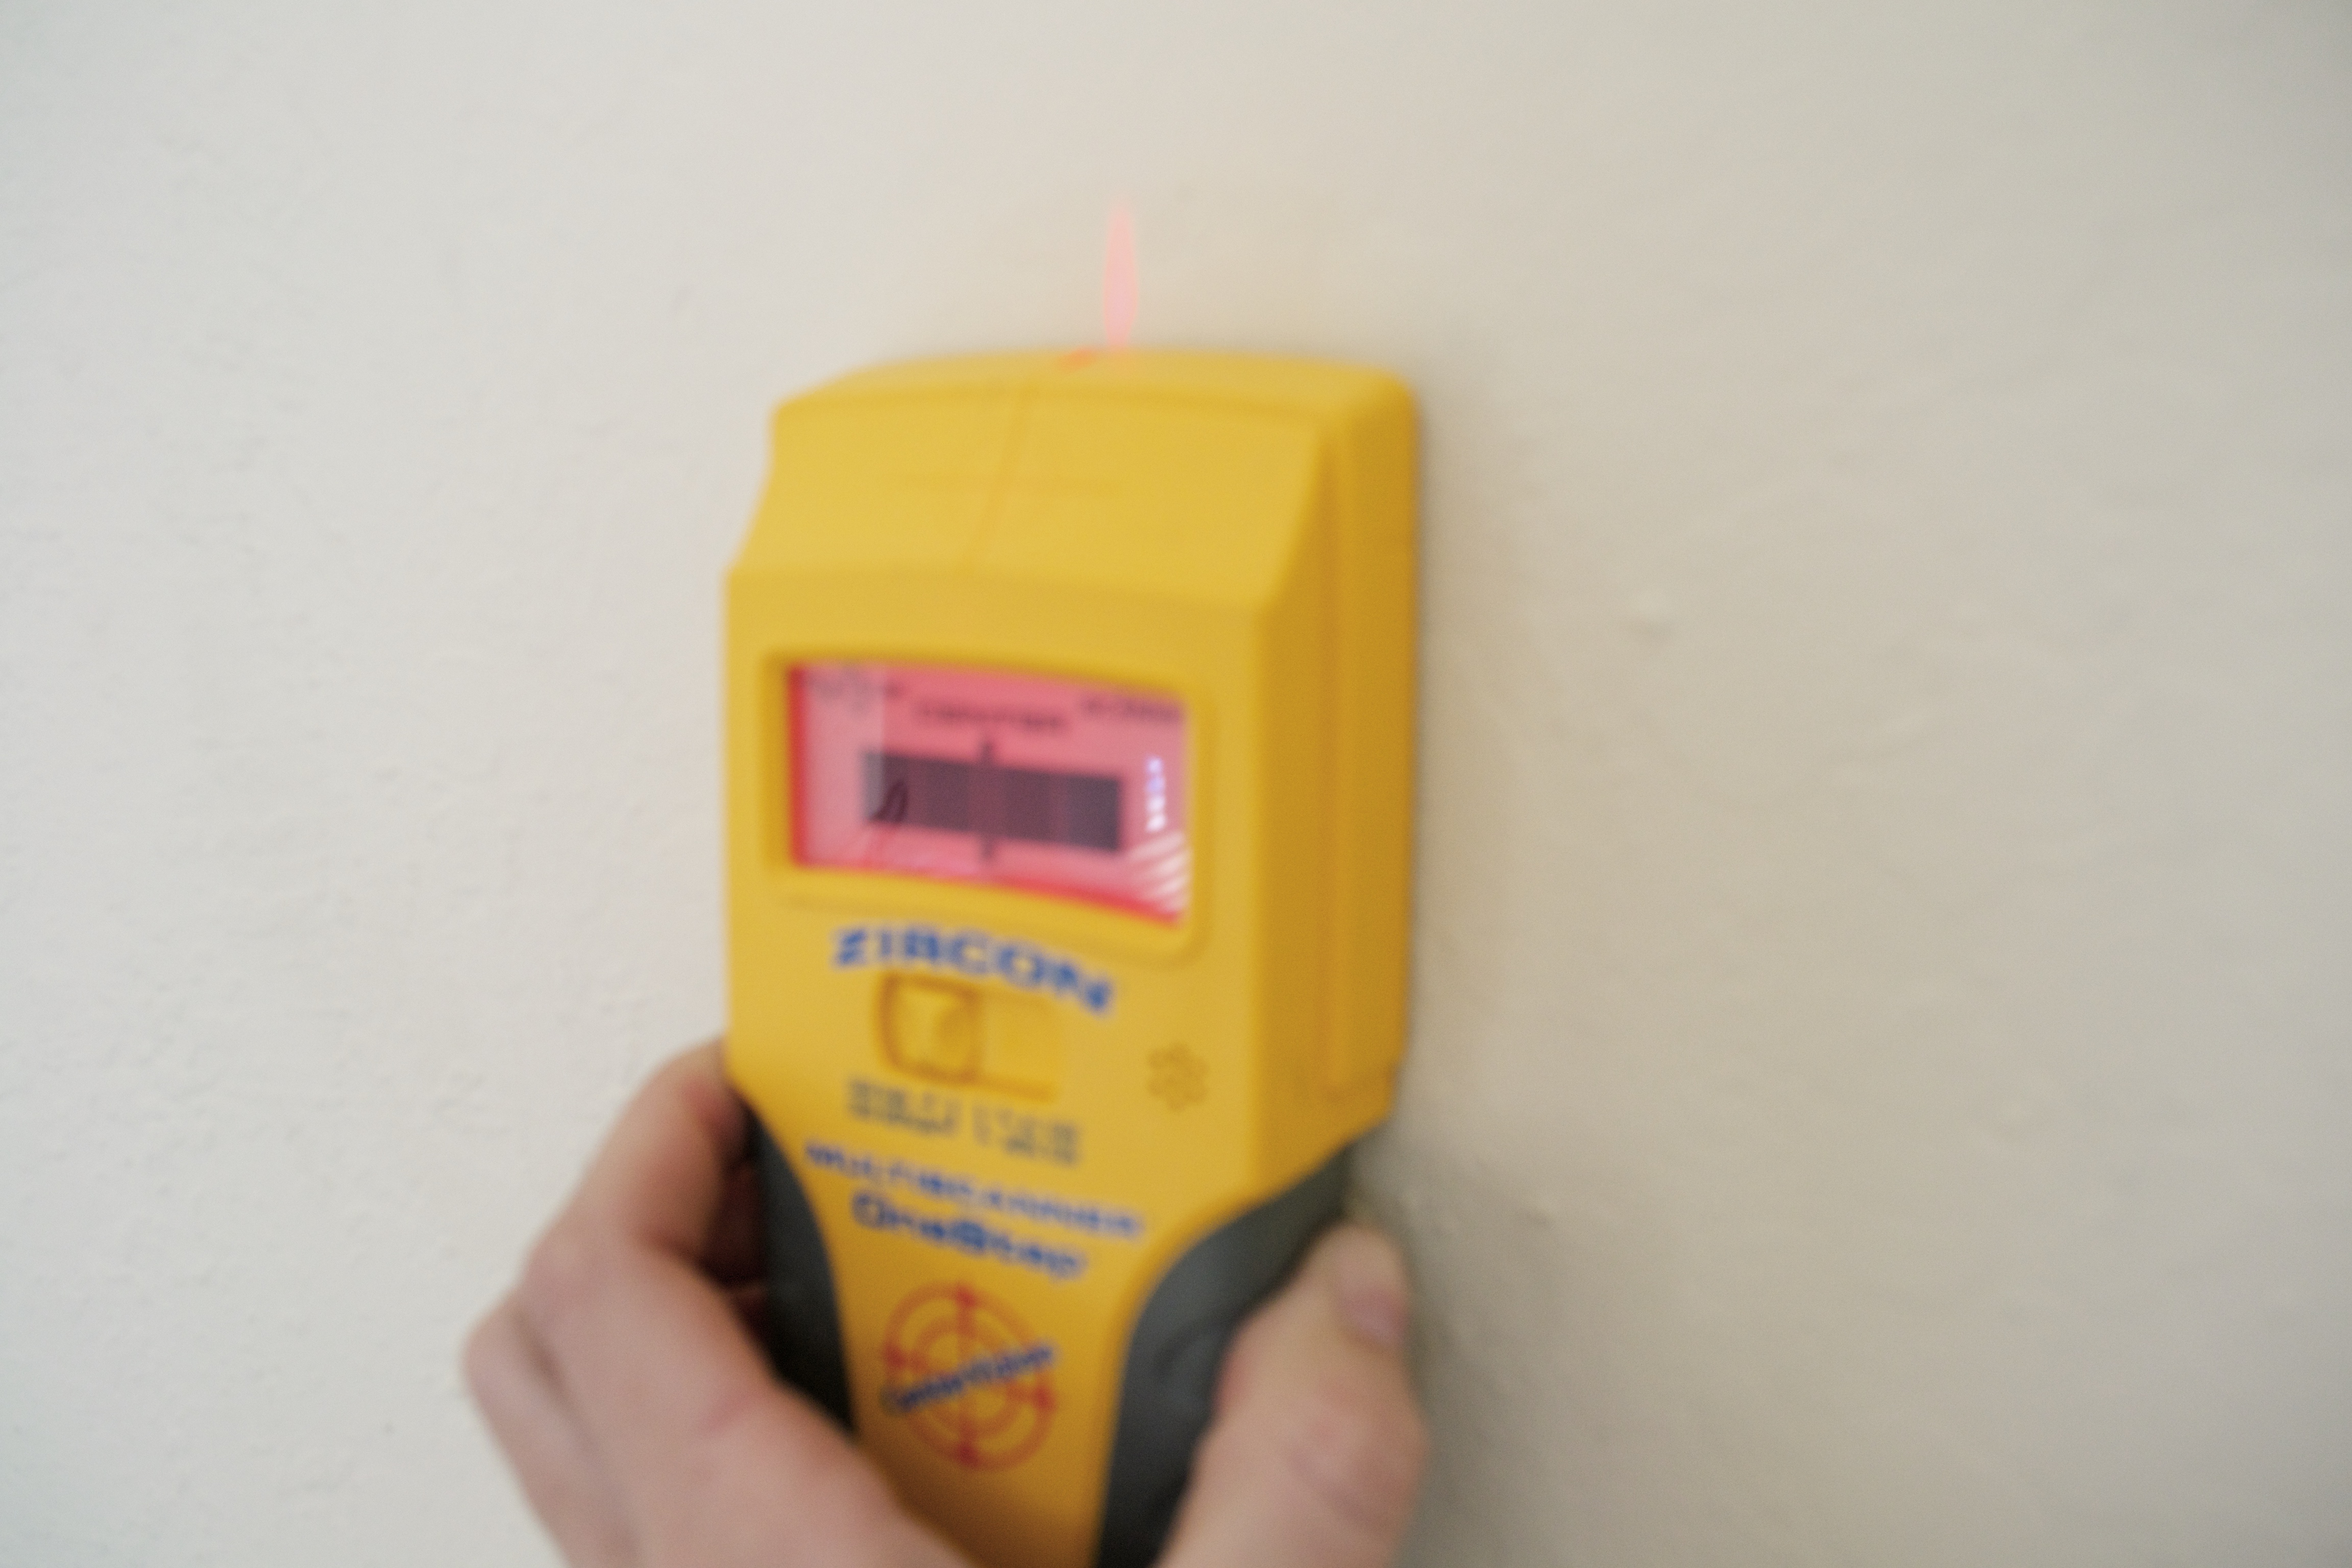
- Use your stud finder to find the studs along your marks. Place marks horizontally along the lines where your shelves will go, to mark where the studs are.
Step 3:
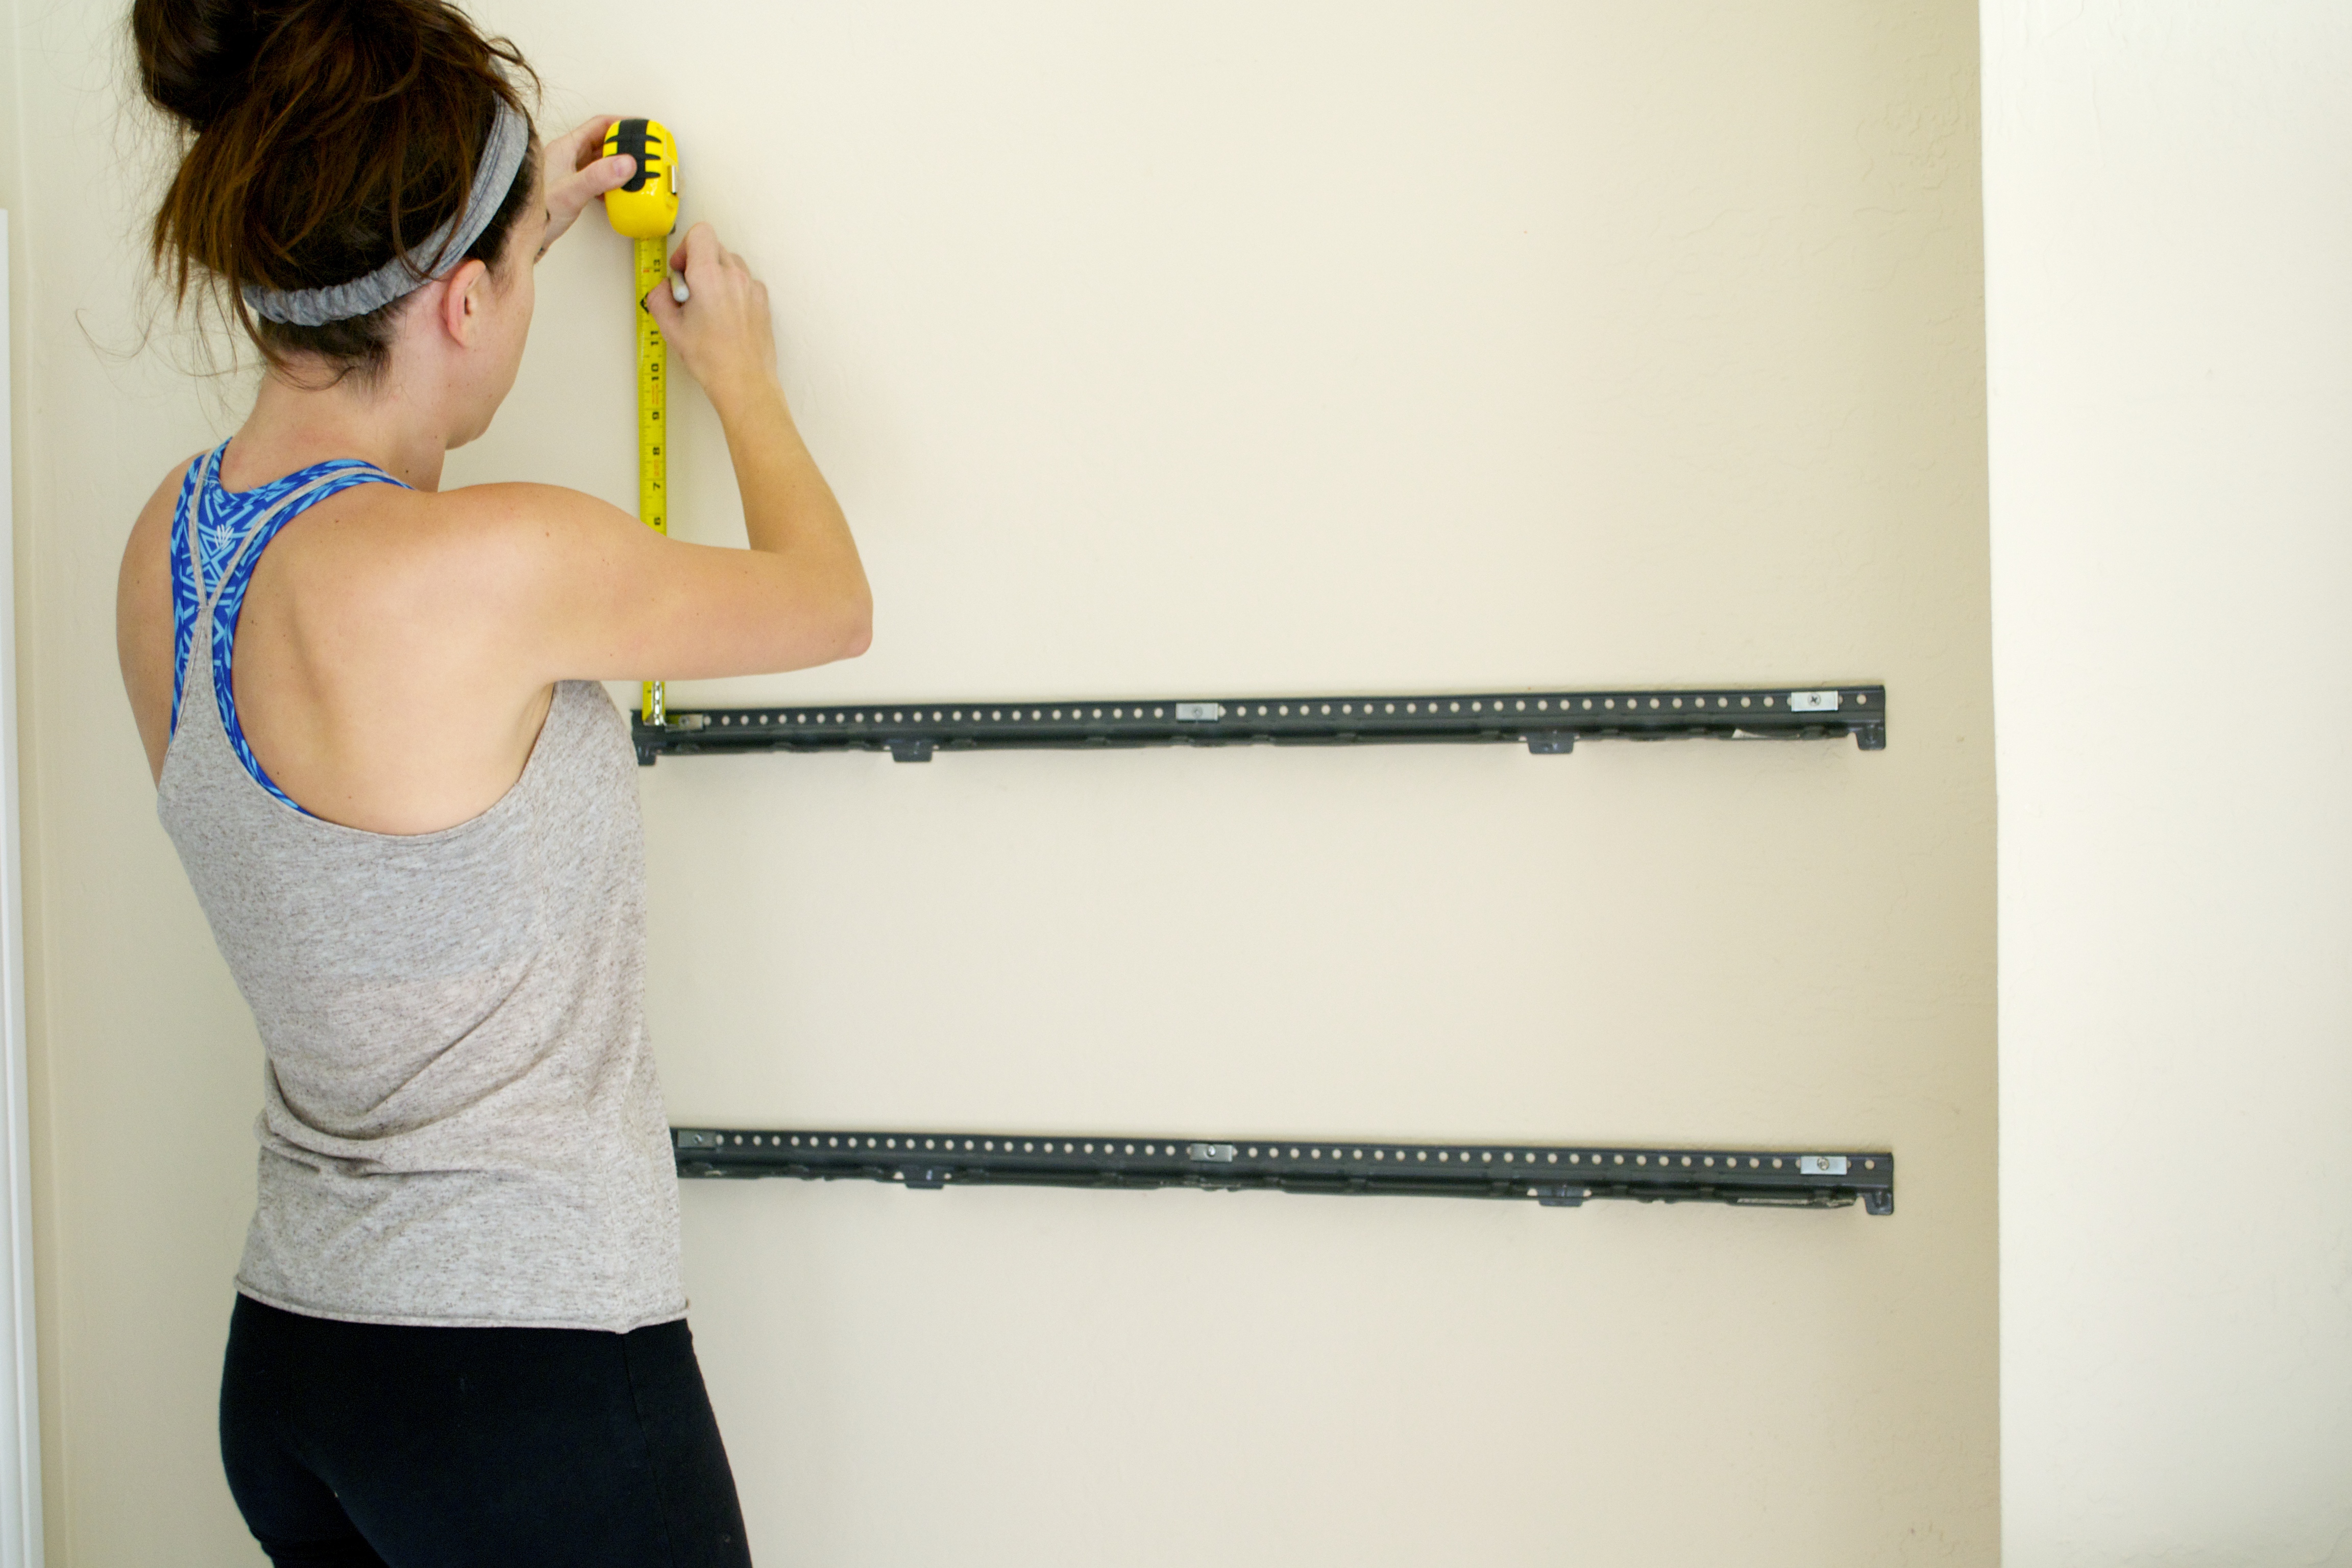
- Take the mounting hardware from your shelves and line it up with your marks for the first shelf.
- Drill your wood screws through the mounting hardware and into the wall studs.
- Repeat 2 more times for the next 2 shelves.
Step 4:
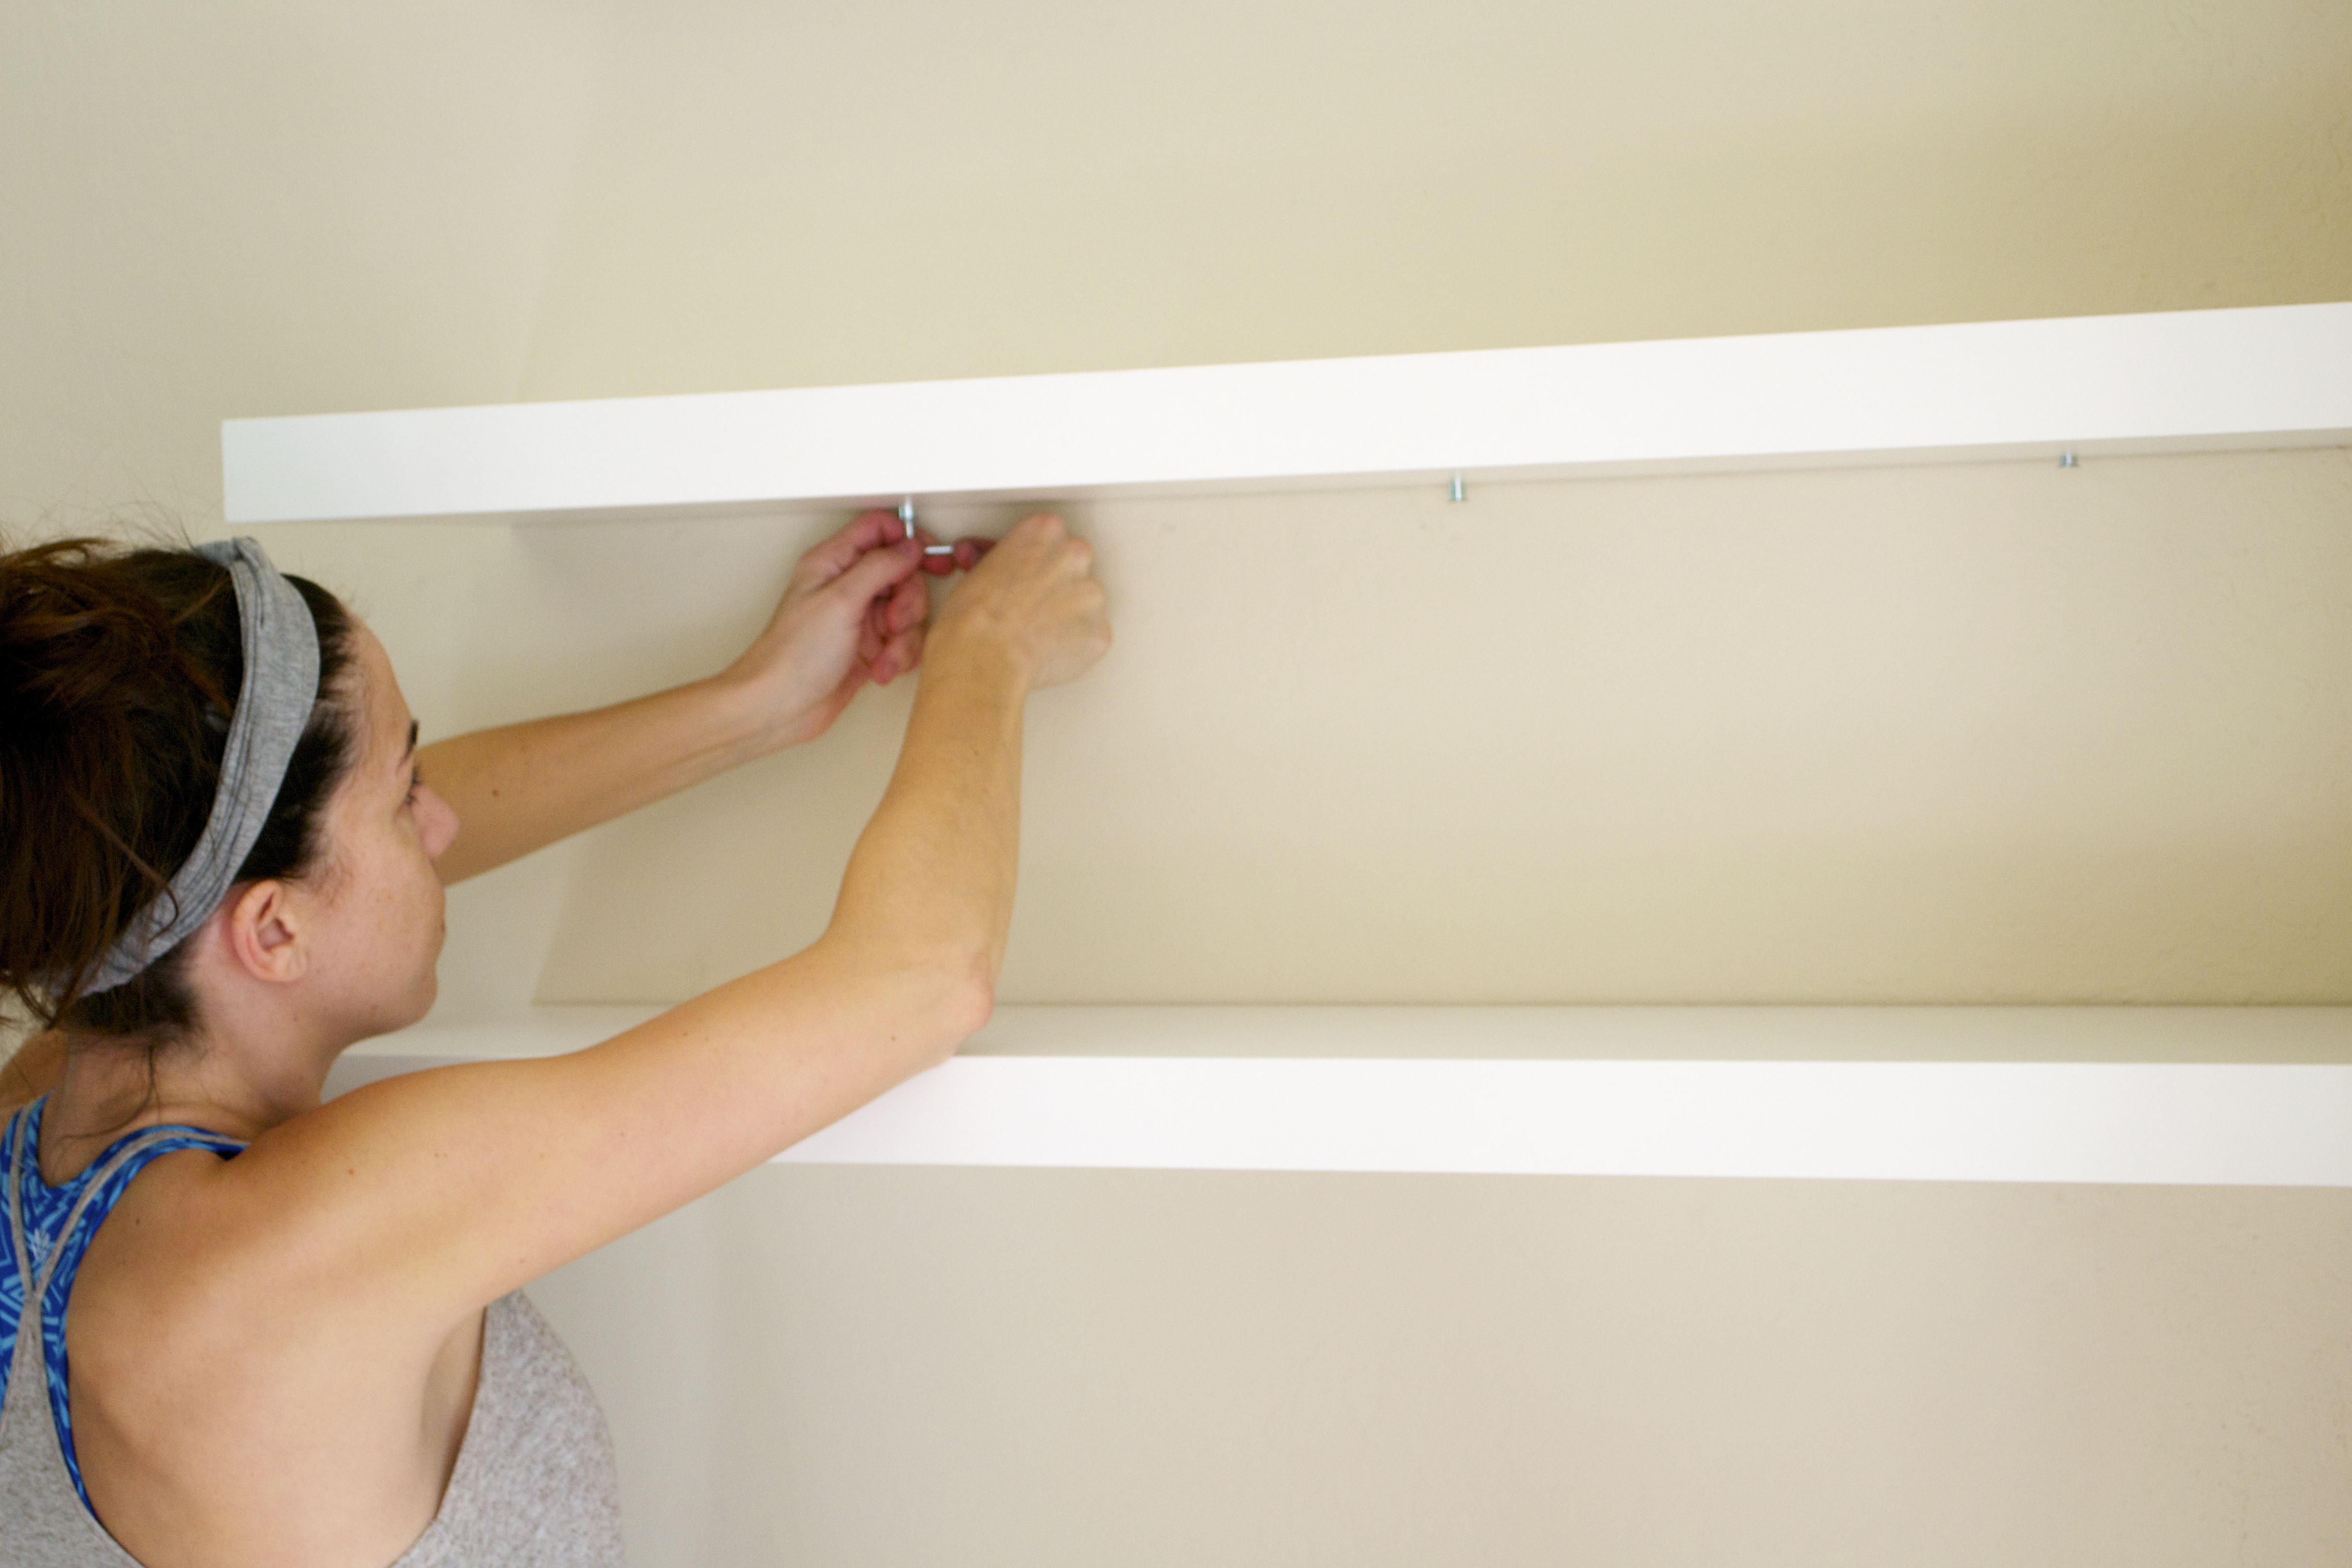
- Once all the mounting hardware is up, place your shelves on the mounting hardware and attach as instructed.
- I suggest starting with the top shelf and working your way down because it’s easier to screw them in place.
Step 5:
- Repeat Steps 1-4 on the other side of your fireplace for the remaining 3 shelves.
Ta da! New “built-in” shelves! This process is WAYYY easier than it seems. I did this entire process in a couple hours one afternoon. Easy peasy. Now, to put your cabinets in for the finishing touch…
Putting Your Cabinets in Place
The Necessary Supplies:
- South Shore Morgan Storage Console – White
- Drill (even though it says not to use one, it will save you SO much time and headache).
Quick Note: The reason I chose these cabinets are because they were the tallest, and widest white cabinets I could find for under $200 each. You’ll want your cabinets taller than 30”, and as close to 43” wide as possible (the width of the shelves is 43” and you want them to match up). These are the best value with the best dimensions. You can look yourself, but I did HOURS of research until I found these. They match up PERFECTLY with the Ikea Lack shelves.
Step 1:
- Easy- assemble your cabinet as the instructions tell you. Each cabinet should take about 2-3 hours to assemble (if using a drill).
Step 2:
- Place your cabinets on each side of your newly whitewashed fireplace, under your newly installed shelves.
- I did NOT use any mounting hardware or do anything special to attach the cabinets to the walls. This way, I could adjust them as I pleased. It also made it MUCH easier for me to hide cords behind and beside them.
Easy enough! Once your cabinets are in place, you’re done with your fireplace makeover and have a brand new living room with DIY “built-ins”!
All in, this project cost me about $500. $500 instead of $5000 – I’d say that’s a steal! And, I’m no longer daydreaming about built-ins when I’m trying to relax and watch TV. Ahh, peace of mind is priceless…
Lastly, if you’re renting your space, ask your landlord before you whitewash the fireplace. If they say no, just show them the before and after pictures I have on here. Maybe they’ll change their mind. If they still say no, the “built-ins” around the fireplace will still add the touch of sophistication you’re looking for, without doing anything permanent to the house. You can’t go wrong!
And to wrap up, here’s a quick overview of everything you’ll need to get the fireplace makeover pictured above, yourself:
Whitewash for Fireplace:
- Pint of White Paint
- Cheap paint brush
- Rags (ones you don’t mind throwing away after)
- Bucket
- Water
- Kraft Paper (or plastic drape)
- 3M Edge Lock Painter’s Tape
- Black Spray Paint (optional)
Floating Shelves:
- Ikea Lack Floating Shelves (43” wide) in White
- Similar available online here.
- Stud Finder
- Drill (You can use a screwdriver but you’ll want to die after – I do NOT recommend)
- Wood Screws
- Marker
Leave a Reply