
Wrapping paper, I have no idea why it’s such a big business. I mean, it’s sole purpose is to cover a gift so the recipient can’t see what’s inside. It’s meant to be ripped, torn, and then tossed aside as you get to the real prize – what’s INSIDE!
However, we seem to have this fascination with wrapping paper. In particularly, unique gift wrapping ideas. In this day and age, what a present looks like on the outside has almost become as important as what is actually on the inside! Maybe it’s because the wrap job is a reflection of the gift-giver? Or maybe it’s because we want our presents to look enticing even before opening?
Whatever the reason, I’ve completely fallen guilty to this desire to wrap perfect gifts. Yet, my reason for doing so is a lot more lackluster than you might imagine.
I have always been a stickler for perfect wrapping. Tucking edges in so every edge is a folded edge (no raw edges on MY presents) and tying perfect bows so they are certain never to fall crooked. But I began to come up with DIY gift wrapping ideas when I decided to buy kraft butcher paper on a whim.
I needed brown paper to wrap some packages to ship in the mail, so I bought what I thought was a large roll of it on Amazon. Thinking it would be just like a bulky wrapping paper roll, I added it to my cart and checked out. Never did I think twice until it arrived at my doorstep.
IT.WAS.GINORMOUS! HUGE! I mean, I was going to have kraft butcher paper for YEARS, or so I thought. Yea, now I could send my packages off, but what was I going to do with the rest of this gigantic roll? I guess I had to use it for other wrapping purposes – and this is when I started getting creative.
I used that plain brown paper for EVERYTHING. Birthday parties, bridal showers, baby showers, Christmas – you name it- it was brown. But not just plain brown, I found ways to make it unique for each occasion.
For example, for a bridal shower, I wrapped the gift in the kraft paper. Then, I used a white paint pen to draw little white hearts in a bunch of different sizes all over the paper, with the bride’s name in big white letters in the center. Then topped it off with a big white bow in the corner
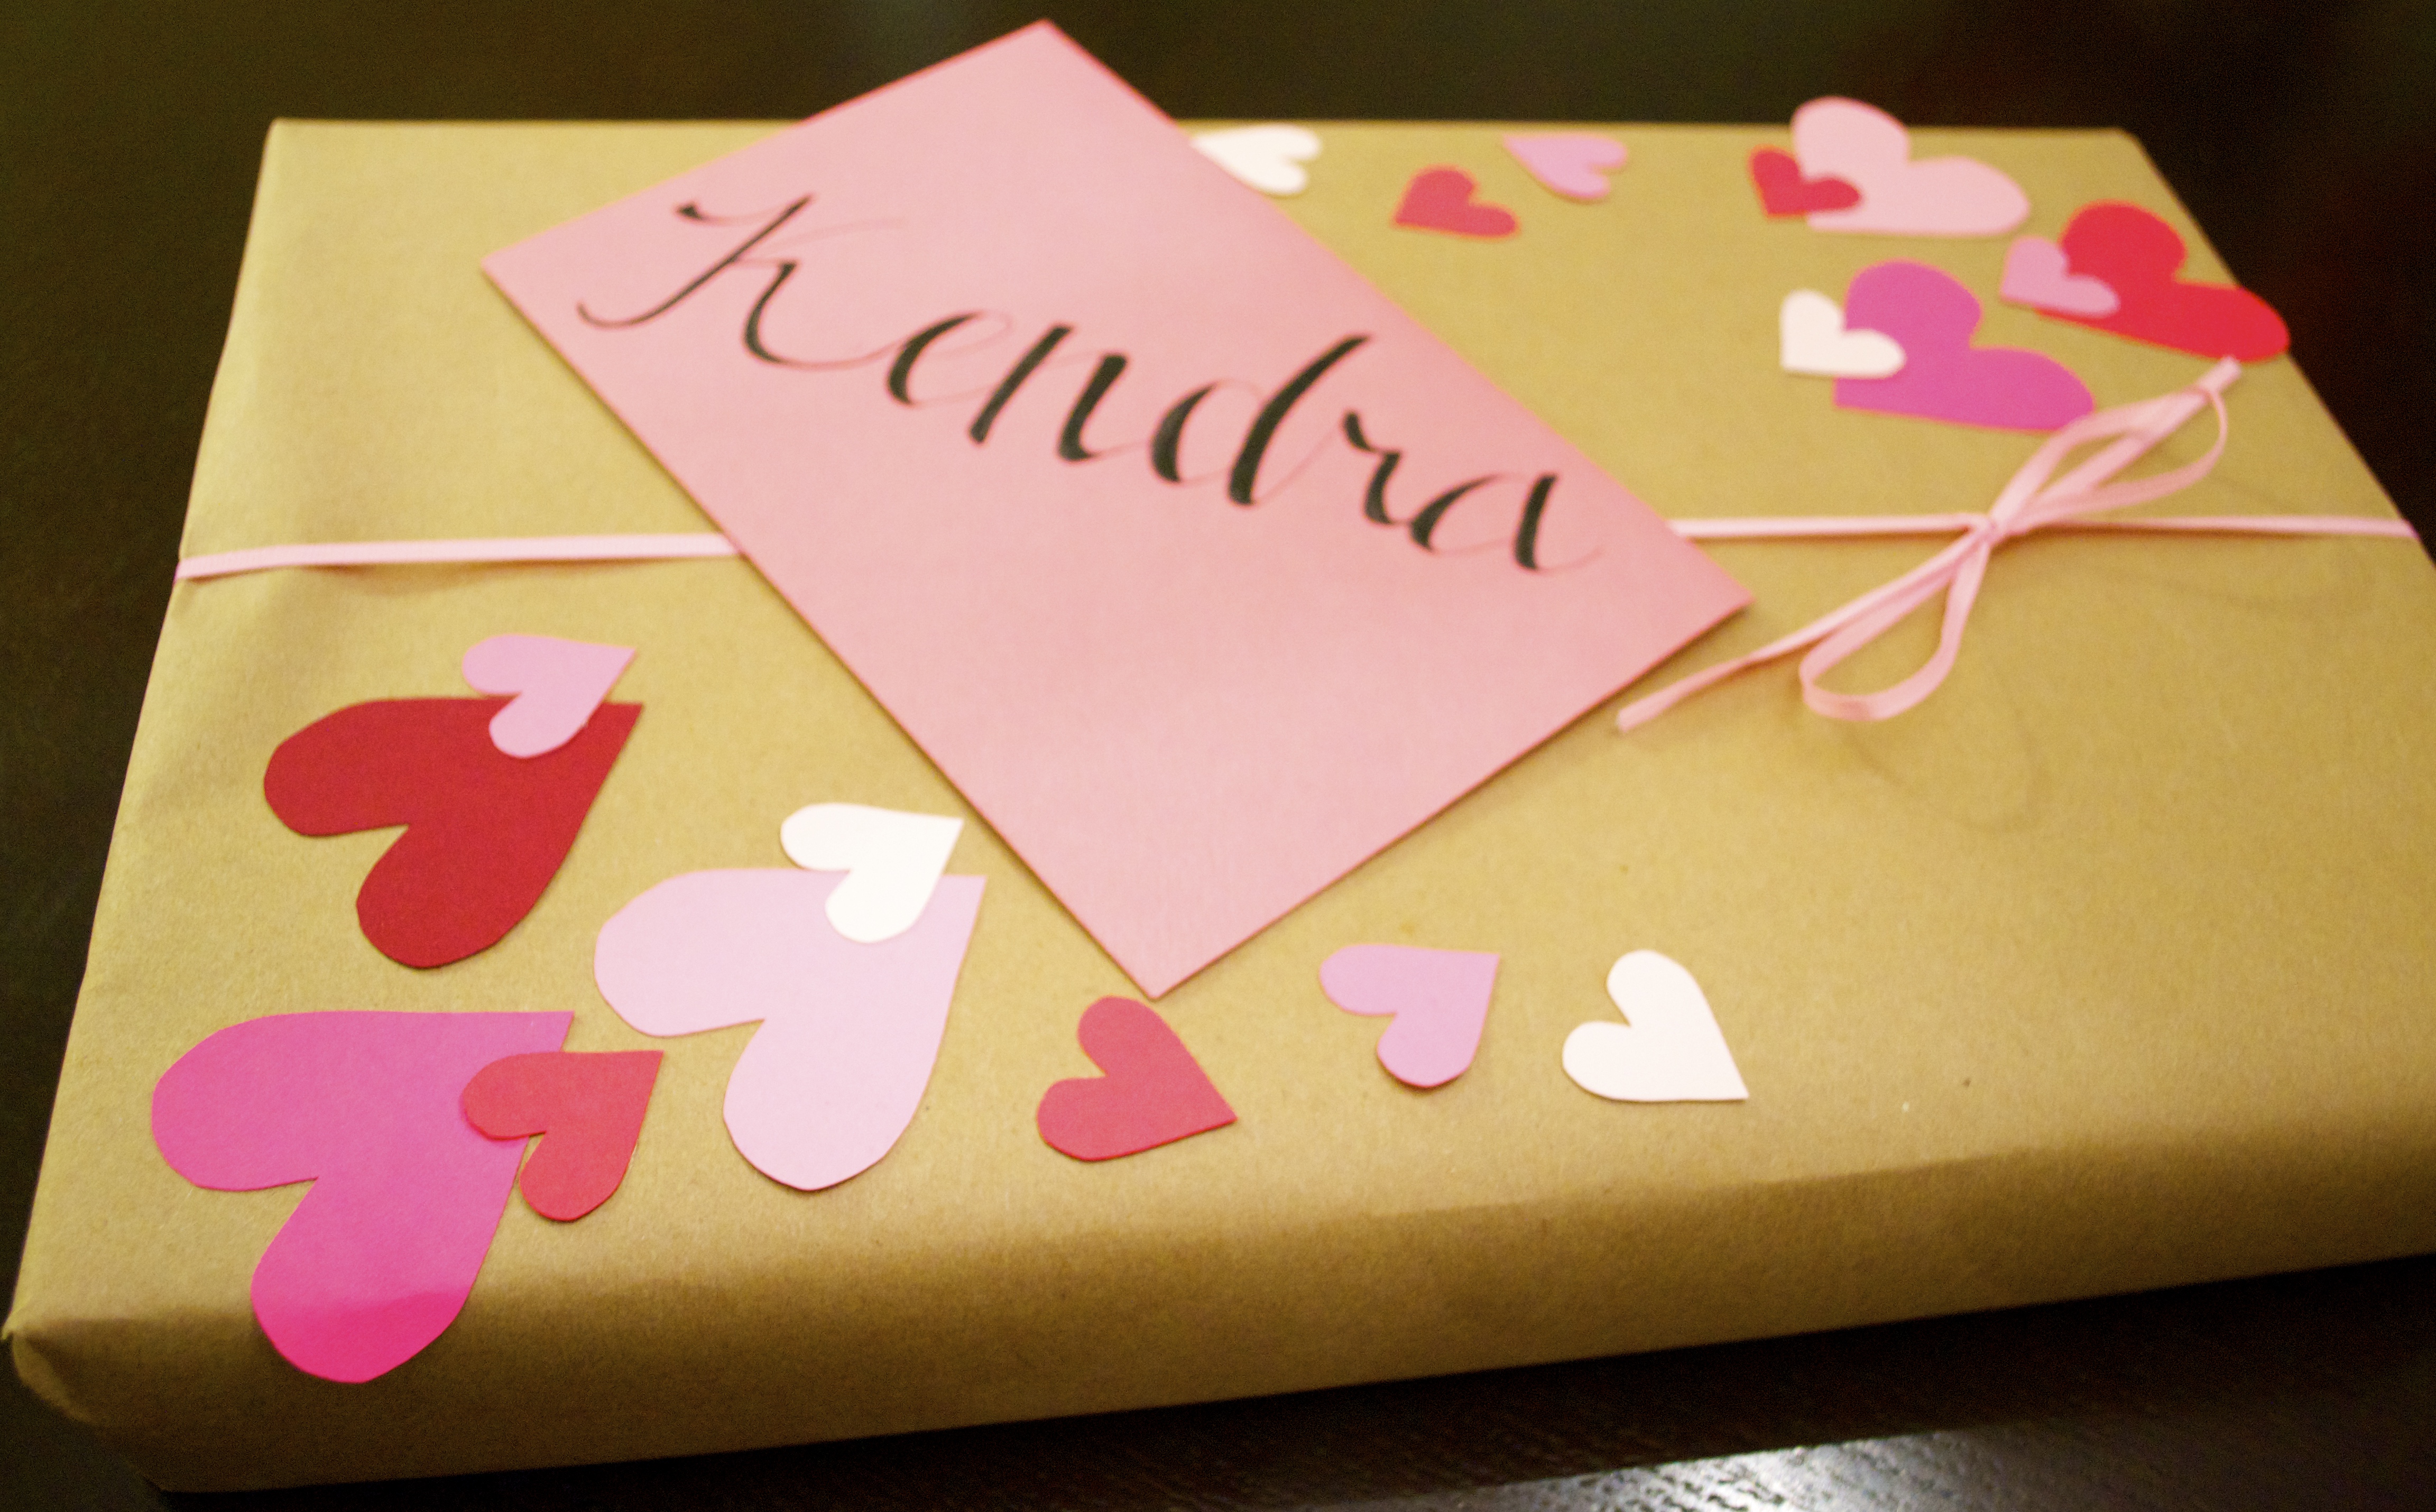
For a Valentine’s day party, I cut out different shades of pink and red heats and pasted them all over the brown paper and wrapped it up with a pink bow.
And for a birthday, I drew what looked like fireworks all over the paper, and added a few paper cut-outs that looked like fireworks to stand out form the rest. BOOM! Fun and so creative.
I wish I had taken pictures of them all to show you. But a few tutorials will have to do. Below are 2 different gift wrapping tutorials you can use, specifically for Christmas wrapping.
I especially LOVE these DIY gift wrapping ideas for “Santa’s presents”. If you have children, it’s a GREAT way to differentiate “Santa’s gifts” from mommy and daddy’s gifts. And if the kids go snooping around for the paper… they’ll NEVER find it because it’s DIY. Sneaky, huh?
But don’t just stop there, you can parlay the ideas into ANY occasion, just using different colors and designs. Just try it, you’ll be hooked!
DIY Christmas Gift Wrapping Idea #1
The Necessary Supplies:
- Kraft Paper Roll
- Green Cardstock
- Red Cardstock
- Silhouette Cameo or similar cutting machine (optional)
- Hot glue or elmer’s glue
- Green and white baking twine
- Opaque white gel pen or paint pens
- TIP: If you’re going to use paint pens, make sure they’re WATER BASED. The oil based ones don’t write well on paper.
- Graphite transfer paper (optional)
- Scissors
- Tape
Step 1:
- Take your present and wrap it as you normally would in the kraft paper, taping down the back and side seams.
Step 2:
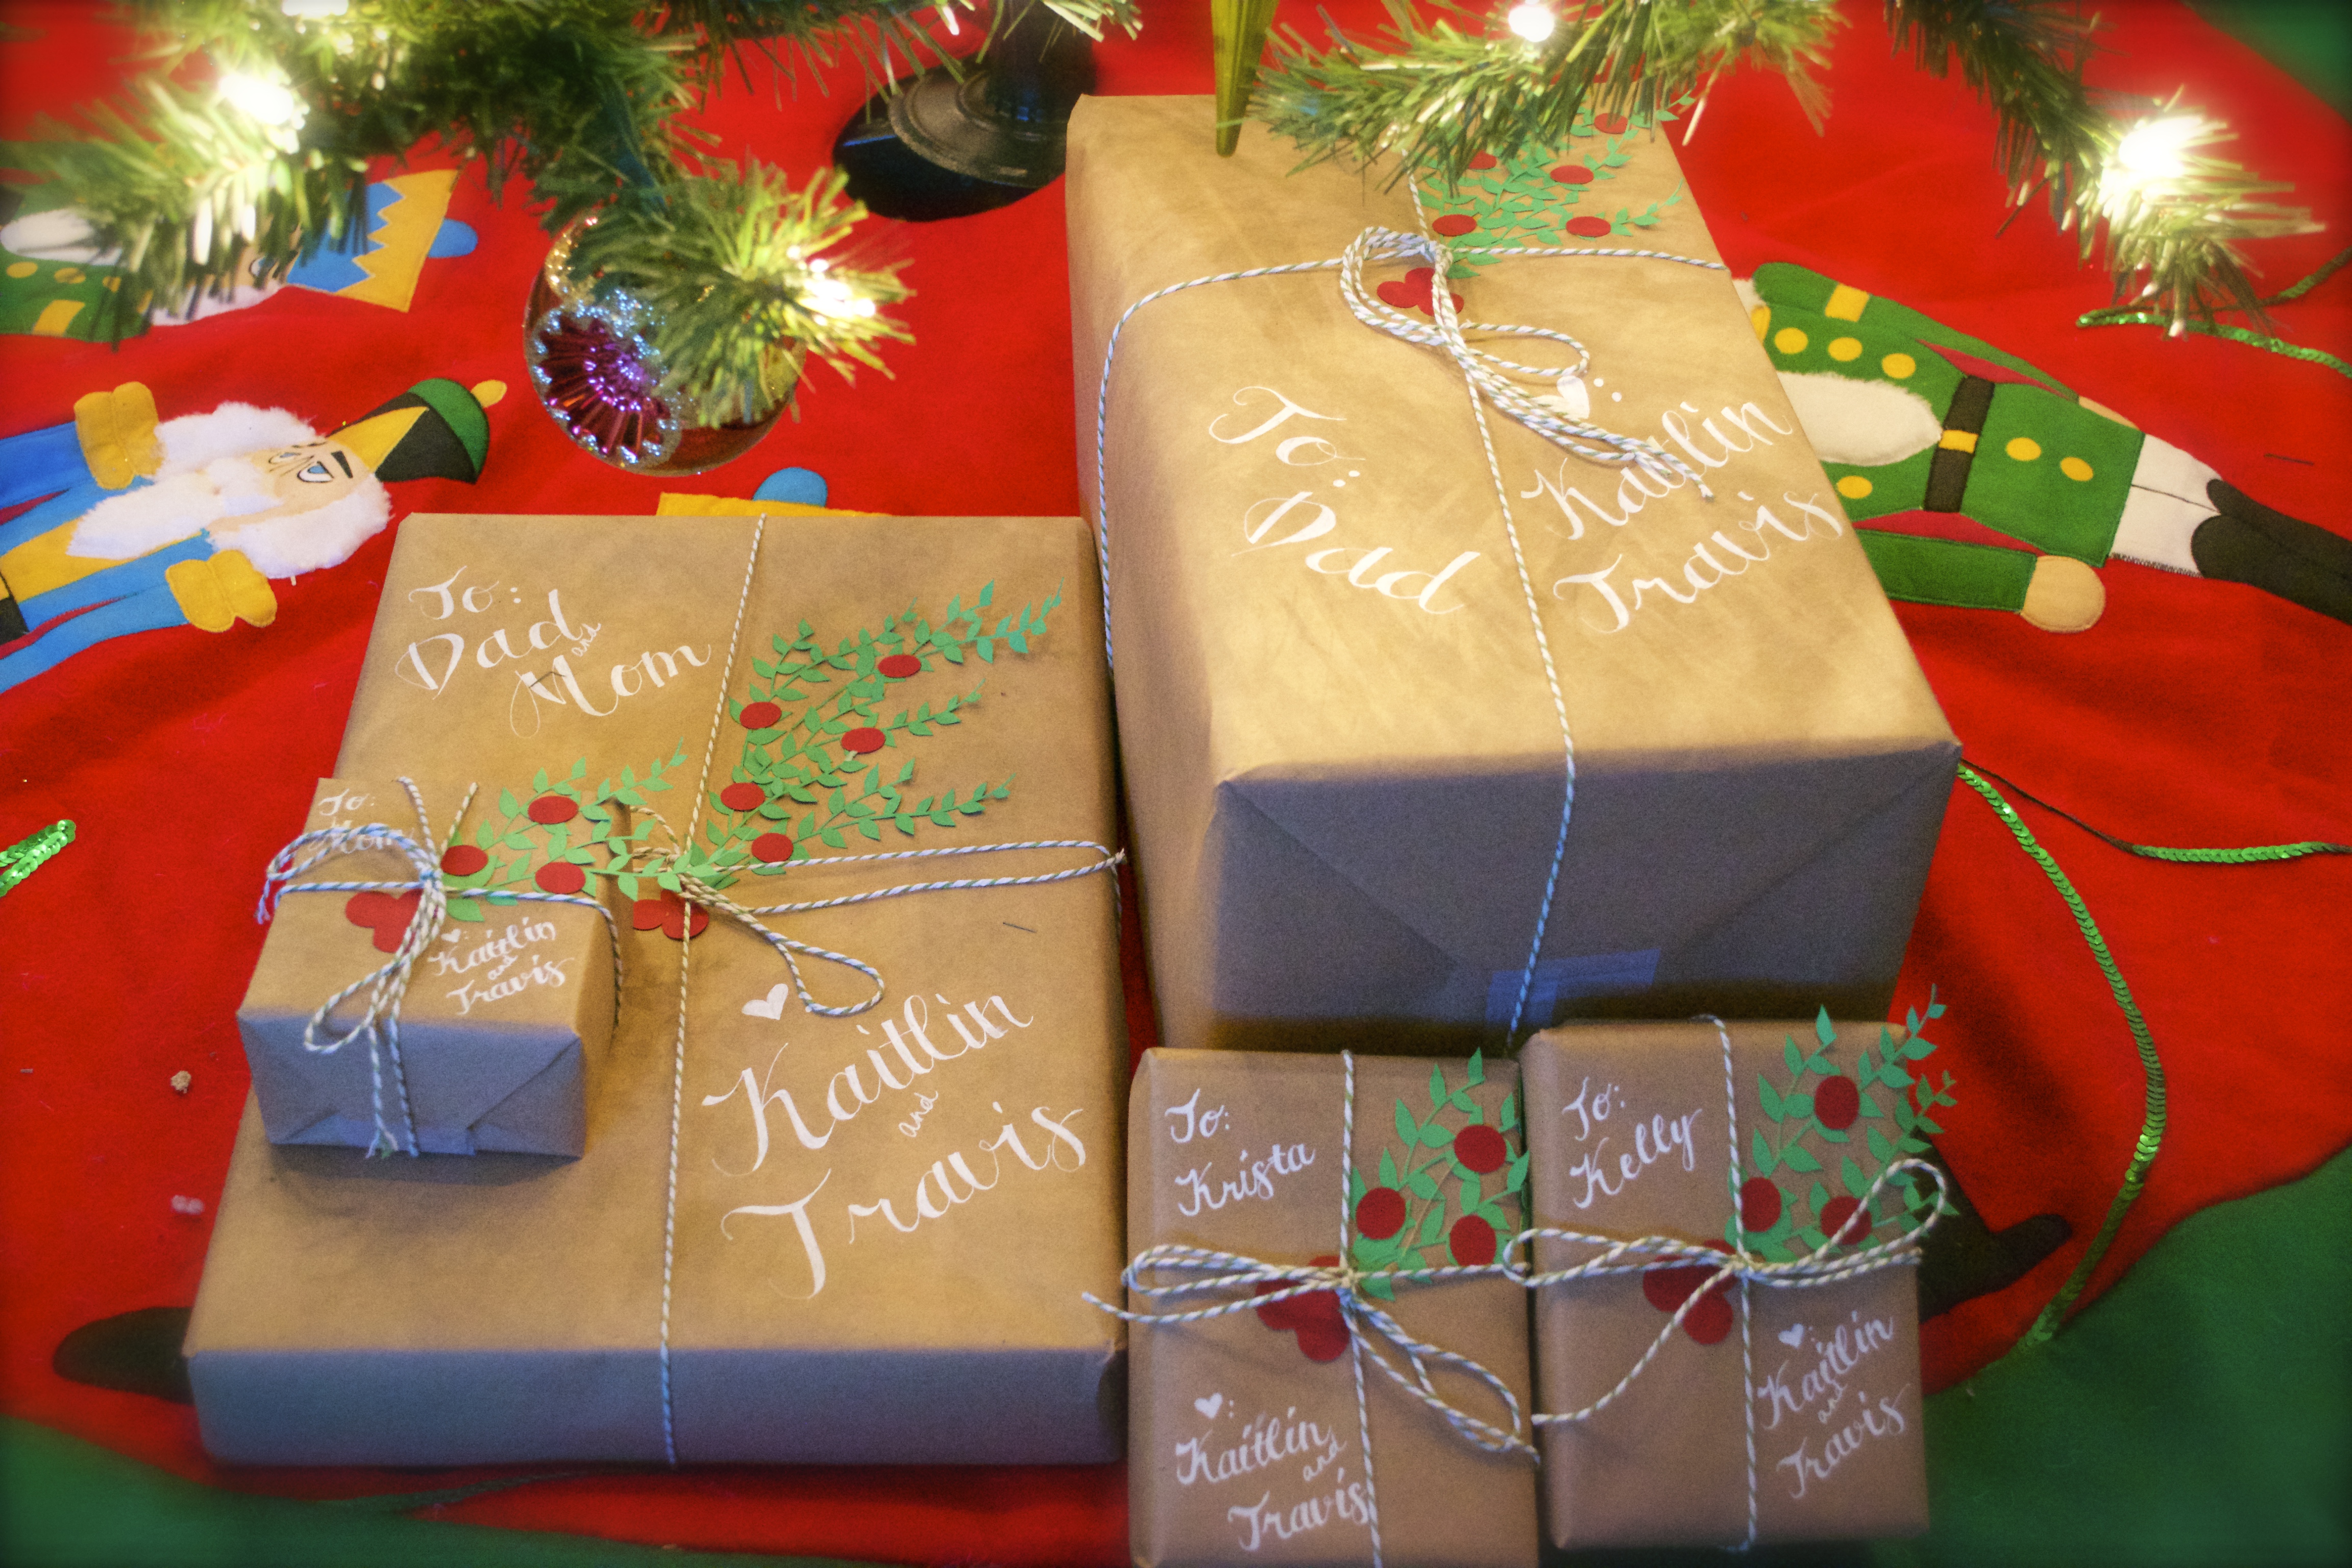
- Use this template for the leaves and this one for the berries, and download them to your cutting machine software. Proceed to cut the leaves out of your green cardstock and the berries out of your red cardstock.
- If you do not have a cutting machine, you don’t need the template. Simple make leaf-shaped cuts out of your green cardstock and circular cuts out of your red cardstock. The leaves don’t have to look EXACTLY as mine do. Anything that resembles a wreath or garland will do, and you can clue them onto your present to look as such.
- Now, take your cuts and glue them directly onto the kraft paper you’ve wrapped your present in. Once you have your desired look, wrap a bow with your green bakers twine around the present.
Step 3:
- Finally, take your white gel or paint pen and write DIRECTLY on the kraft paper who the present is to/from.
- To do this so pretty, I looked at a font I liked on my computer and tried to mimic it. If you’re not as good at freehand, there’s an easier way. Print out the font you like in EXACTLY what you want it to say, and use transfer paper to trace it onto your present (just as in my chalkboard tutorial). Then, go over it with your white pens. Nobody will know that you didn’t free hand it yourself!!
And ta da!! Very rustic, yet totally chic! A very welcome departure from the crazy prints you get in the store, but just as festive. Am I right?
Now, if you want to see how you can get creative with colors OTHER than brown paper, below is another tutoorial using plain red paper to wrap gifts…
DIY Christmas Gift Wrapping Idea #2
The Necessary Supplies:
- Red Metallic Wrapping Paper
- Plain red paper rolls (non-metallic) are a cheaper option an works just as well
- 1.5-2″ Black Ribbon
- Gold Cardstock (I used gold glitter cardstock)
- Scissors
- Tape
- (OPTIONAL: FOR TAGS)
- Red Cardstock
- White Cardstock
- Green and white baker’s twine
- Hot Glue Gun and Glue
- Silhouette Cameo or similar cutting machine (optional)
Step 1:
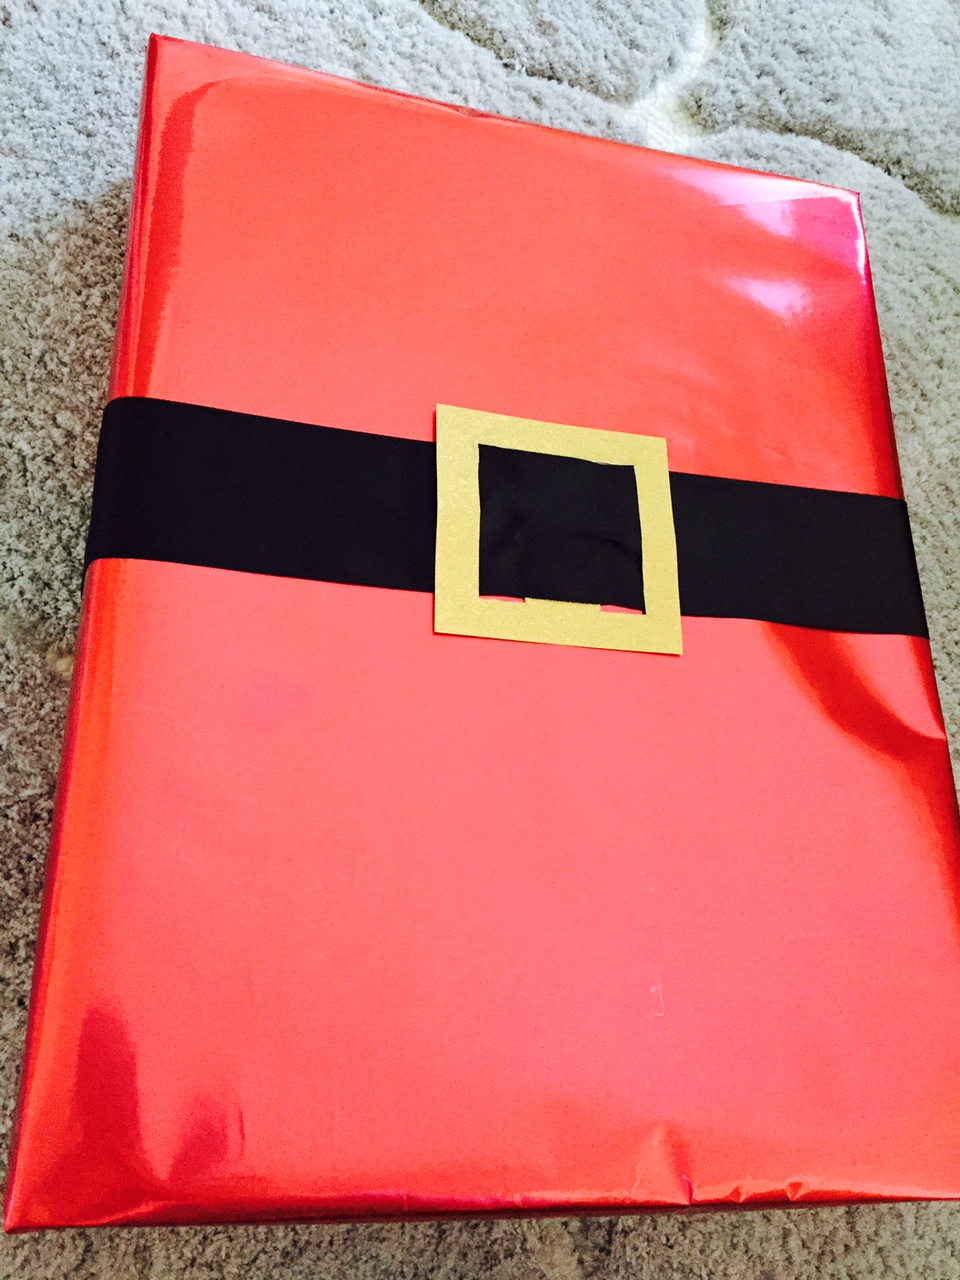
- Before anything, you’ll need to make sure you cut “belt buckles” out of your gold cardstock. To do this, use your cutting machine, and this template, to cut them out. Make sure to adjust the width of the openings to be 1.5 or 2″ depending on the size of your ribbon.
- If you don’t have a cutting machine, just load your gold carstock into your printer, and print the design onto your cardstock. Then, by hand, cut out each square so that your buckles resemble the buckles in the picture above.
Step 2:
- Wrap your present with your red wrapping paper. Just wrap it normally as you’d wrap any present, taping the back and ends shut.
Step 3:
- Cut your black ribbon to fit around the width of your box. Then, thread it through the “belt buckle” appropriately, and tape the ribbon together and the box on the bottom side.
- Lastly, put a loop of tape under the “belt buckle” to hold it in place on the present so it doesn’t slide around and to the side (you want it smack in the center and to stay there).
Step 4 (OPTIONAL: TAGS):
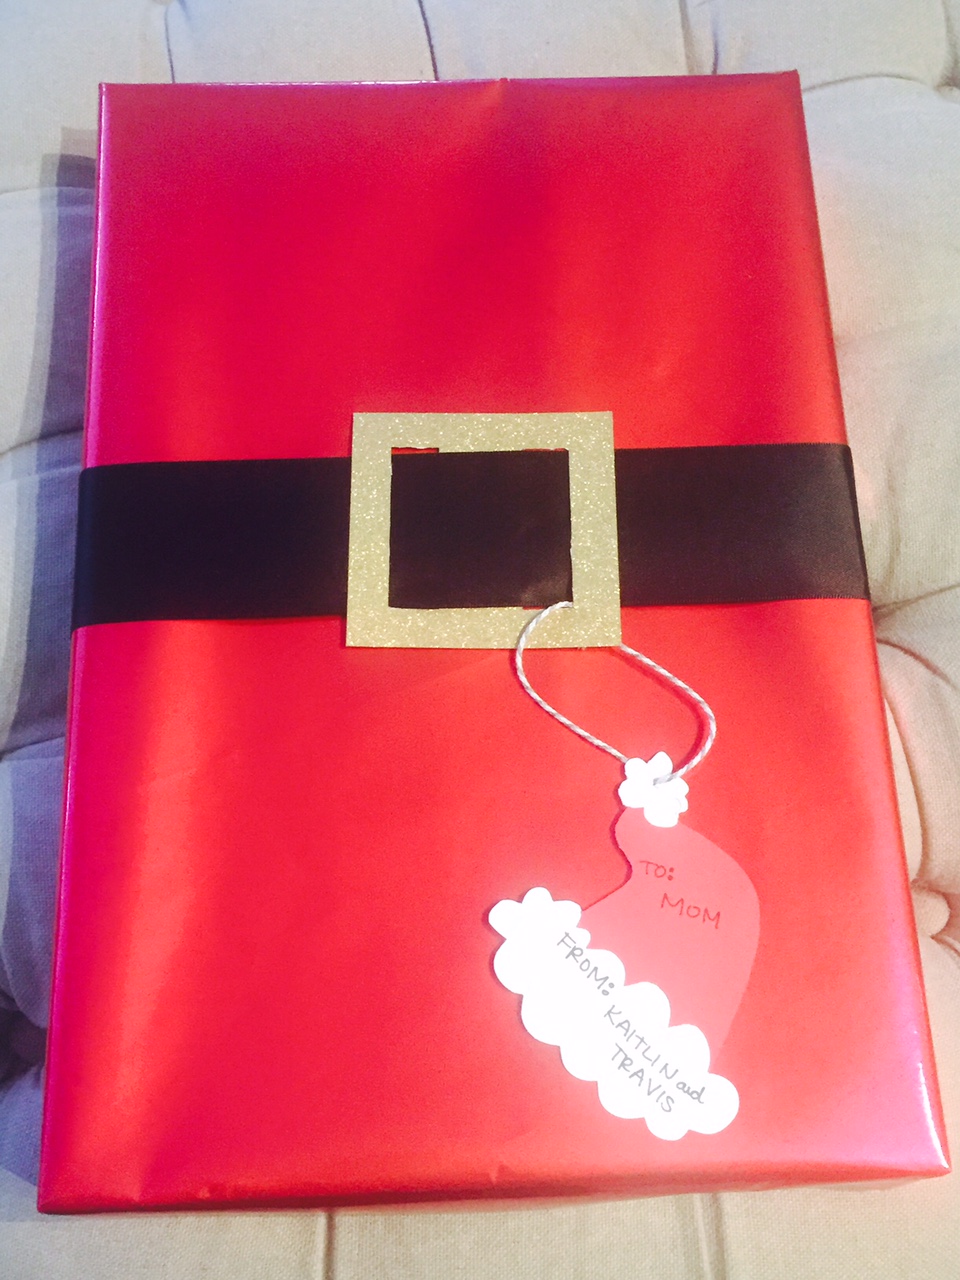
- If you want to add the cute Santa hats as tags, it’s really easy. Just download these templates (Santa hat trim and Santa hat body) and upload it to your cutting machine software. Then, cut the full silhouette out of your white cardstock, and the silhouette of the hat body ONLY out of the red cardstock (see picture above).
- If you don’t have a cutting machine (such as the Silhouette Cameo) simply print these designs on your home printer, and cut them out by hand. They’re not too intricate so it should be fairly easy for you.
- Once all the designs are cut out, use your hot glue gun to glue the red pieces in top of the white pieces so that they look like red hats with white trim.
- Lastly, poke small holes in the top of the hats (this small hole punch works well) and thread through your green baker’s twine. Attach to the edge of the “belt buckle” by tying a loop with the twine.
Then, ta da!!! Your Santa gift wrapping is completely perfect and completely ADORABLE!!
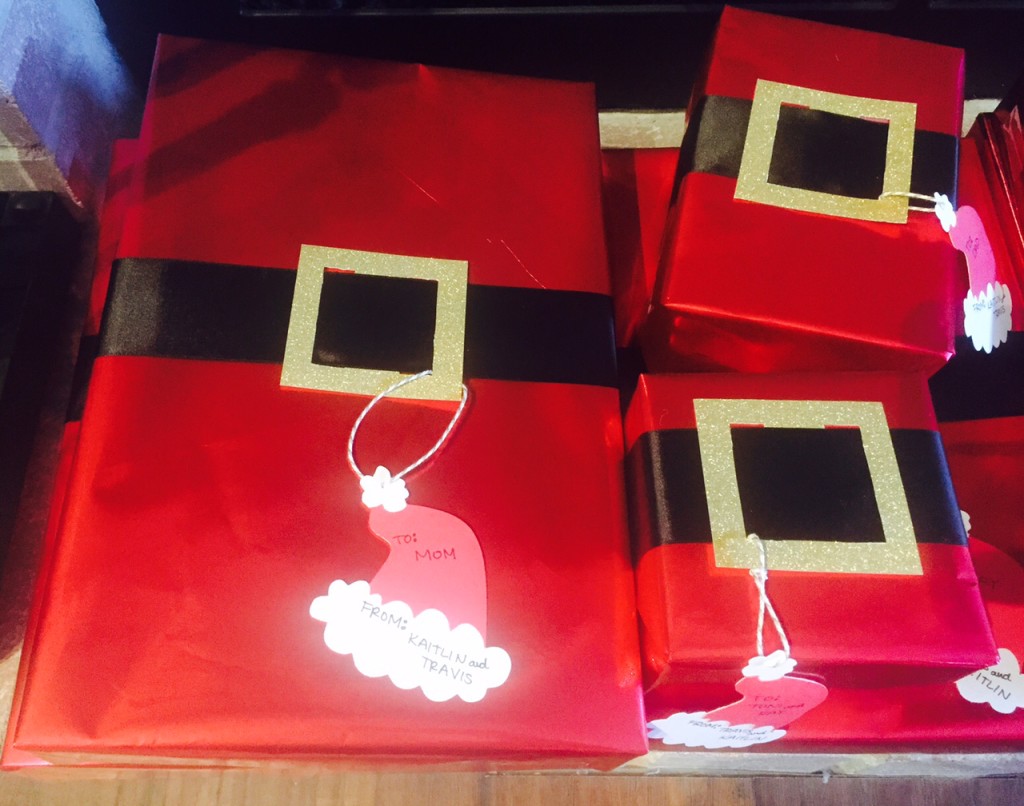

I die! Ho Ho Ho never was more literal in your house. These presents look like they dropped straight from Santa’s workshop and under your tree. Your children and friends will be extremely impressed, but have NO idea it was so easy.
How can YOU get creative with wrapping this season? If you need a little reminder of the tools you’ll need to get started, here ya go. But remember, you can use these supplies YEAR ROUND. Just be creative with each occasion:
Kraft Paper Gift Wrapping:
- Kraft Paper Roll
- Green Cardstock
- Red Cardstock
- Silhouette Cameo or similar cutting machine (optional)
- Hot glue or elmer’s glue
- Green and white baking twine
- Opaque white gel pen or paint pens
- TIP: If you’re going to use paint pens, make sure they’re WATER BASED. The oil based ones don’t write well on paper.
- Graphite transfer paper (optional)
- Scissors
- Tape
Red Paper Gift Wrapping:
- Red Metallic Wrapping Paper
- Plain red paper rolls (non-metallic) are a cheaper option an works just as well
- 1.5-2″ Black Ribbon
- Gold Cardstock (I used gold glitter cardstock)
- Scissors
- Tape
- (OPTIONAL: FOR TAGS)
- Red Cardstock
- White Cardstock
- Green and white baker’s twine
- Hot Glue Gun and Glue
- Silhouette Cameo or similar cutting machine (optional)
HAPPY CRAFTING!!
Great Scott! I hate wrapping gifts. I’m just not the kind of person that excels at any arts & crafts. Thanks for the step by step.