When crafting this bride to be sash for a friend’s upcoming bachelorette party, I couldn’t help but be reminded of a funny story that I’m sure hits close to home to you, too, if you’re reading this post.
It all started a little over a year ago. My bachelorette party was coming up in a couple weeks, and I was having a weekend get-together with one of my bridesmaids, Sarah. Sarah was trying to think of everything she could to make my bachelorette party a special weekend. And I, being the stubborn person that I am, didn’t give her any ideas. I didn’t want her to go to any trouble for me, and so I didn’t give her any ideas of things to do for my bachelorette.
We stopped chatting about bachelorette plans, sipped our wine (ok, ok – more like gulped, but who’s counting) and enjoyed the rest of our weekend get together.
The following morning, Sarah left early to go run some errands and get some things done around her apartment. Little did I know at the time, but Sarah’s “errands” involved running to Michael’s Arts & Crafts to get the supplies to make a bachelorette bride to be sash and decorations for my big weekend (so very thoughtful of her)!
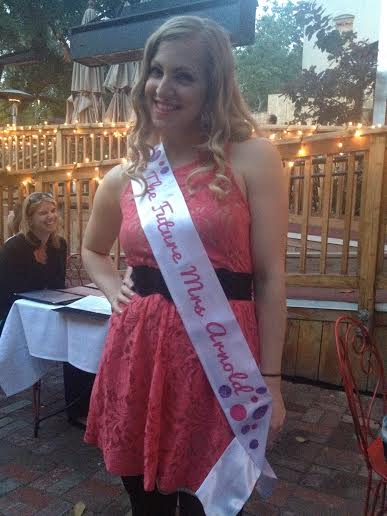
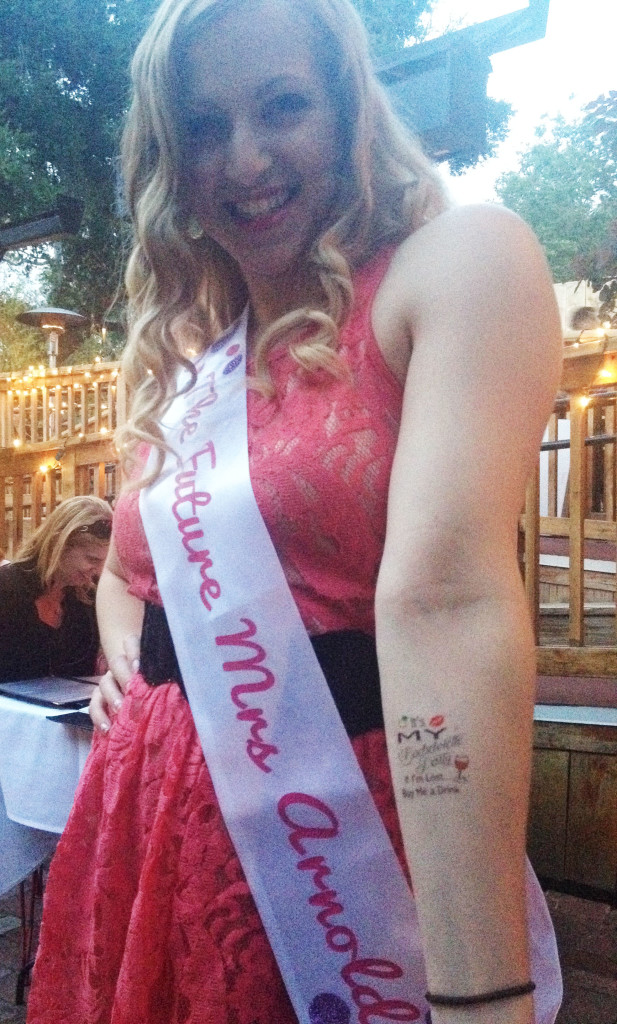
A few weeks later, when the big weekend was upon us, Sarah showed up with the cutest decorations to hang in our Las Vegas hotel room, and the most adorable bride to be sash for me to wear. It read ‘The Future Mrs. Biziorek”. I loved it, my hubby to be loved it, and I still have it as a memento of my last big bash before tying the knot.
Sarah then let the cat out of the bag that she left early from our wine-o weekend of fun to run these errands, with grandiose plans of making these adorable decorations herself. Alas, grandiose was the imperative word. When faced with all the supplies at the craft store, the tasks seemed insurmountable. Really, she was going to have to spend a ton of time figuring out HOW to make the decorations she had in her head, then more time figuring out WHAT she needed to buy to make them with, and then even more time actually MAKING them.
By the time this all ran through her head, she had spent 20 minutes in the craft store (which in her mind, was 20 minutes too long). She immediately ran home and bought exactly what she wanted on Etsy. Done and done.
What she WISHES she would have had was this tutorial. It would have not only saved her time in the craft store, but it would tell her EXACTLY the supplies she needed to make the decorations she wanted, where to get them, and HOW to quickly put them together. And in the end, she could have saved a bunch of money.
Well, it’s too late for Sarah. But it’s not too late for you. In this tutorial, I’ll show you how easy it is to make your own customized DIY bride to be sash, DIY temporary tattoos for the bride to be and her guests, and other easy customized DIY decor to spruce up your bachelorette weekend abode.
DIY Customized Bride to Be Sash
The Necessary Supplies:
- Blank Sash (I used WHITE but they come in all colors)
- Heat Transfer Vinyl (recommended) or Heat Transfer Printable Paper
- I used PINK and GLITTER LAVENDER vinyl
- Silhouette Die Cutting Machine (optional) or scissors
Step 1:
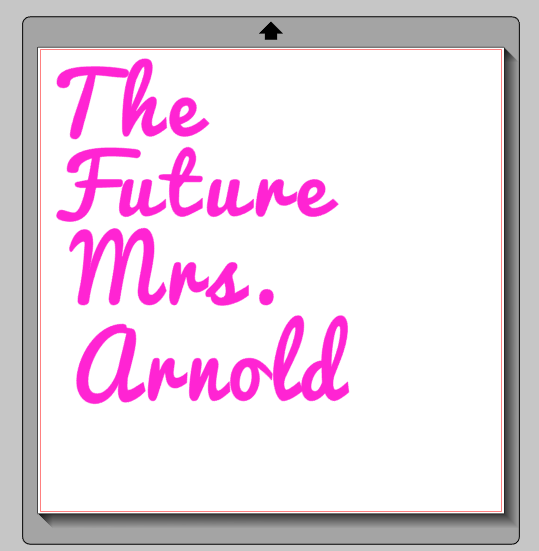
- Make your design in a Word Document, Photoshop, Design Studio, or whatever program is easiest for you to work in and has the fonts you want to use.
- If you don’t have a die cutting machine, I suggest using a blocky lettering so it’s easy to cut out by hand.
Step 2:
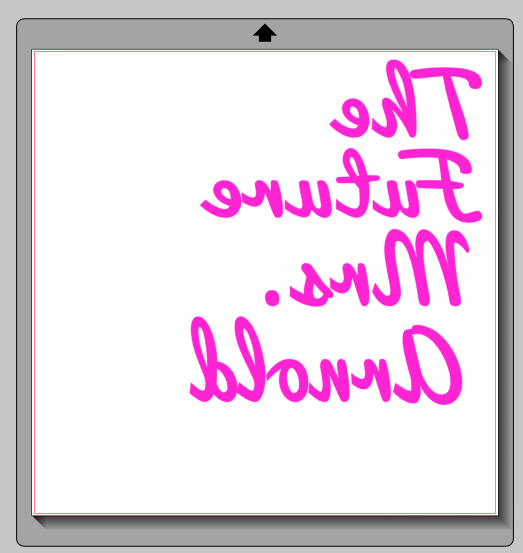
- If using iron on vinyl, take your design, and mirror it so that it looks backwards on your screen (this is what I used).
- Then, place the vinyl face down onto your cutting mat (side with the clear sheet down), and send your design to your cutting machine to cut.
- If using printable transfer paper, do NOT reverse the image. Send to your inkjet printer AS IS, and print out your design on the FRONT side of the transfer paper (the back side should have markings on it so you know it’s the back side).
- Then, cut out your letters by hand, one by one. Make sure you leave no white around the edges because it WILL show up when you iron them on.
Step 3:
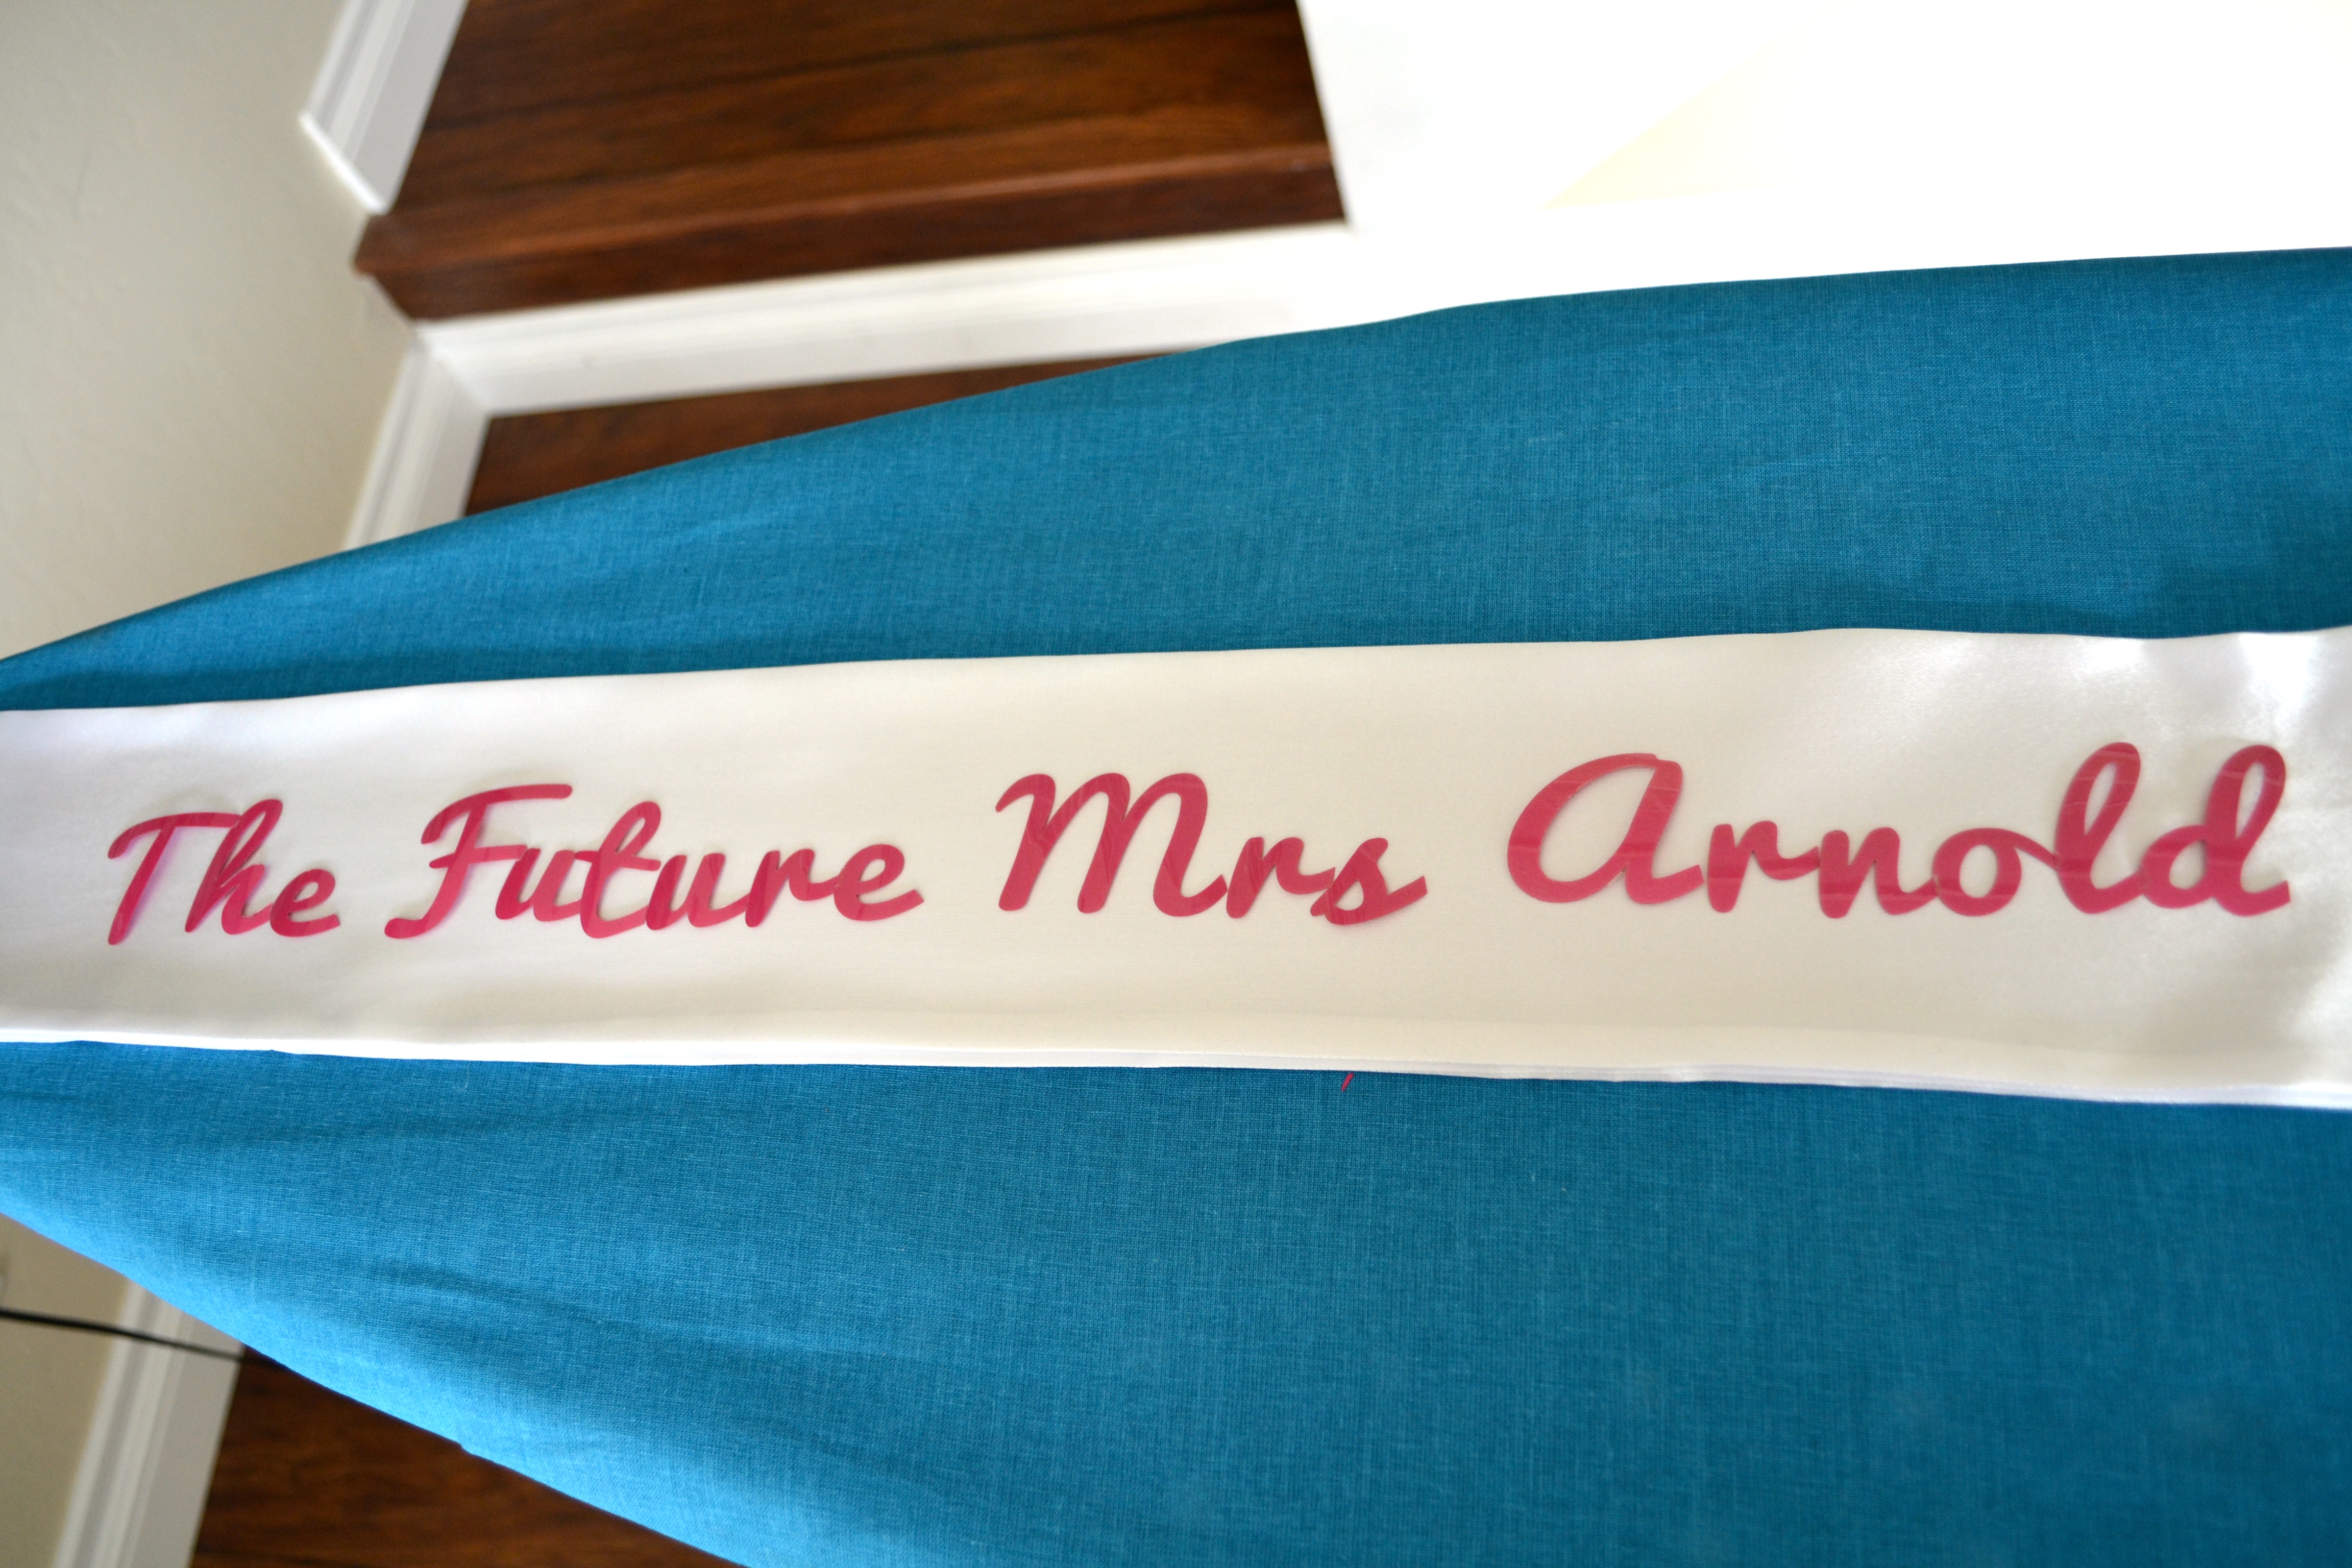
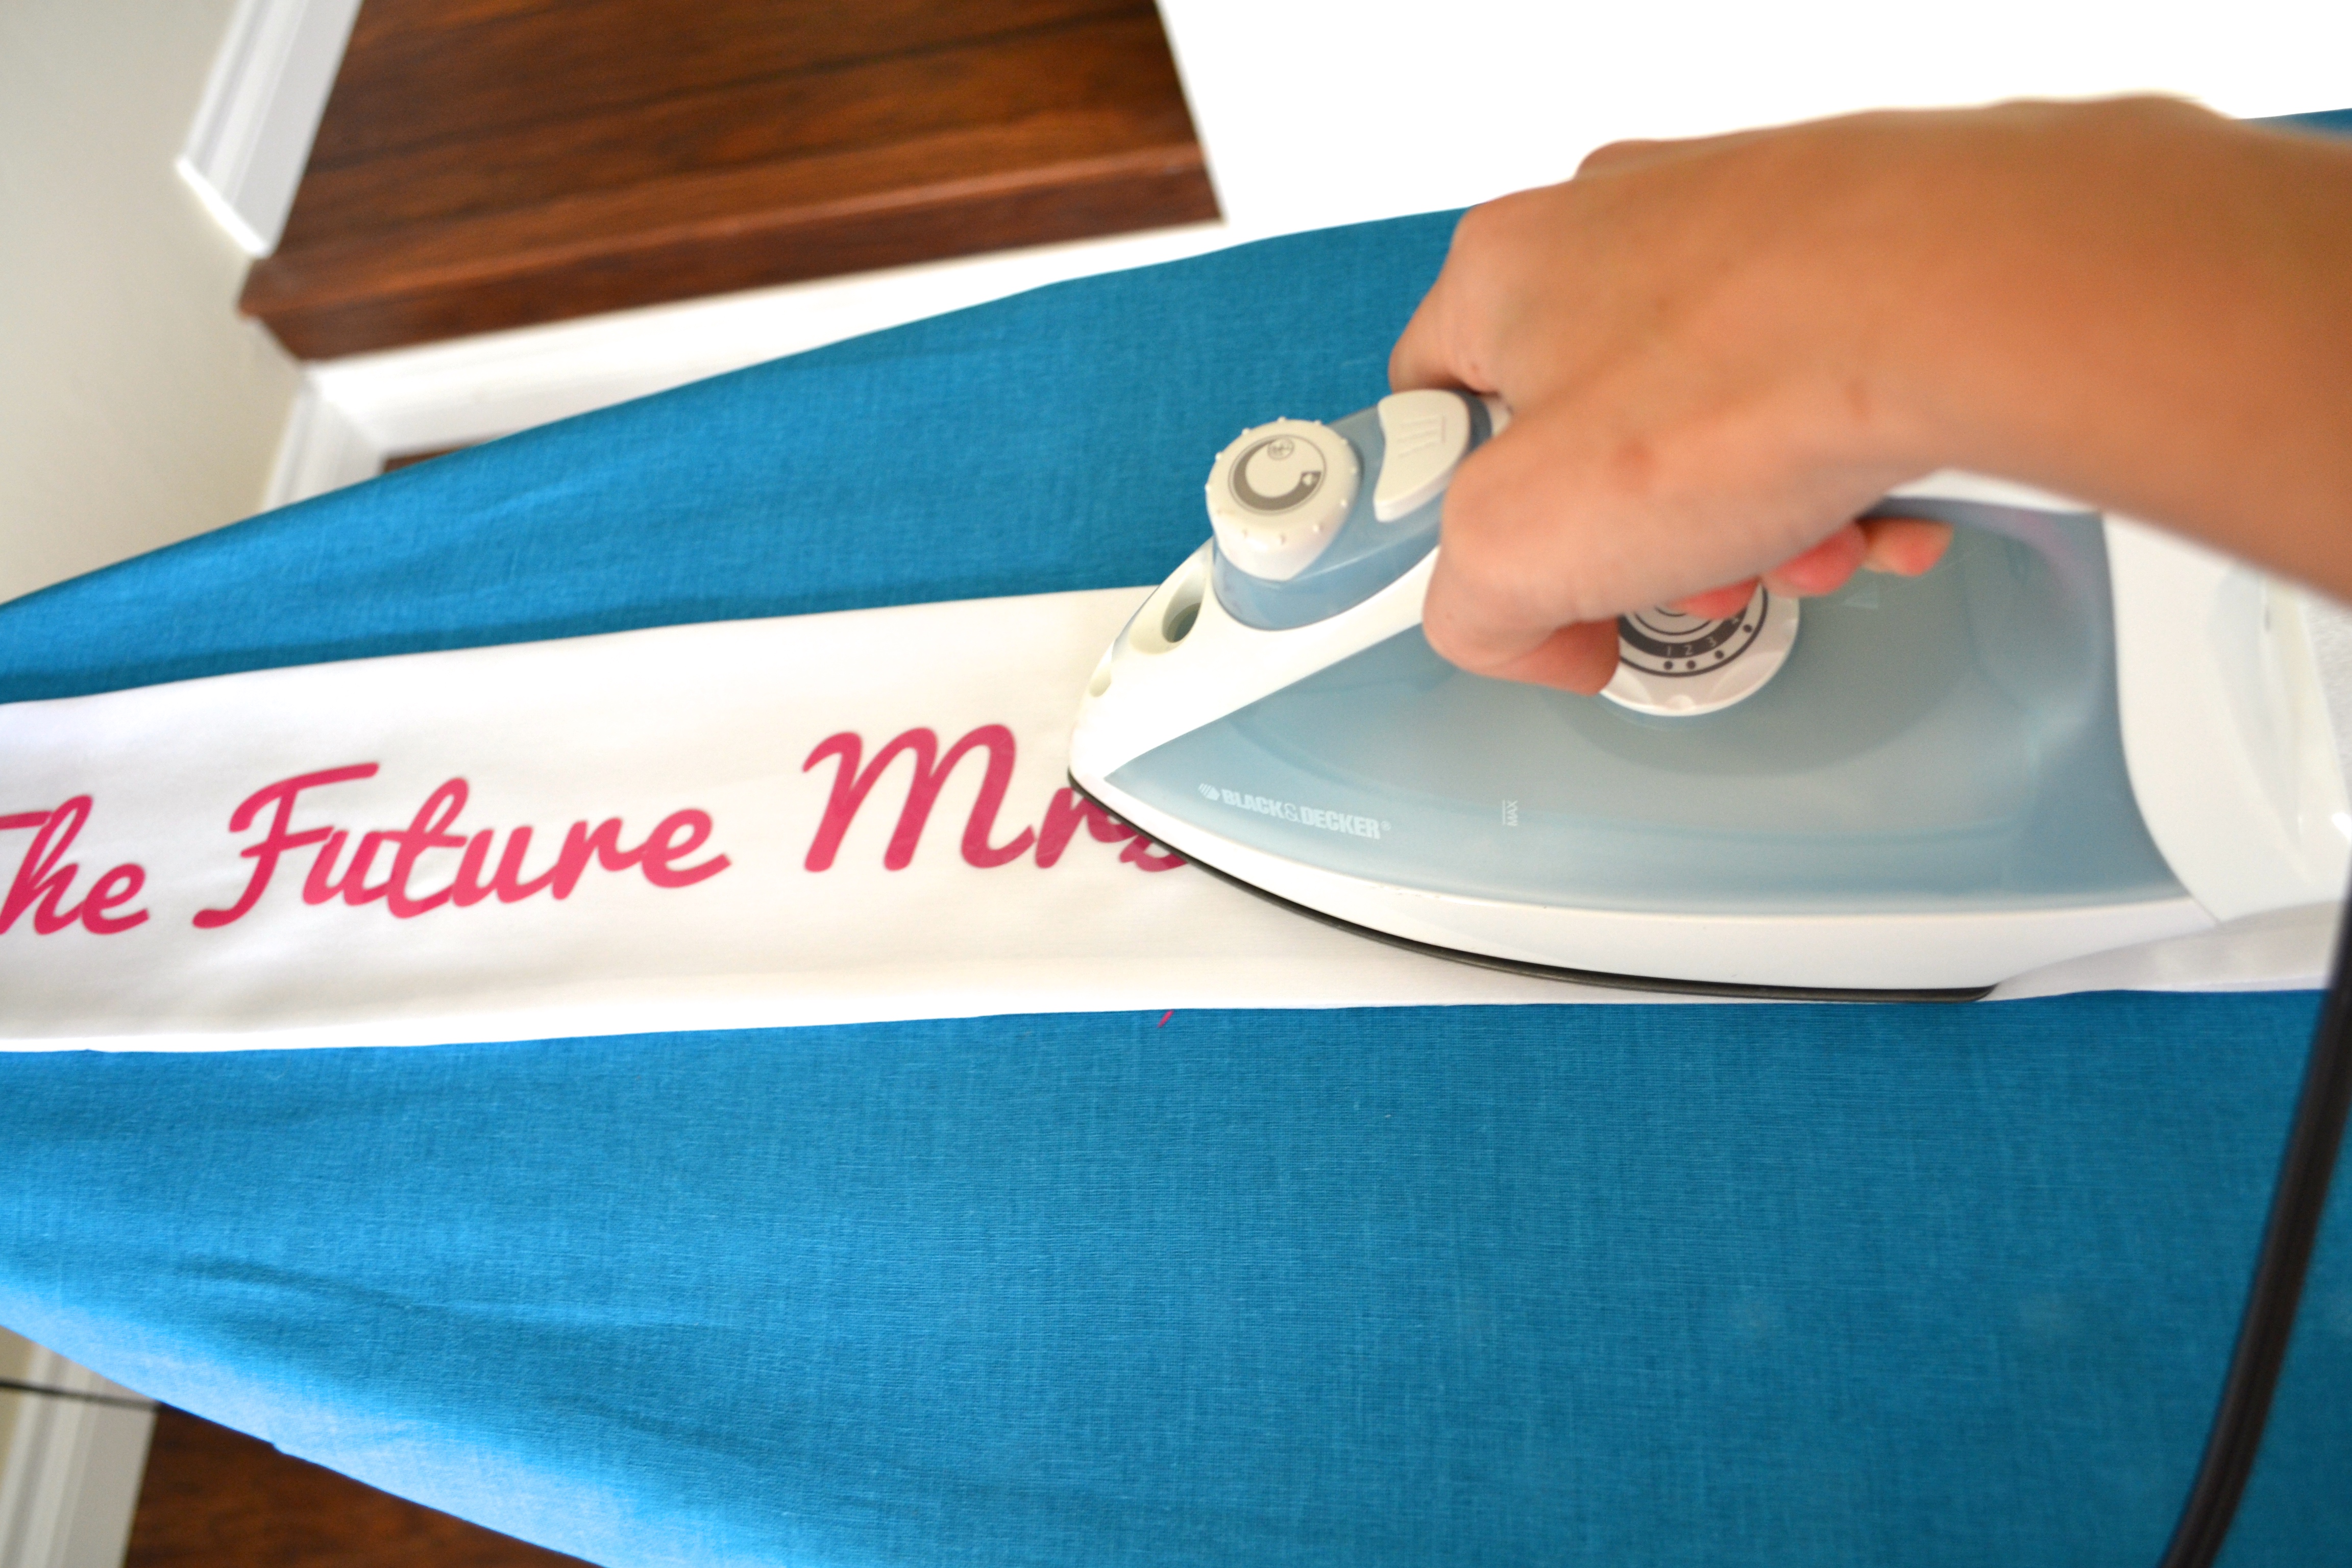
- Place your letters (and any other designs you’ve cut out) exactly where you want them on your sash. Put a thin dish towel or paper towel over your design and sash, and apply heat and pressure with your iron.
- Run the iron evenly over the sash, making sure you get at least 30 seconds of heat (NO STEAM) on each letter and design you’re transferring. Set your iron to about a 3 setting (any hotter may melt the letters).
Step 4:
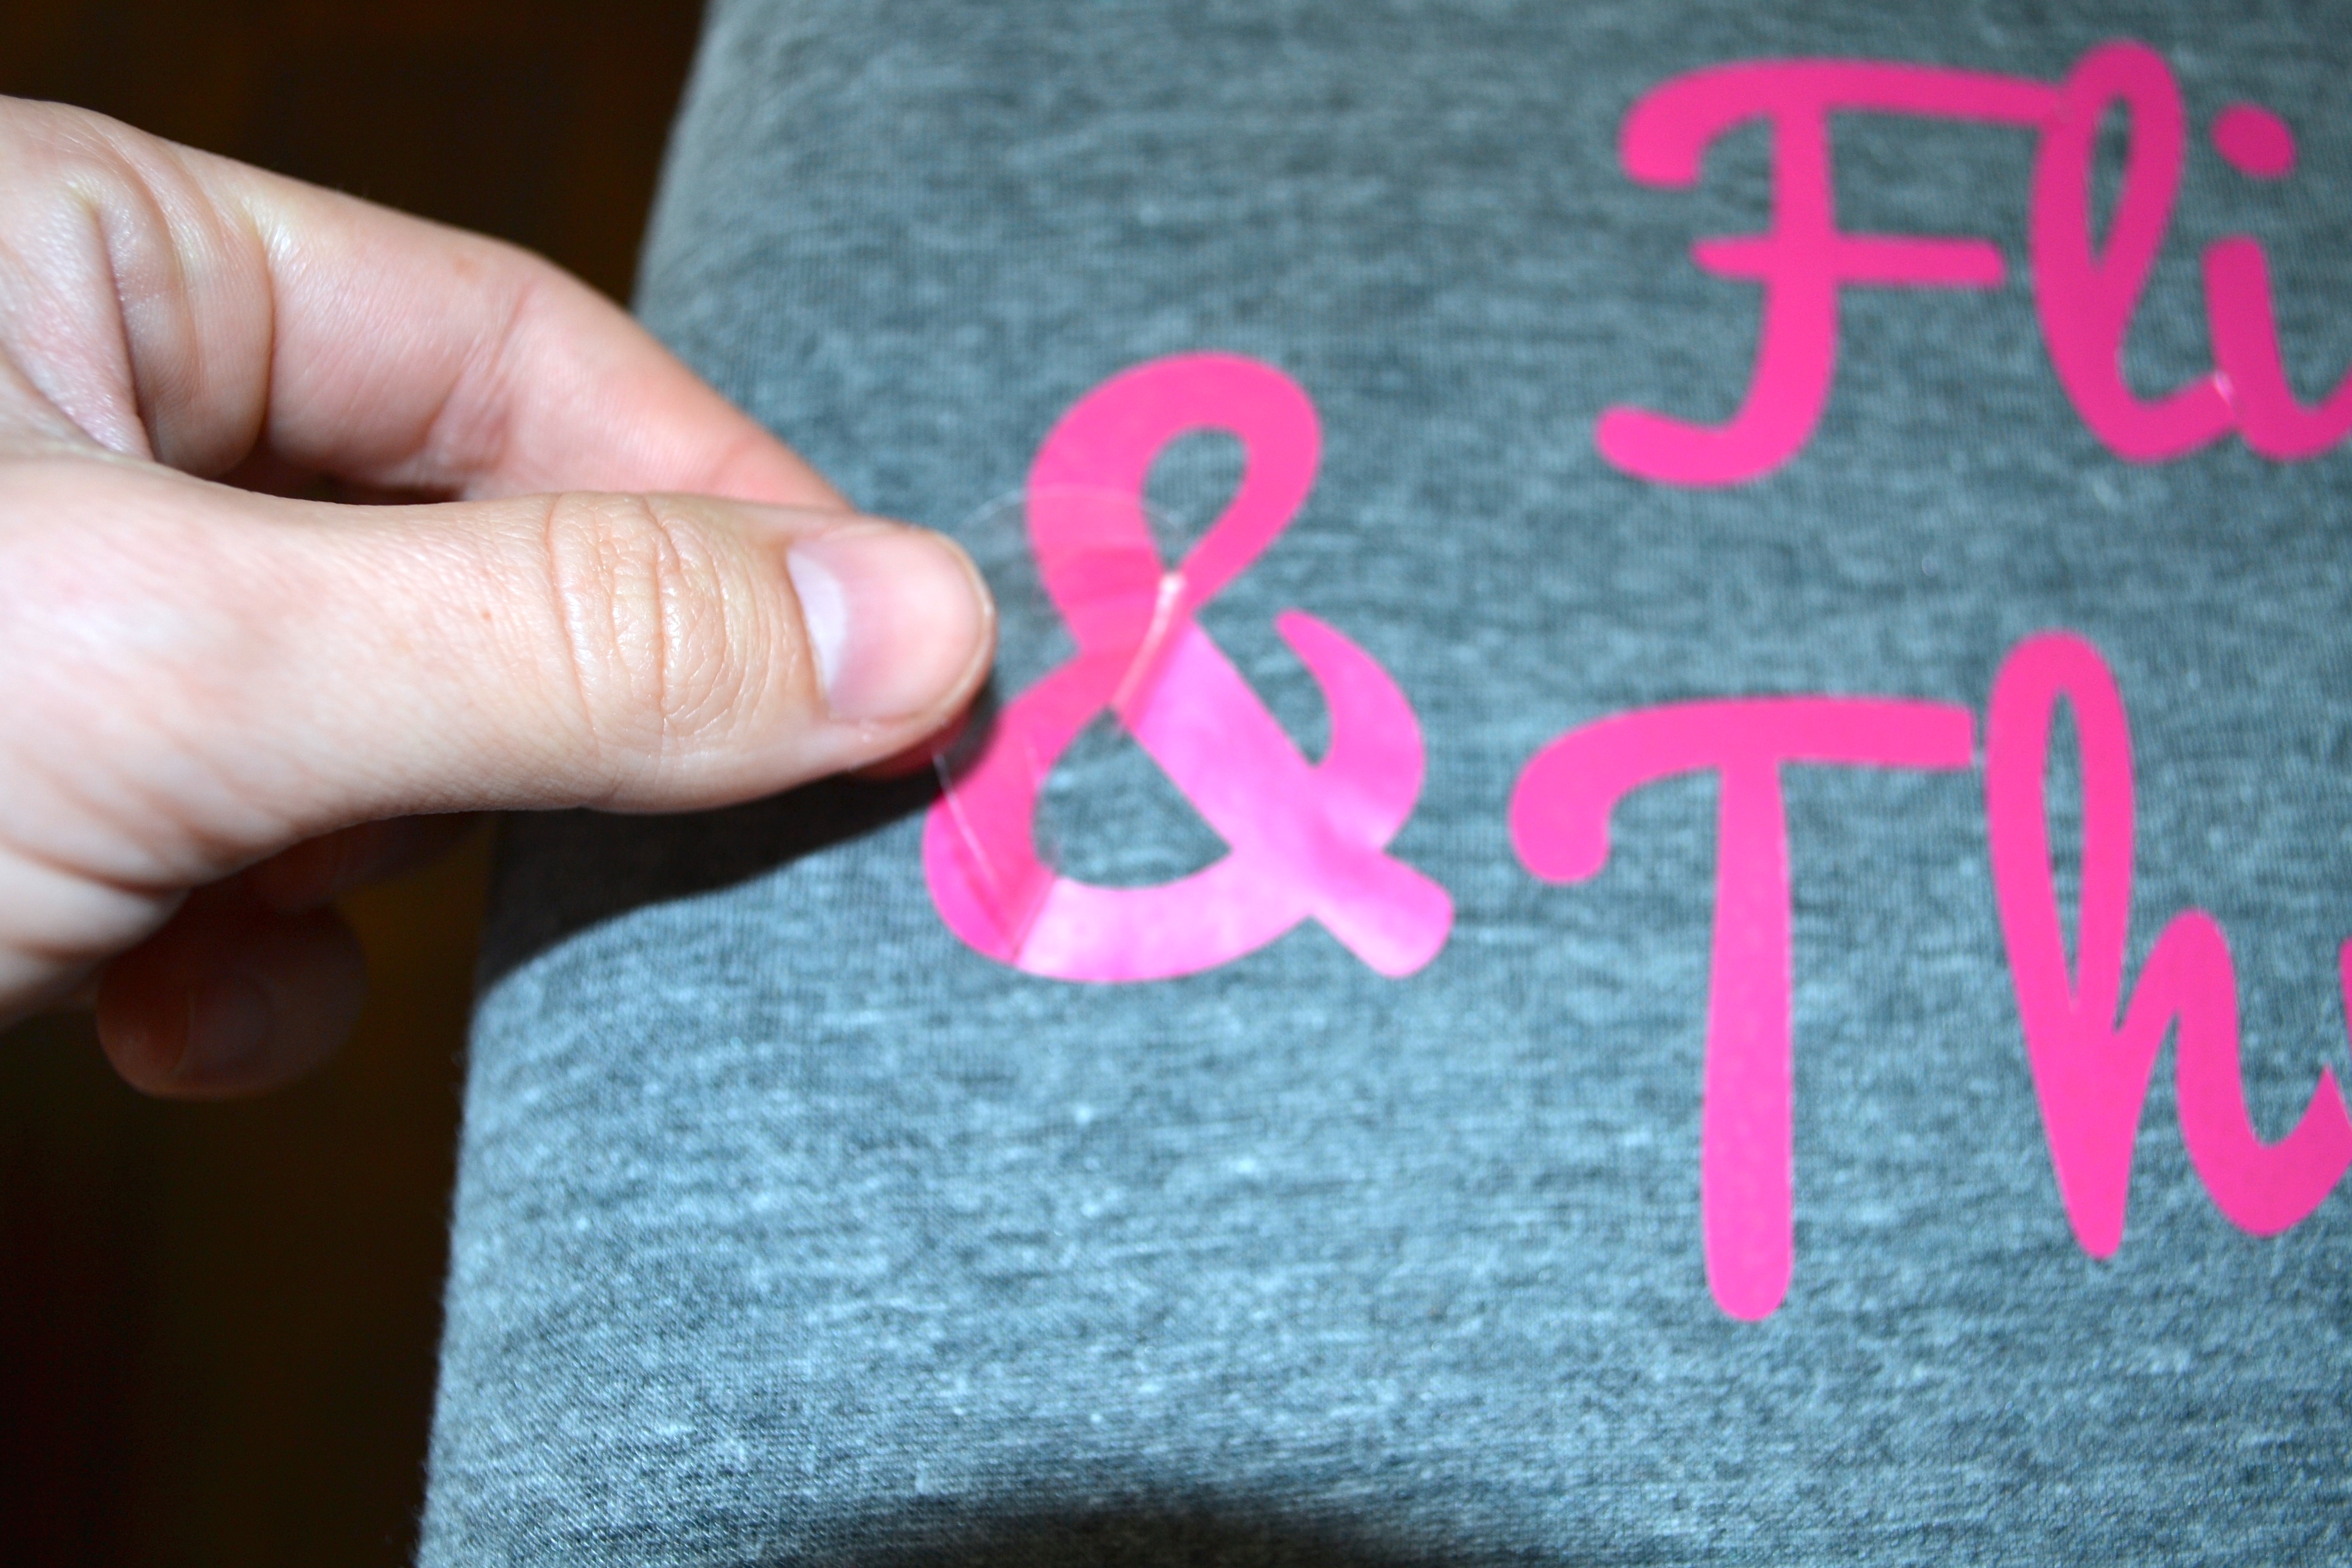
- Take off any clear film that is on top of your lettering (this is mainly with the use of vinyl – heat transfer paper won’t have a film on the top).
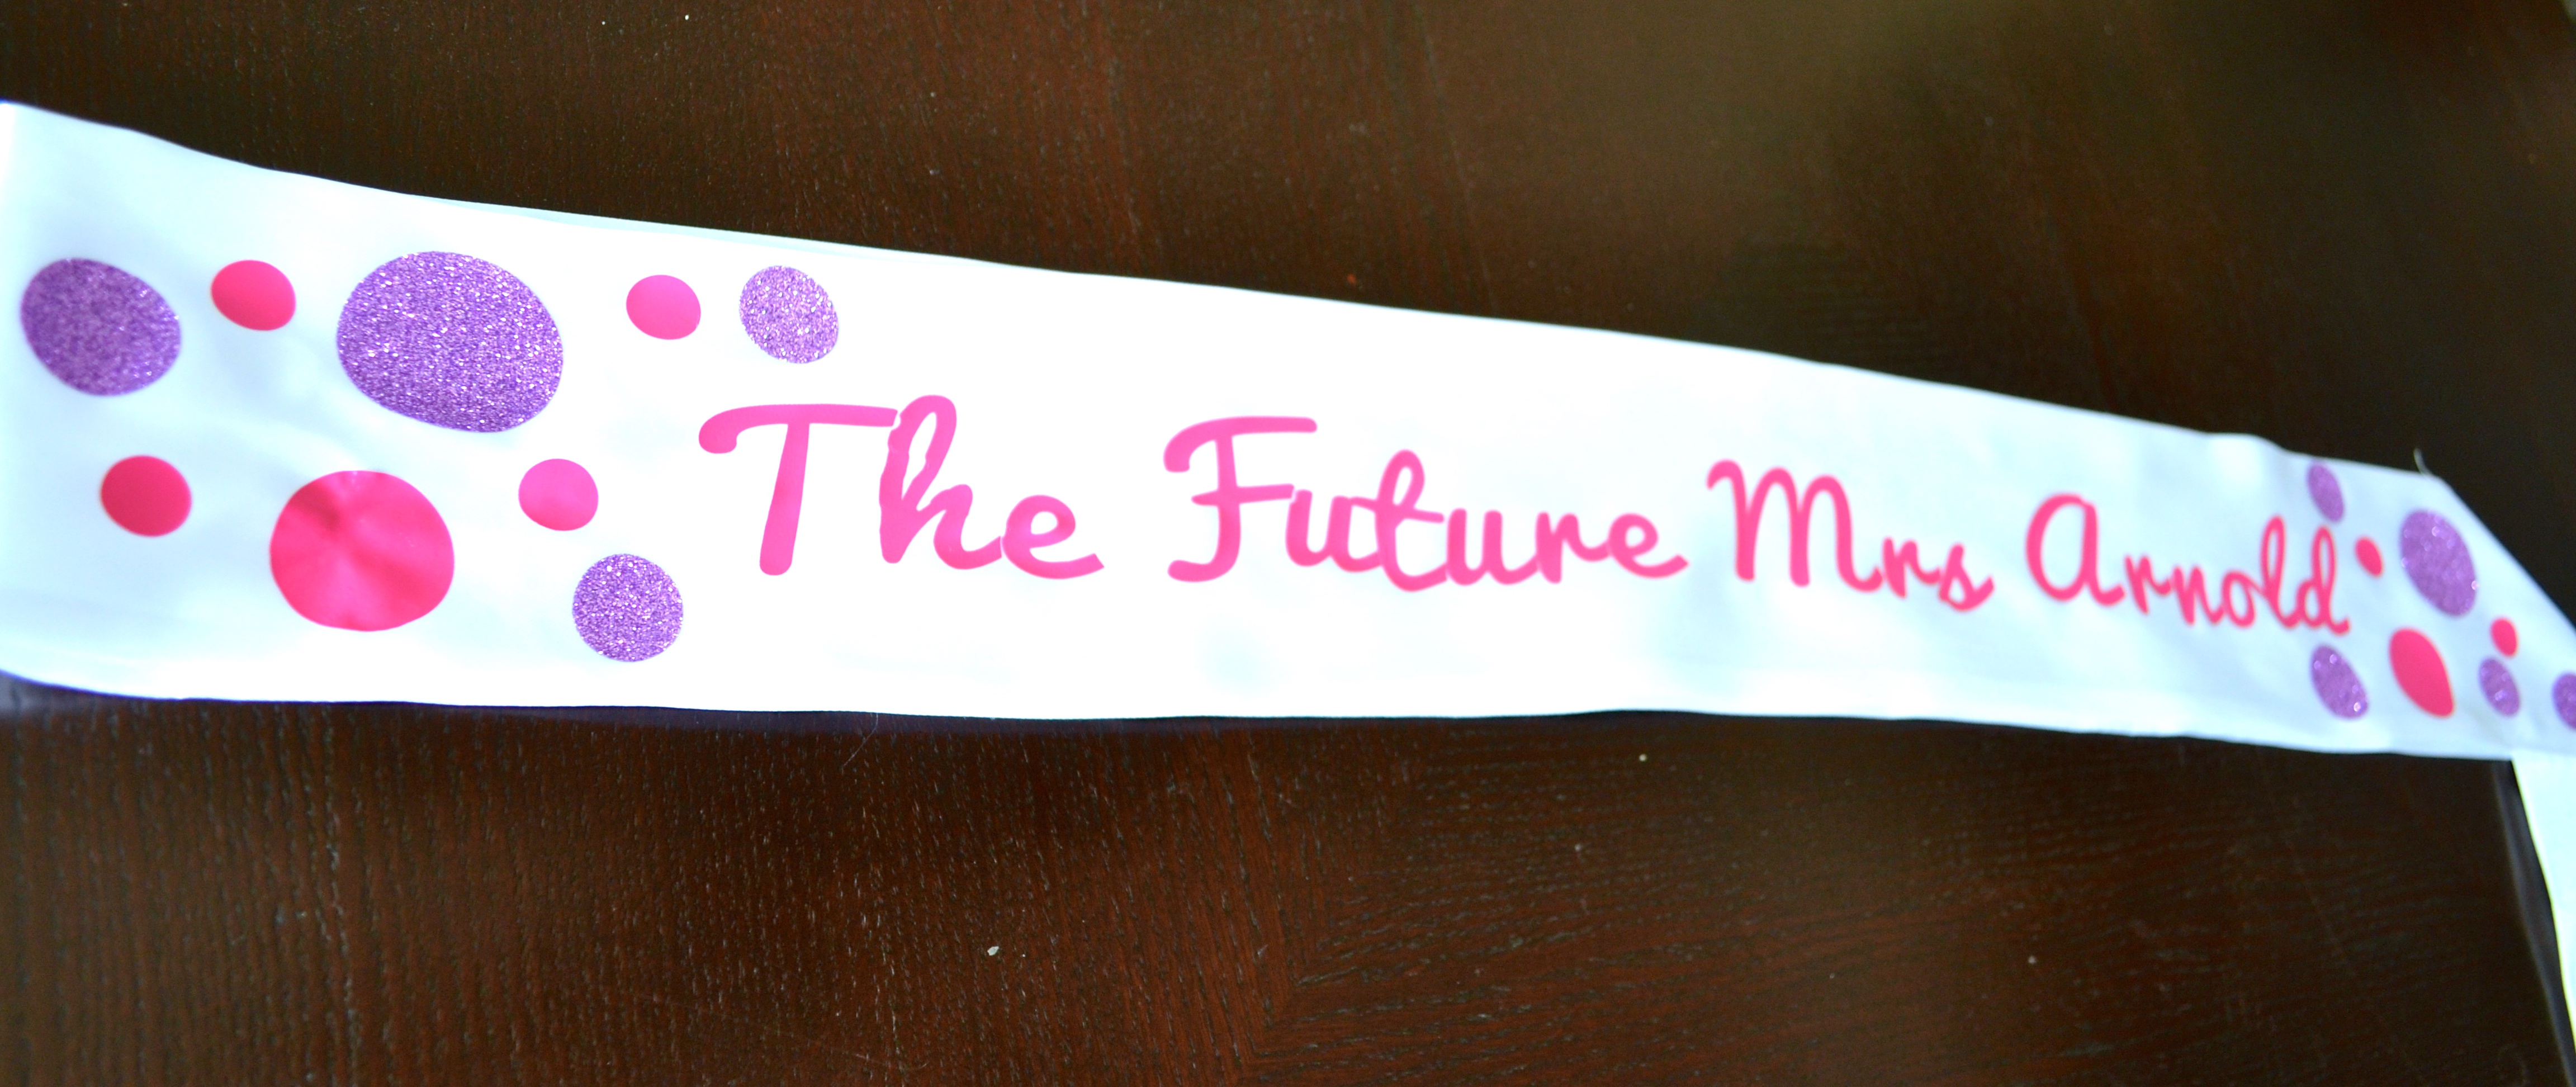
Voi la! Your very own, customized sash for the bride to be! So easy, and SO much cheaper than having someone else do it for you. Plus, the bride is sure to be oh so thankful you put thought into making something extra special for her big celebration!
Now, onto the next fun bachelorette party DIY…
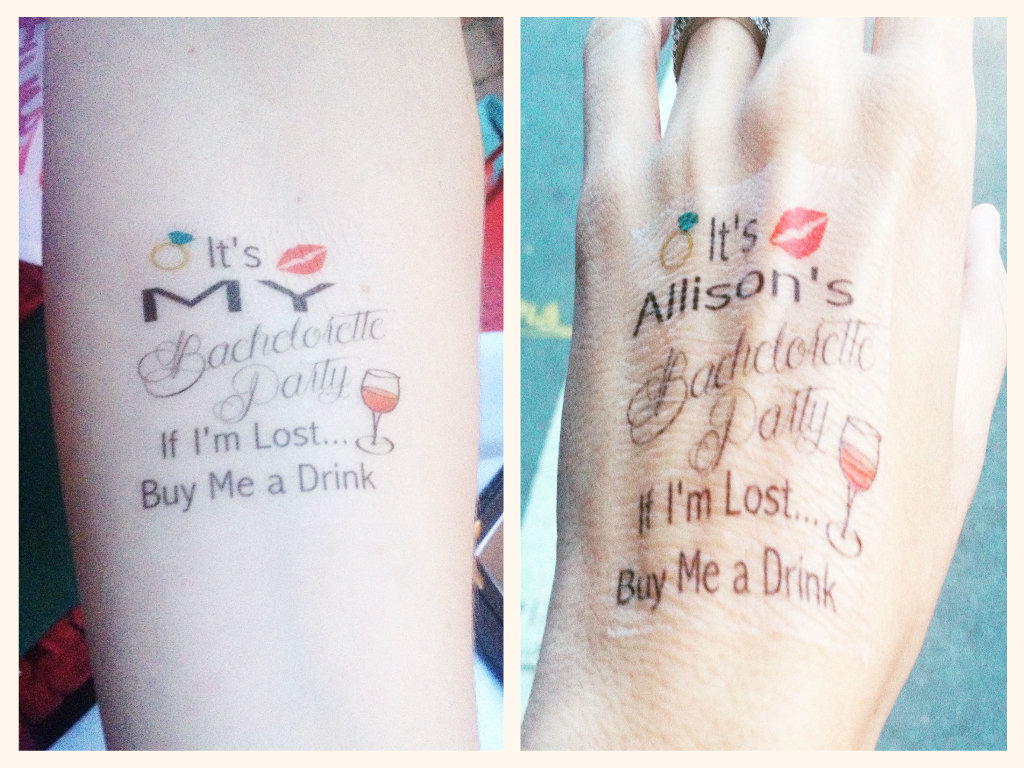
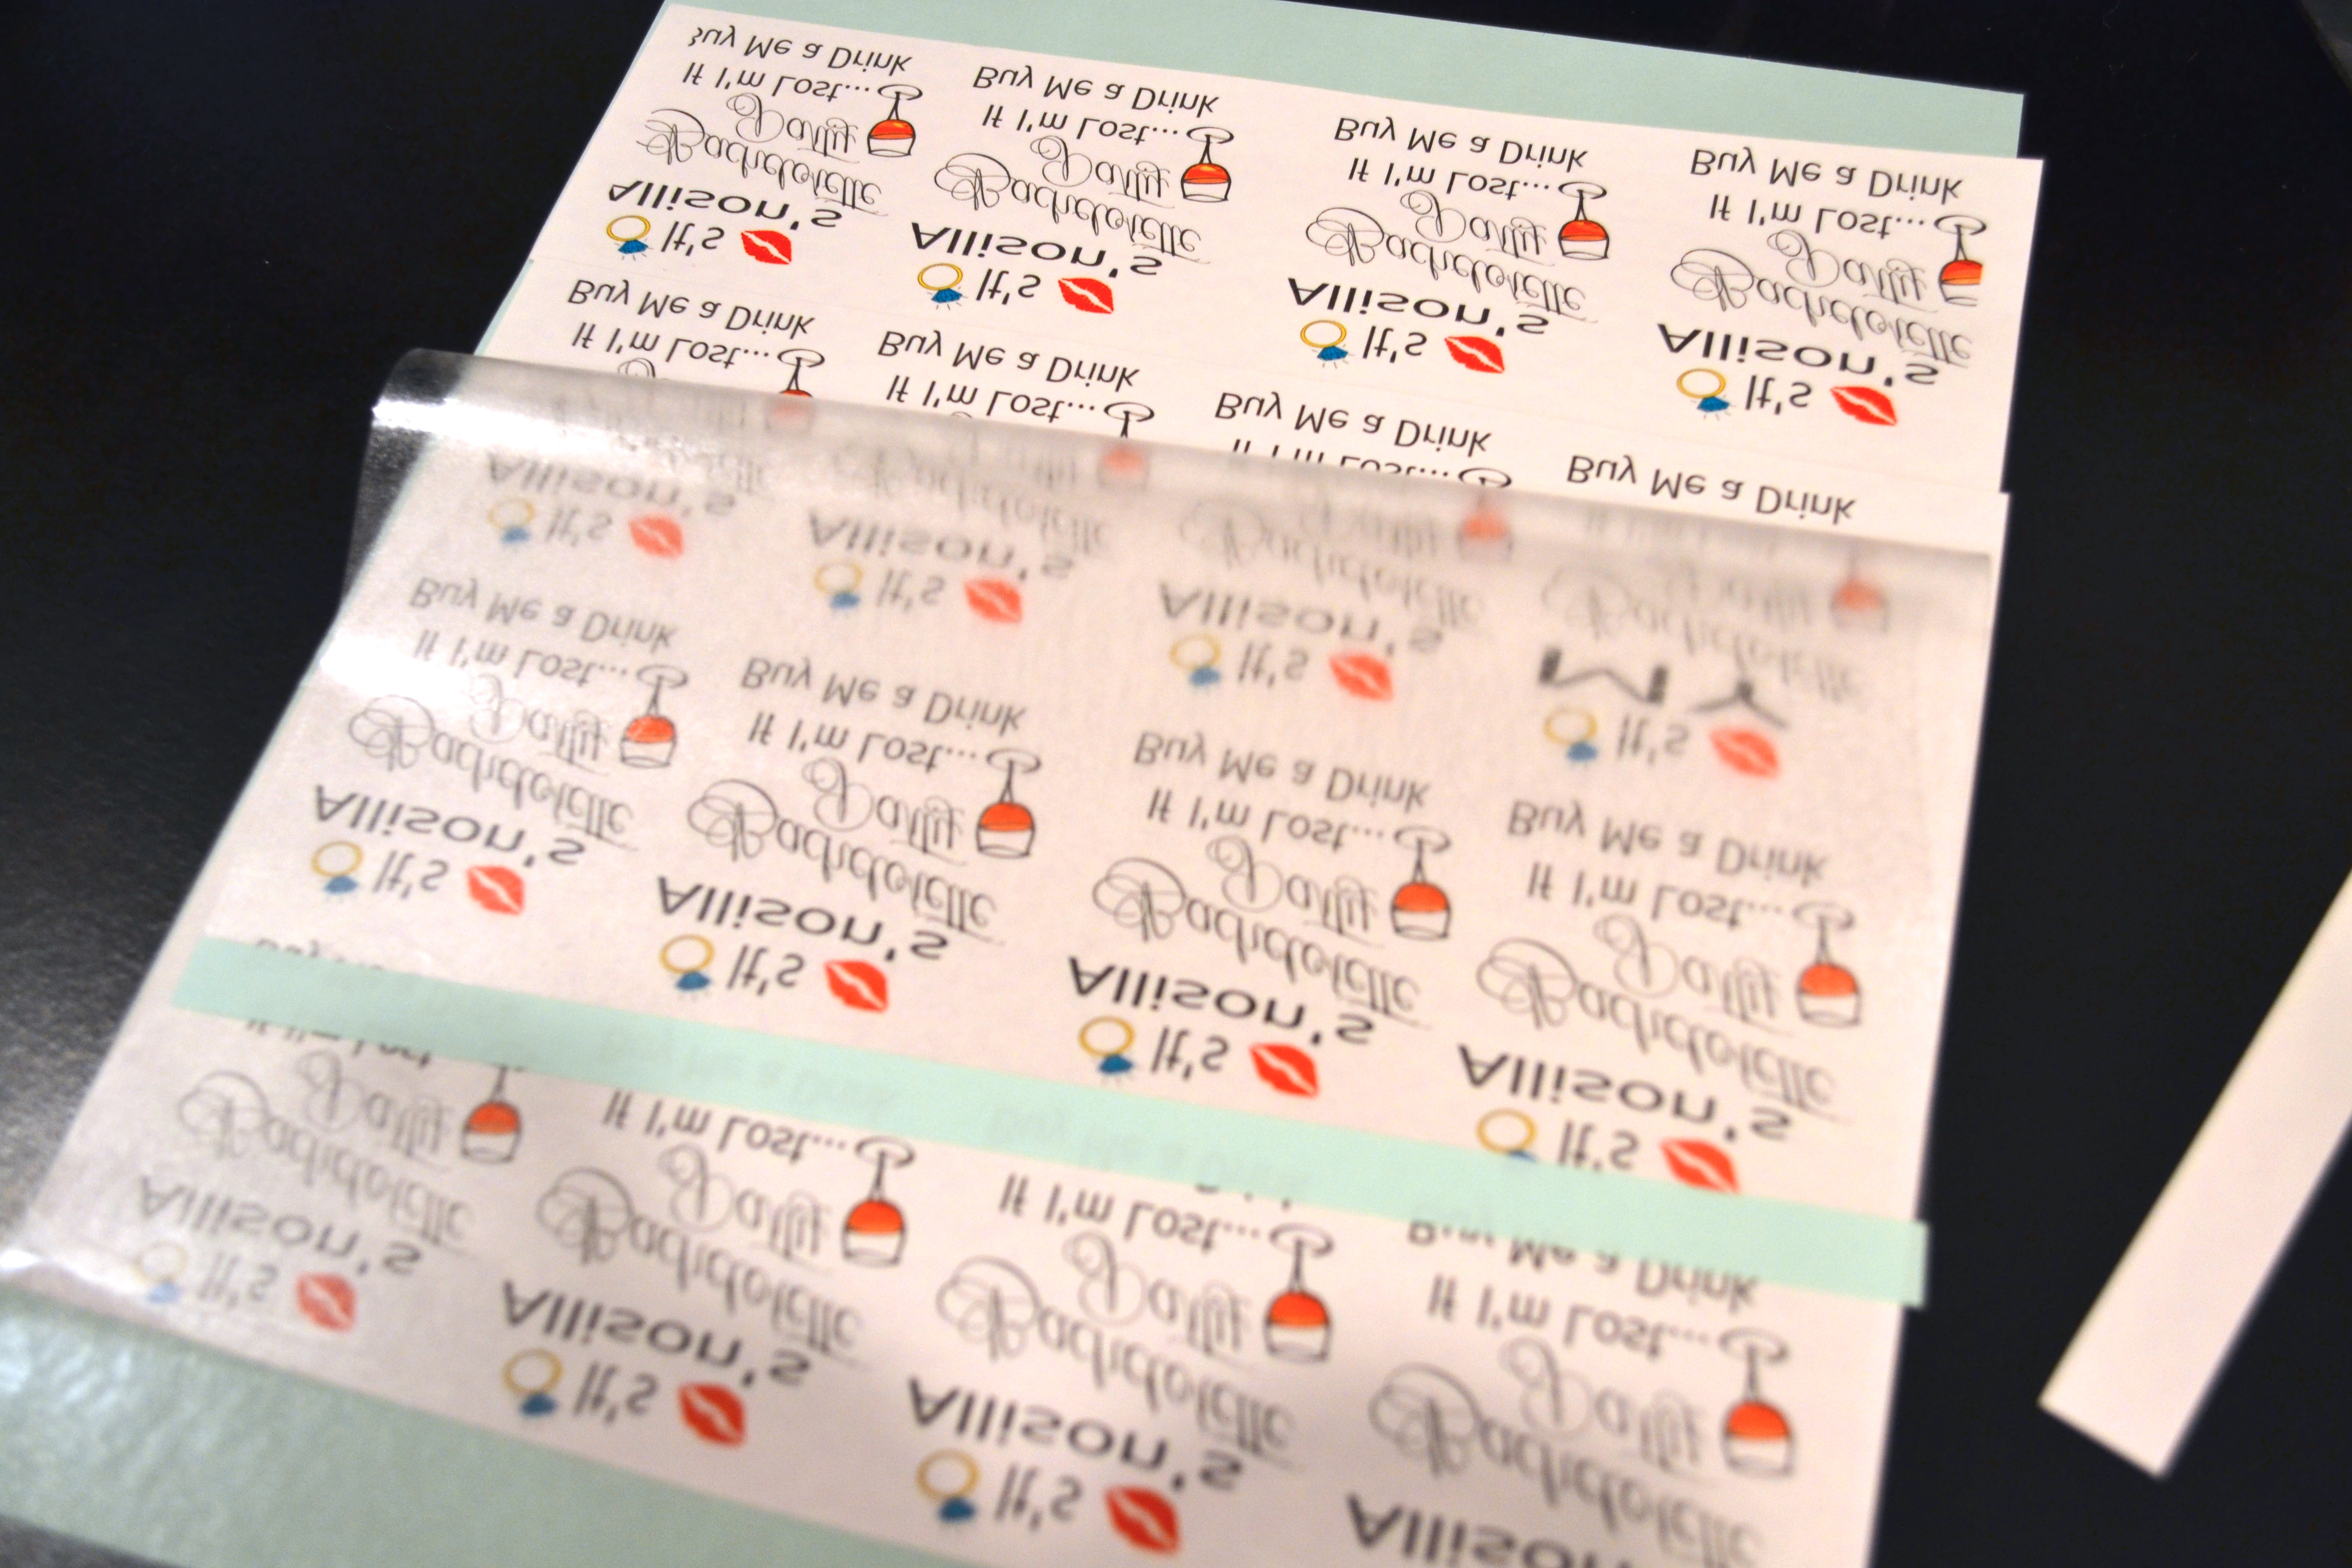
DIY Bachelorette Temporary Tattoos
The Necessary Supplies:
- Printable Temporary Tattoo Paper
- Inkjet Printer
- Scissors
- Silhouette Cameo (or other die cutting machine) – optional
Step 1:

- Make your design in a Word Document, Photoshop, Design Studio, or other applicable program where you have access to clip art and different fonts.
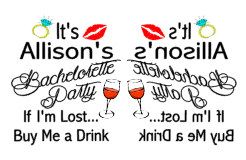
- Make sure if you’re using the bachelorette’s name in the tattoo, that you make a separate design for her that says MY in it, instead of her name (ie: “IT’S ALLISON’S BACHELORETTE, and “IT’S MY BACHELORETTE – get it?)
Step 2:
- Take your design, and mirror it so that it looks backwards on your screen.
- The Silhouette Studio I use is great for this, and it’s a FREE program. Go there and download it if your program won’t “mirror” images for you.
- Then, copy the design as many times as will fit within the printable range on one page.
- I found my design fit comfortably 14 times on one page. 13 for party guests, and 1 for the bride to be.
Step 3:
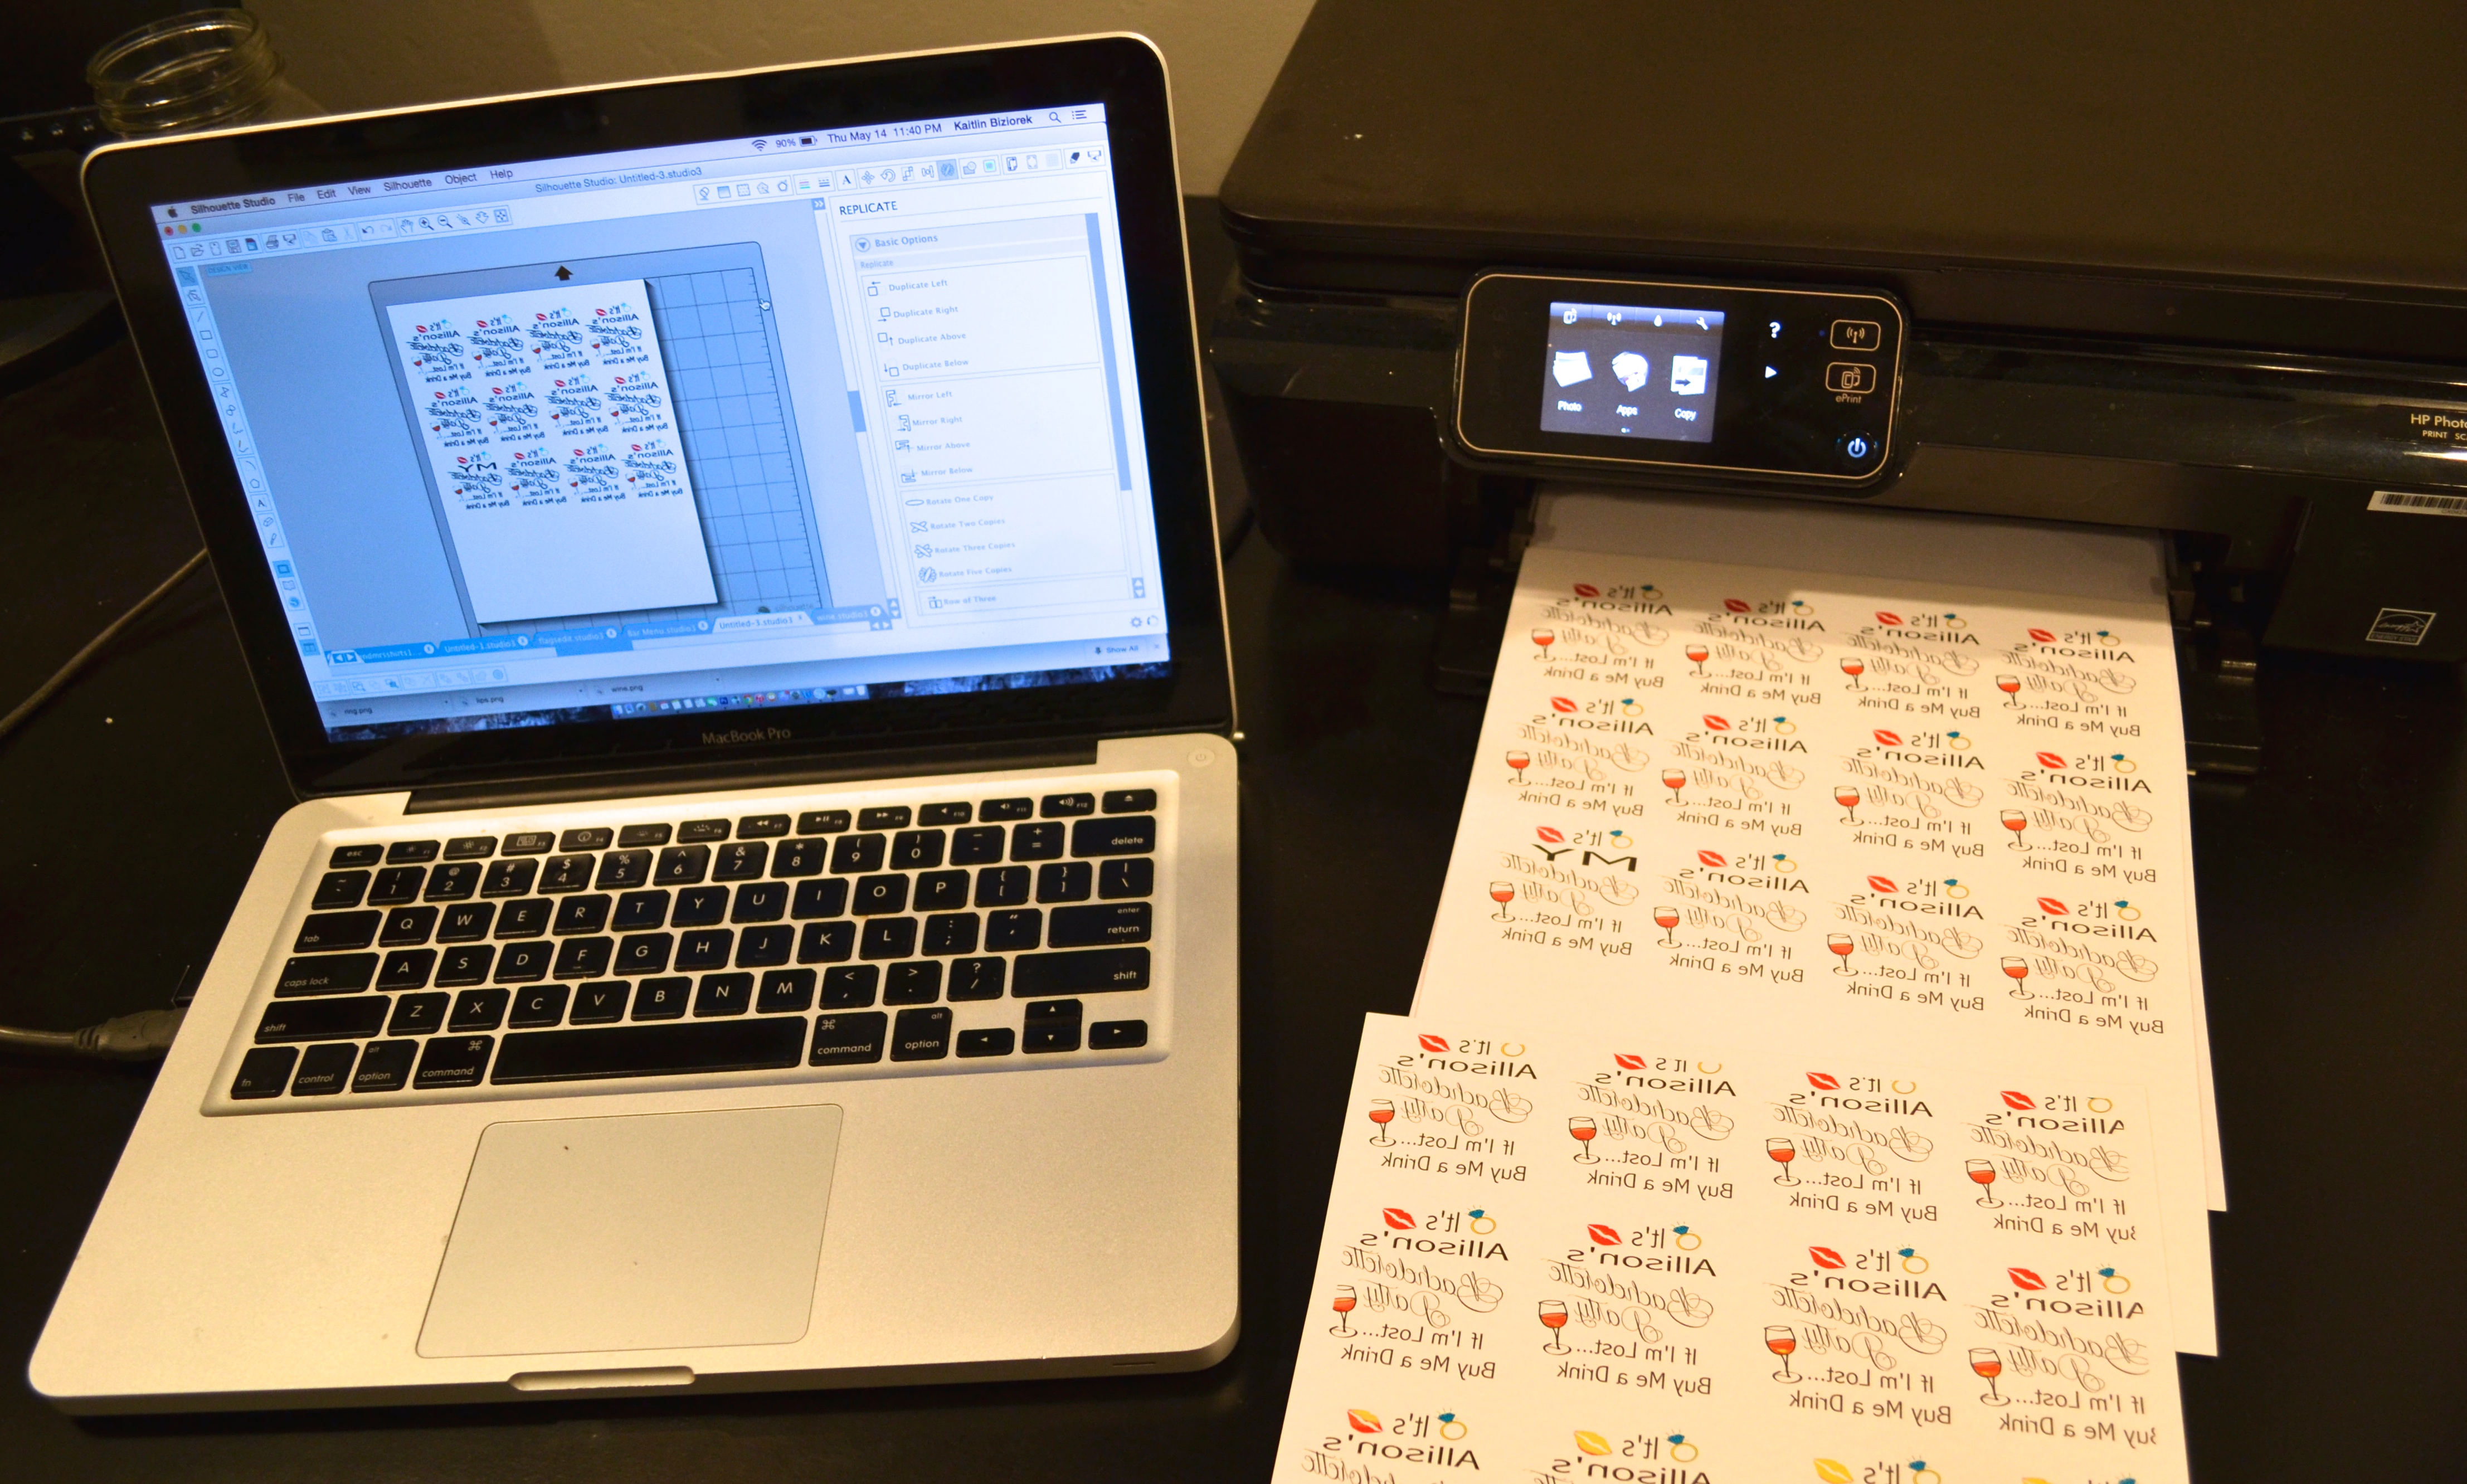
- Insert the glossy tattoo paper into your printer, and make sure that it’s set to print ON THE FRONT of the glossy side.
- Print your design. Let the ink dry COMPLETELY.
Step 4:
- Now, take your clear sticky paper and remove the backing (like one big sticker).
- Place the top of the sticky paper over the top of the glossy paper you just printed your design on. Little by little (and very gently) stick the clear sheet over the top of the entire glossy sheet – smoothing with a ruler or card as you go to ensure there are no air bubbles or bumps.
- This is extremely similar to applying a decal to your car or a screen protector on your phone.
Step 5:
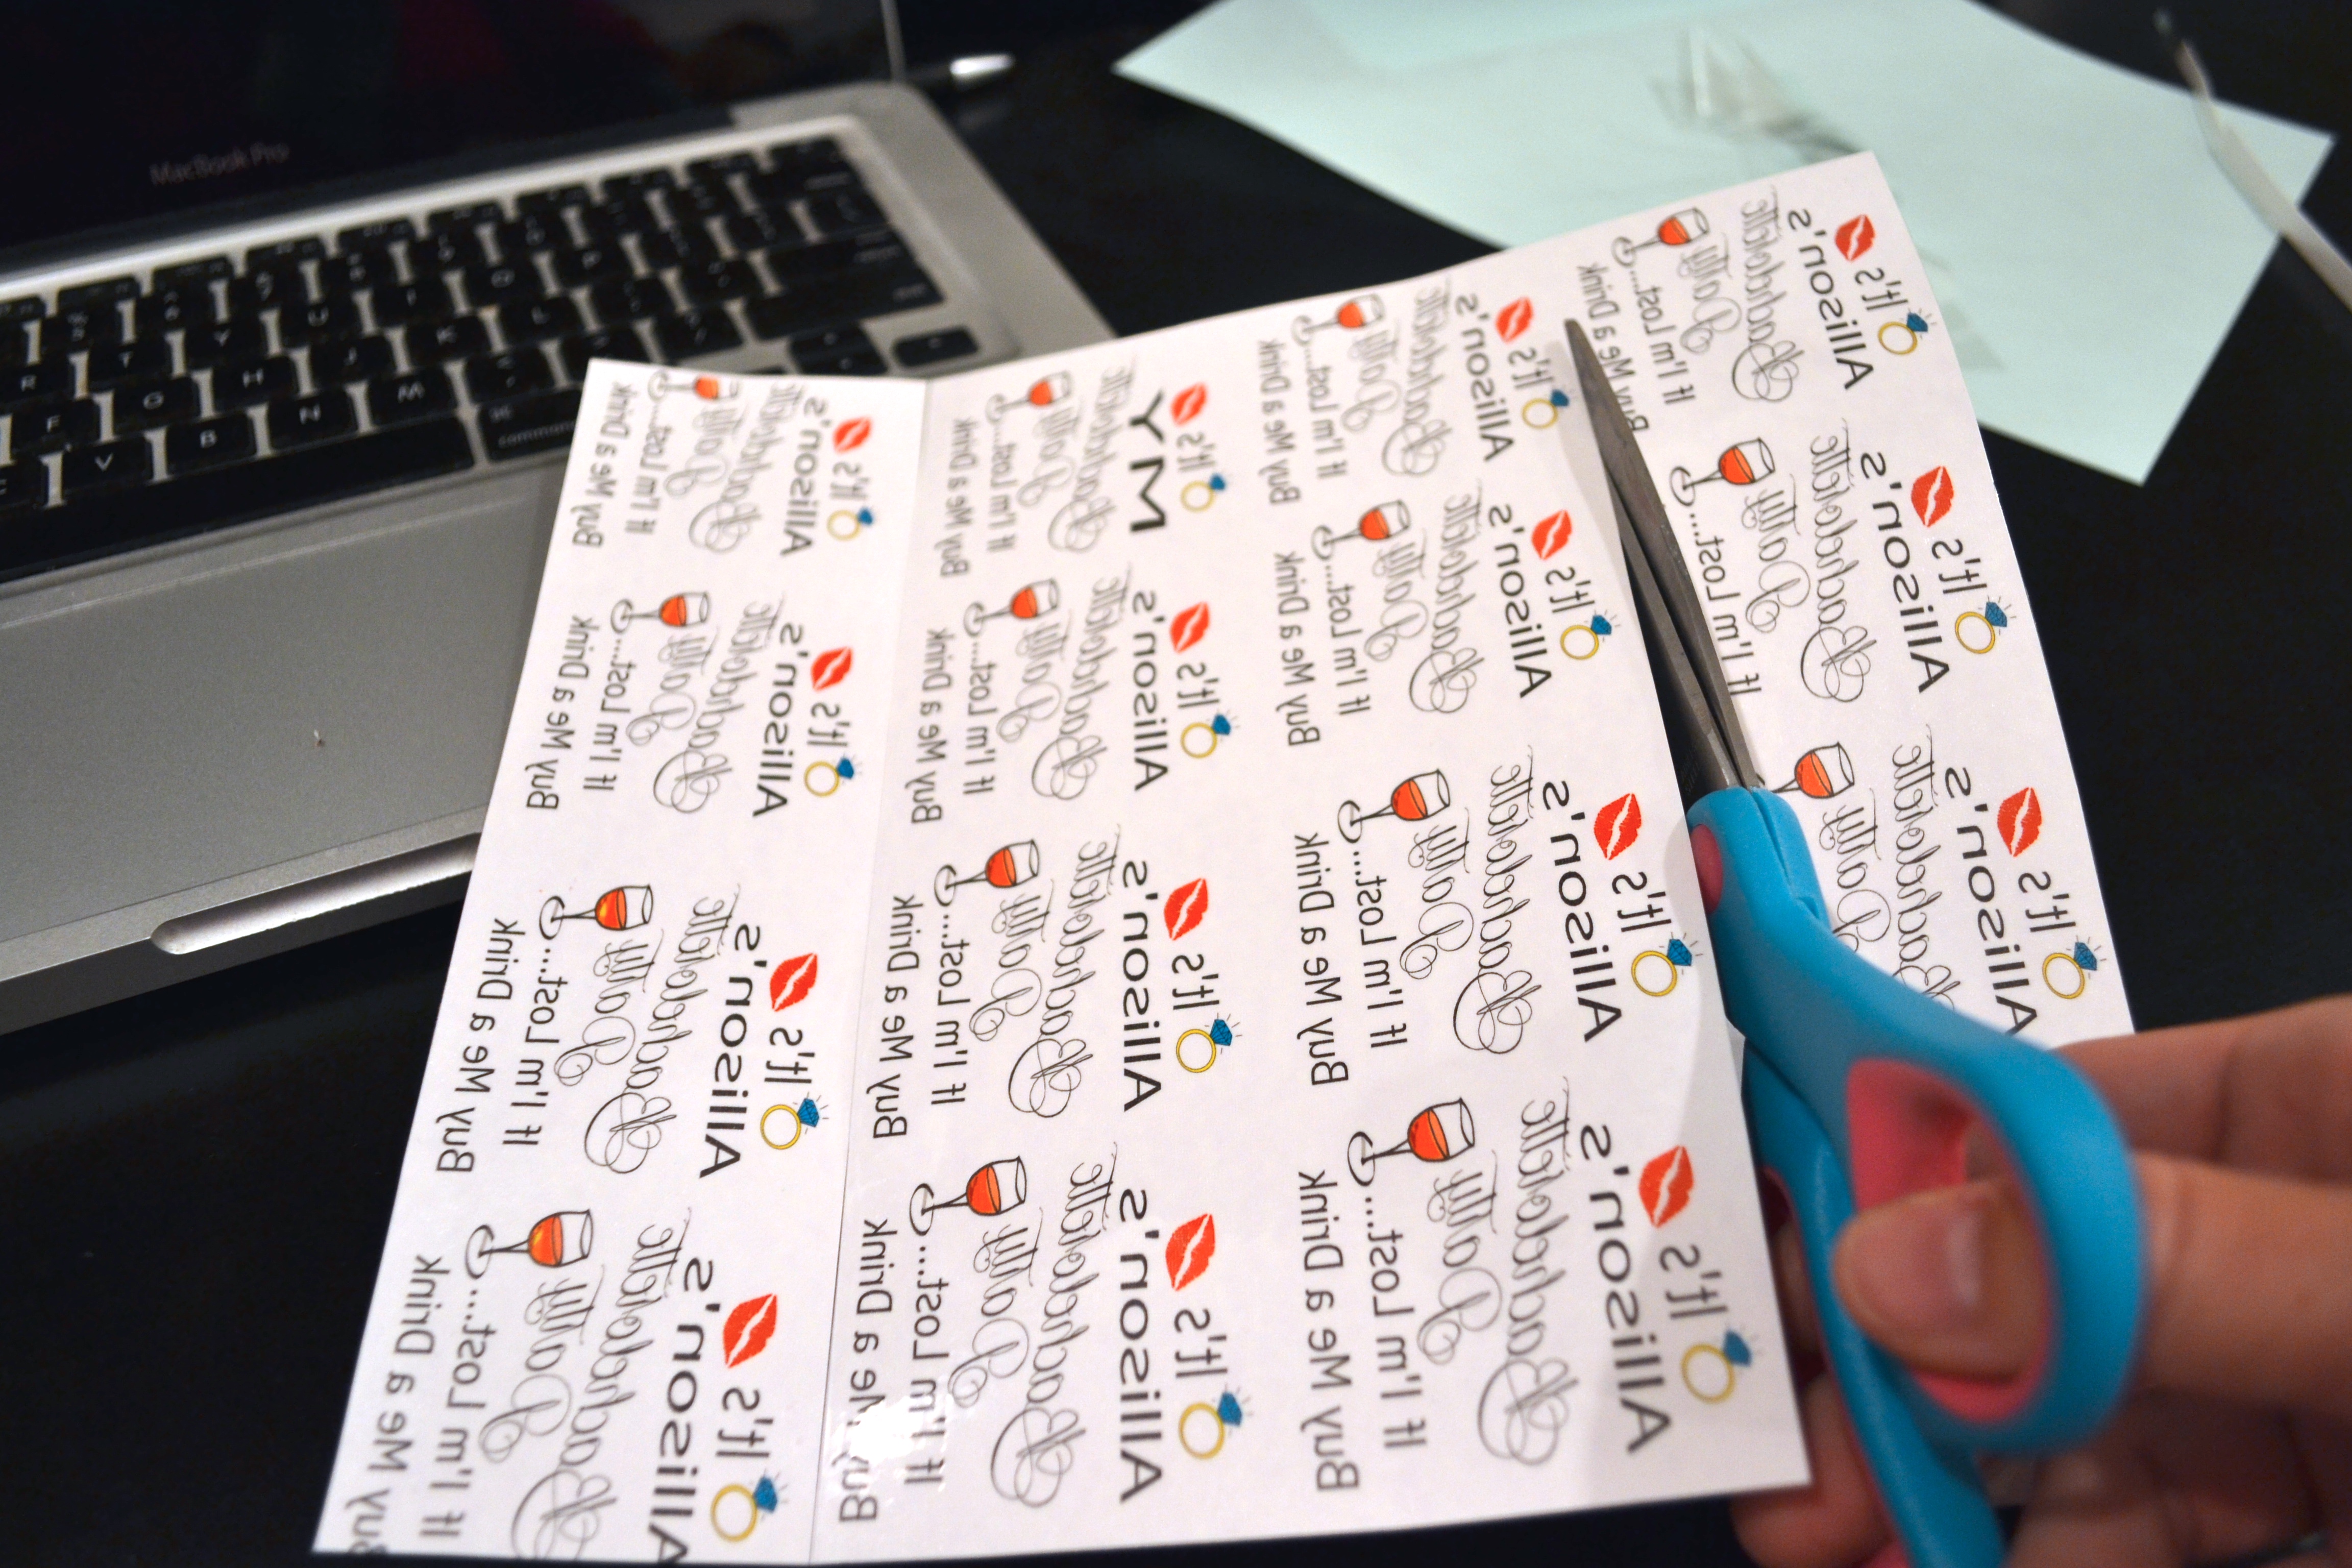
- Cut out your design.
- I used scissors and hand cut it out since my design was just a square.
- If you want precise cuts, and you have a die cutting machine, make sure your design is done in whatever software comes with that machine, and run it through the machine to cut out the outline of the tattoo. Make sure you set it to “double cut” since the paper and plastic sheet together are kind of thick.
Step 6:
- Apply your tattoos and enjoy!
- DISCLAIMER- READ CAREFULLY: Make sure your party guests REMOVE the plastic sheet BEFORE applying their temporary tattoos. You’d be surprised how many people forget how to apply temporary tattoos after all the years of not wearing them!!
And now, let’s not forget about the decor…
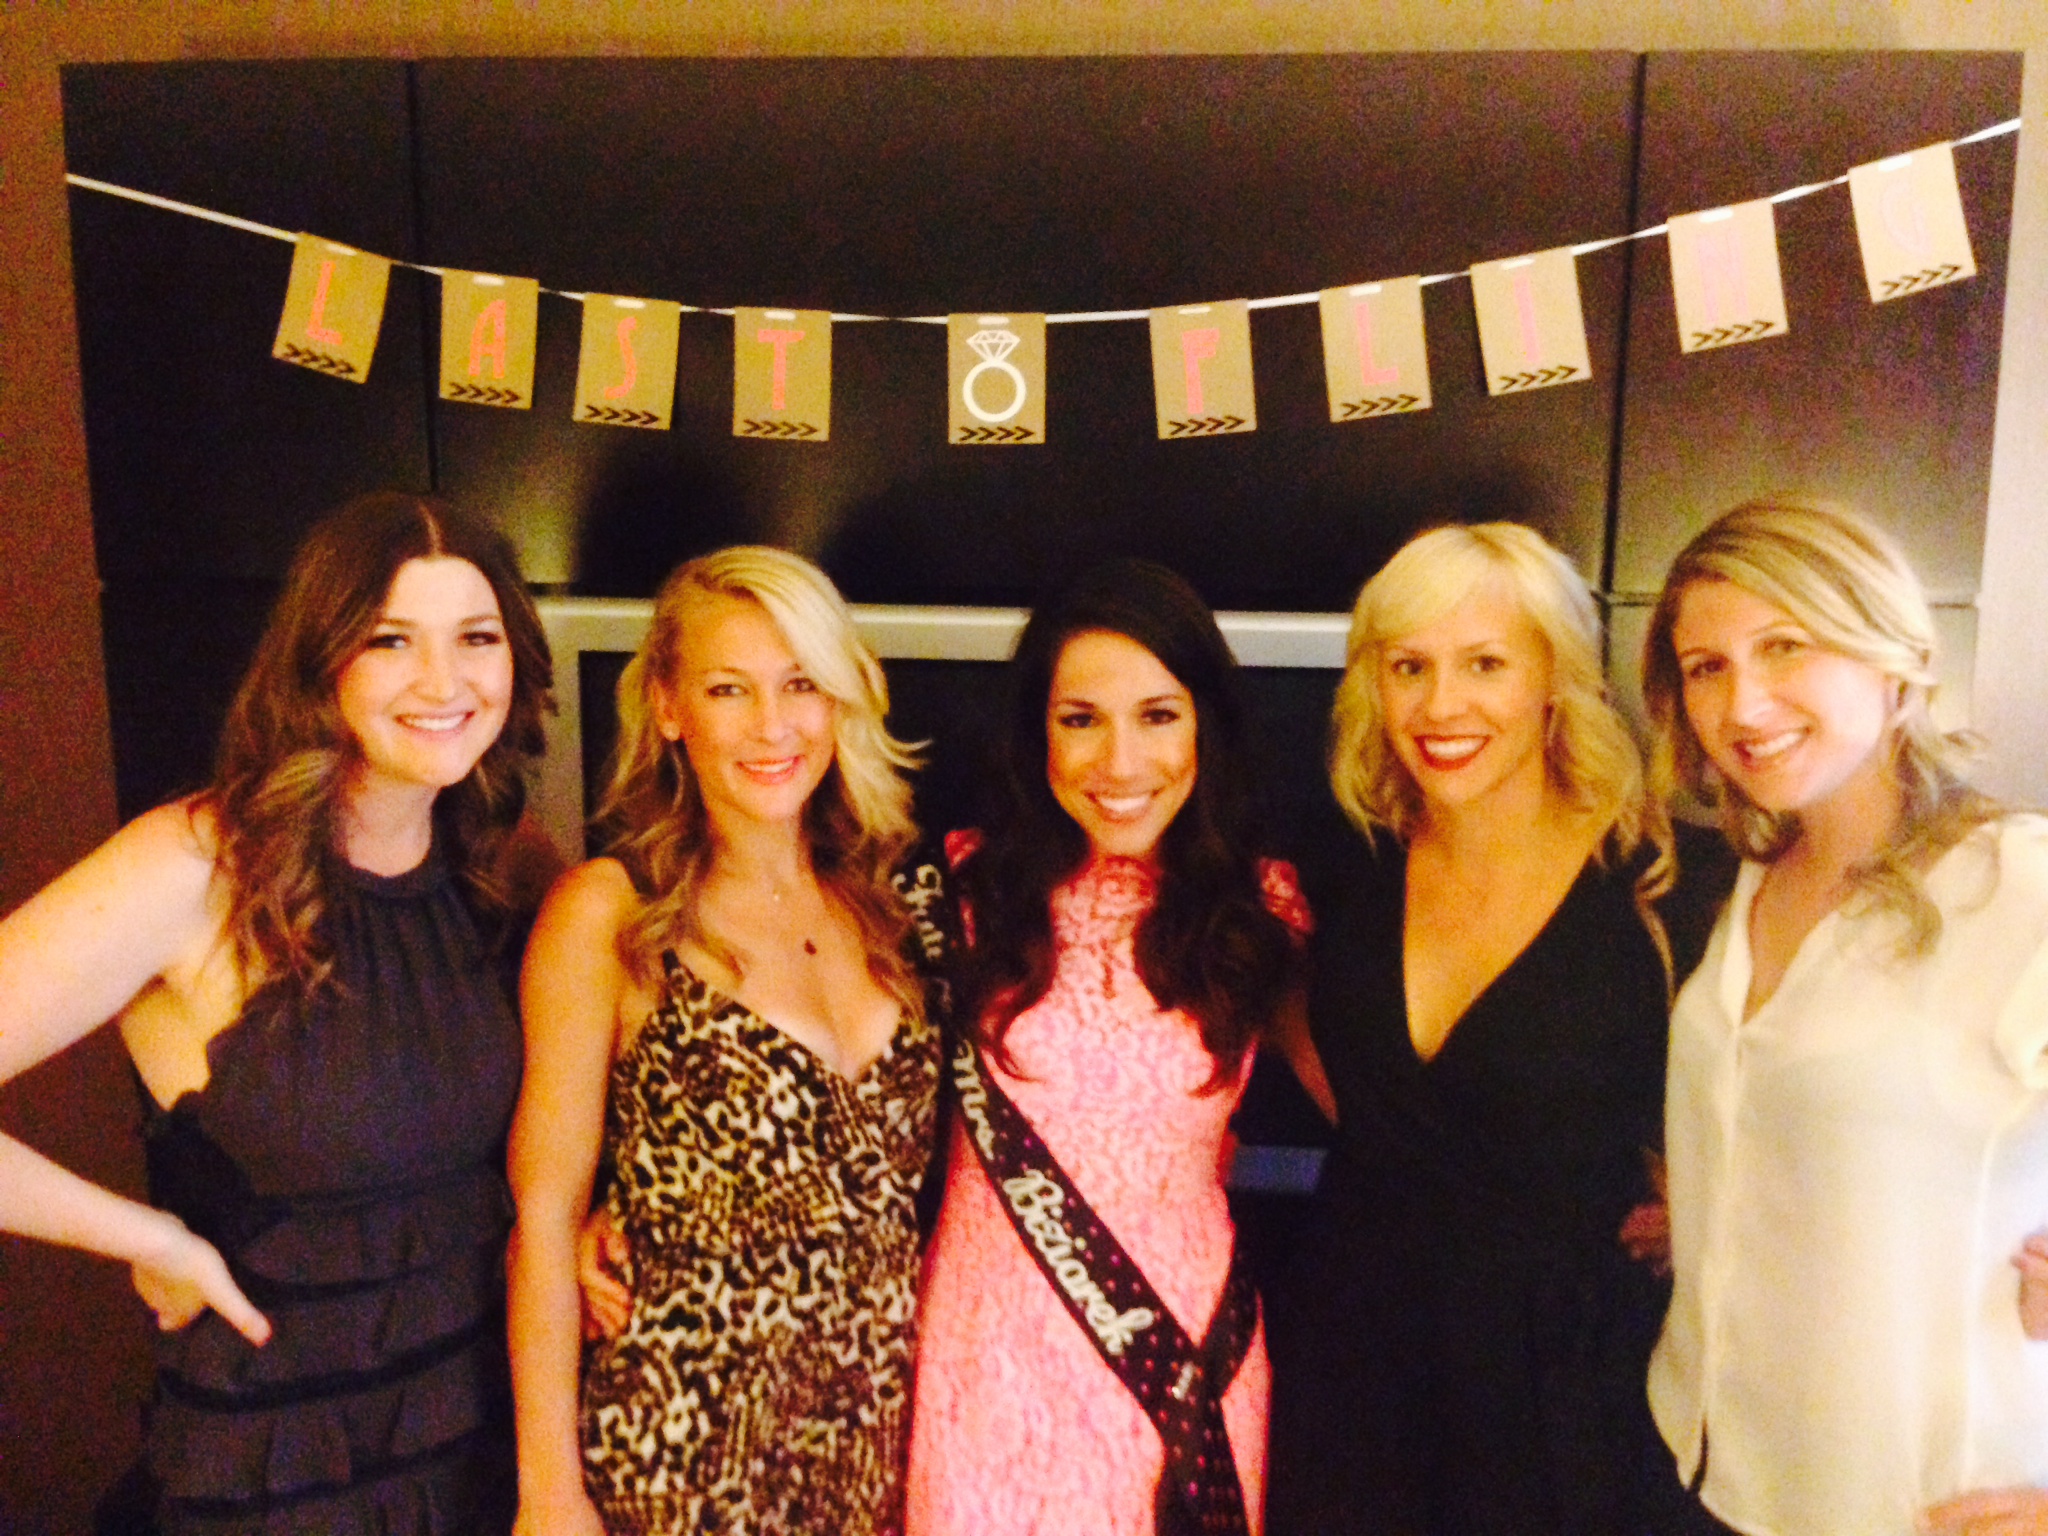
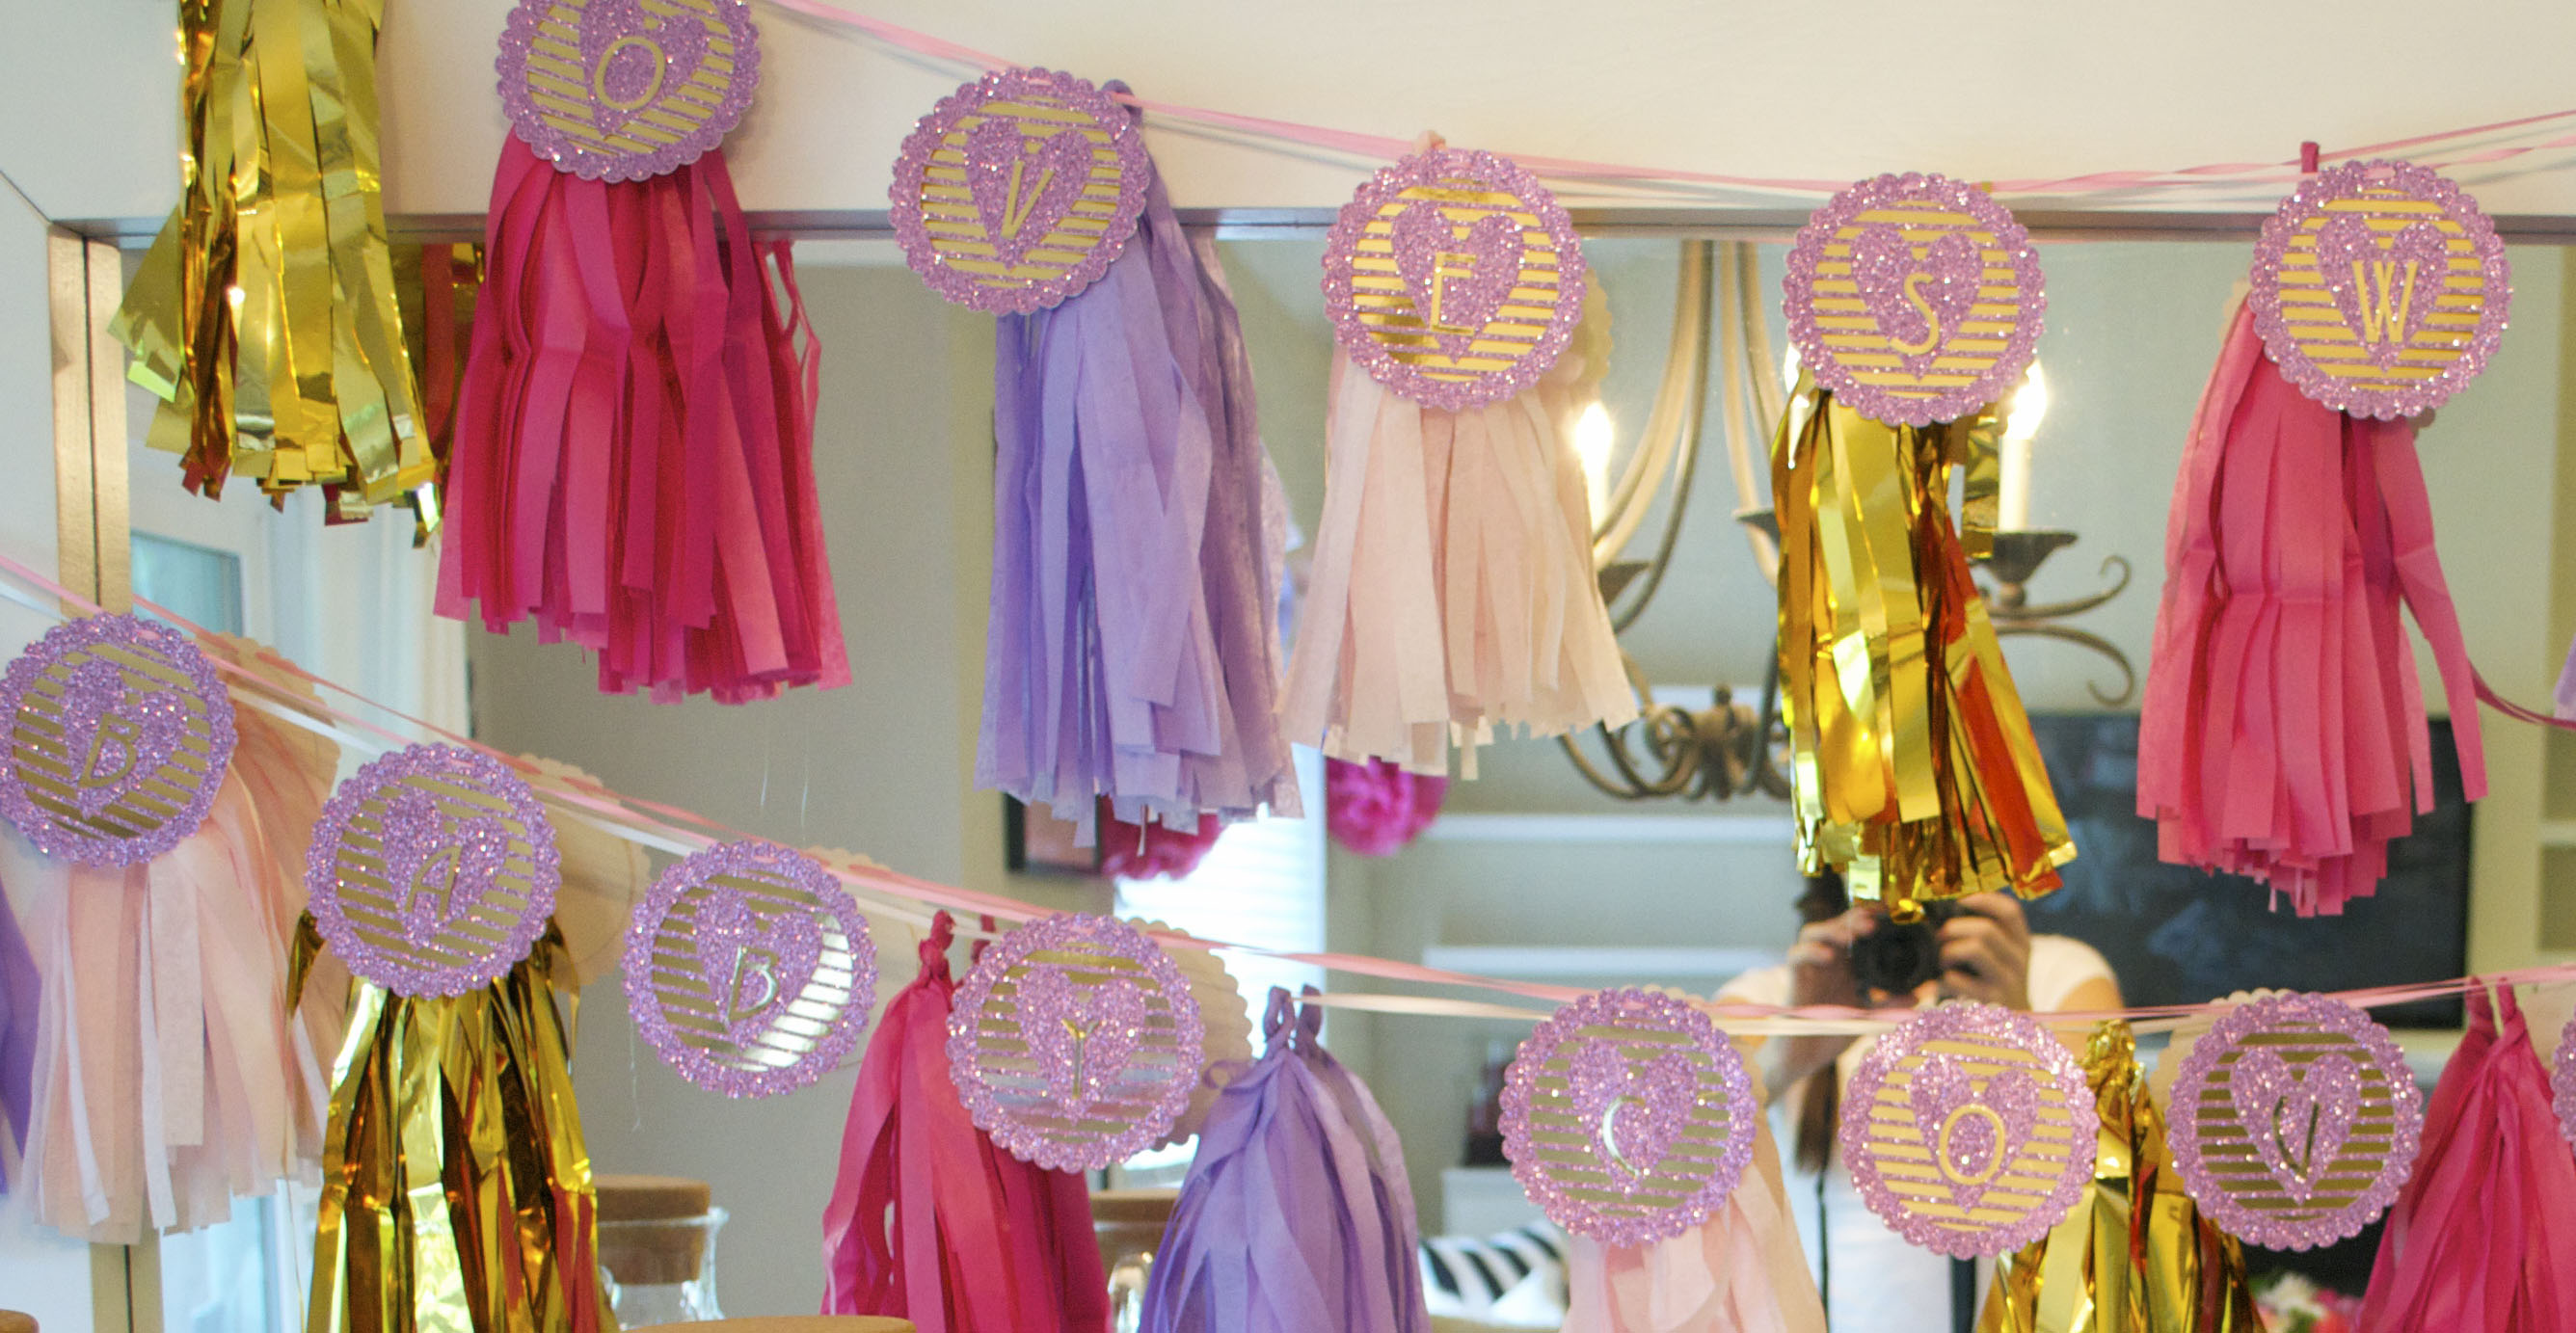
DIY Customized Bride to Be Banner
The Necessary Supplies:
Banner:
- Sparkle Cardstock: (4, 12×12” sheets needed)
- Metallic Gold Cardstock: (3, 12×12” sheets needed)
- ⅛” Pink Ribbon
- Small Hole Punch
- Silhouette Cameo Machine (OPTIONAL)
Tassel Garland:
- 4 colors of tissue paper. I used:
- Scissors
- Thin ⅛” Ribbon
- Hot Glue and Glue Gun
Fishing Line Garland (with hearts):
- Red and Pink Cardstock (optional: patterned cardstock)
- Fishing Line
- Glue gun and hot glue
- Silhouette Cameo (optional – but HIGHLY recommended)
- Scissors (if not using a Cameo)
Well, well, well. Here’s where my crafts collide. If this is your first time to my site, then you haven’t seen my tutorial I did on customized banners. I made a pretty pink and gold banner for a friend’s baby shower, but the tutorial applies for any custom banner you may be making. Take a look at the step by step tutorial here. It’ll tell you everything you need to know, and even give you a free printable to make the exact banner I made, yourself!
I also combined that banner with a tassel garland, to get the look shown above. And I give you the full tassel garland tutorial here.
Additionally, if you want some other fun decor, you may want to check out my 3-D heart garland tutorial here. You don’t even have to make the garland out of hearts. Just apply the steps to any shape you like (ie: circles, anchors, bows… whatever your theme may be). They’re fun to hang around the room, give the walls a whole new dimension, and add some fun and color into the party! Just take a look:

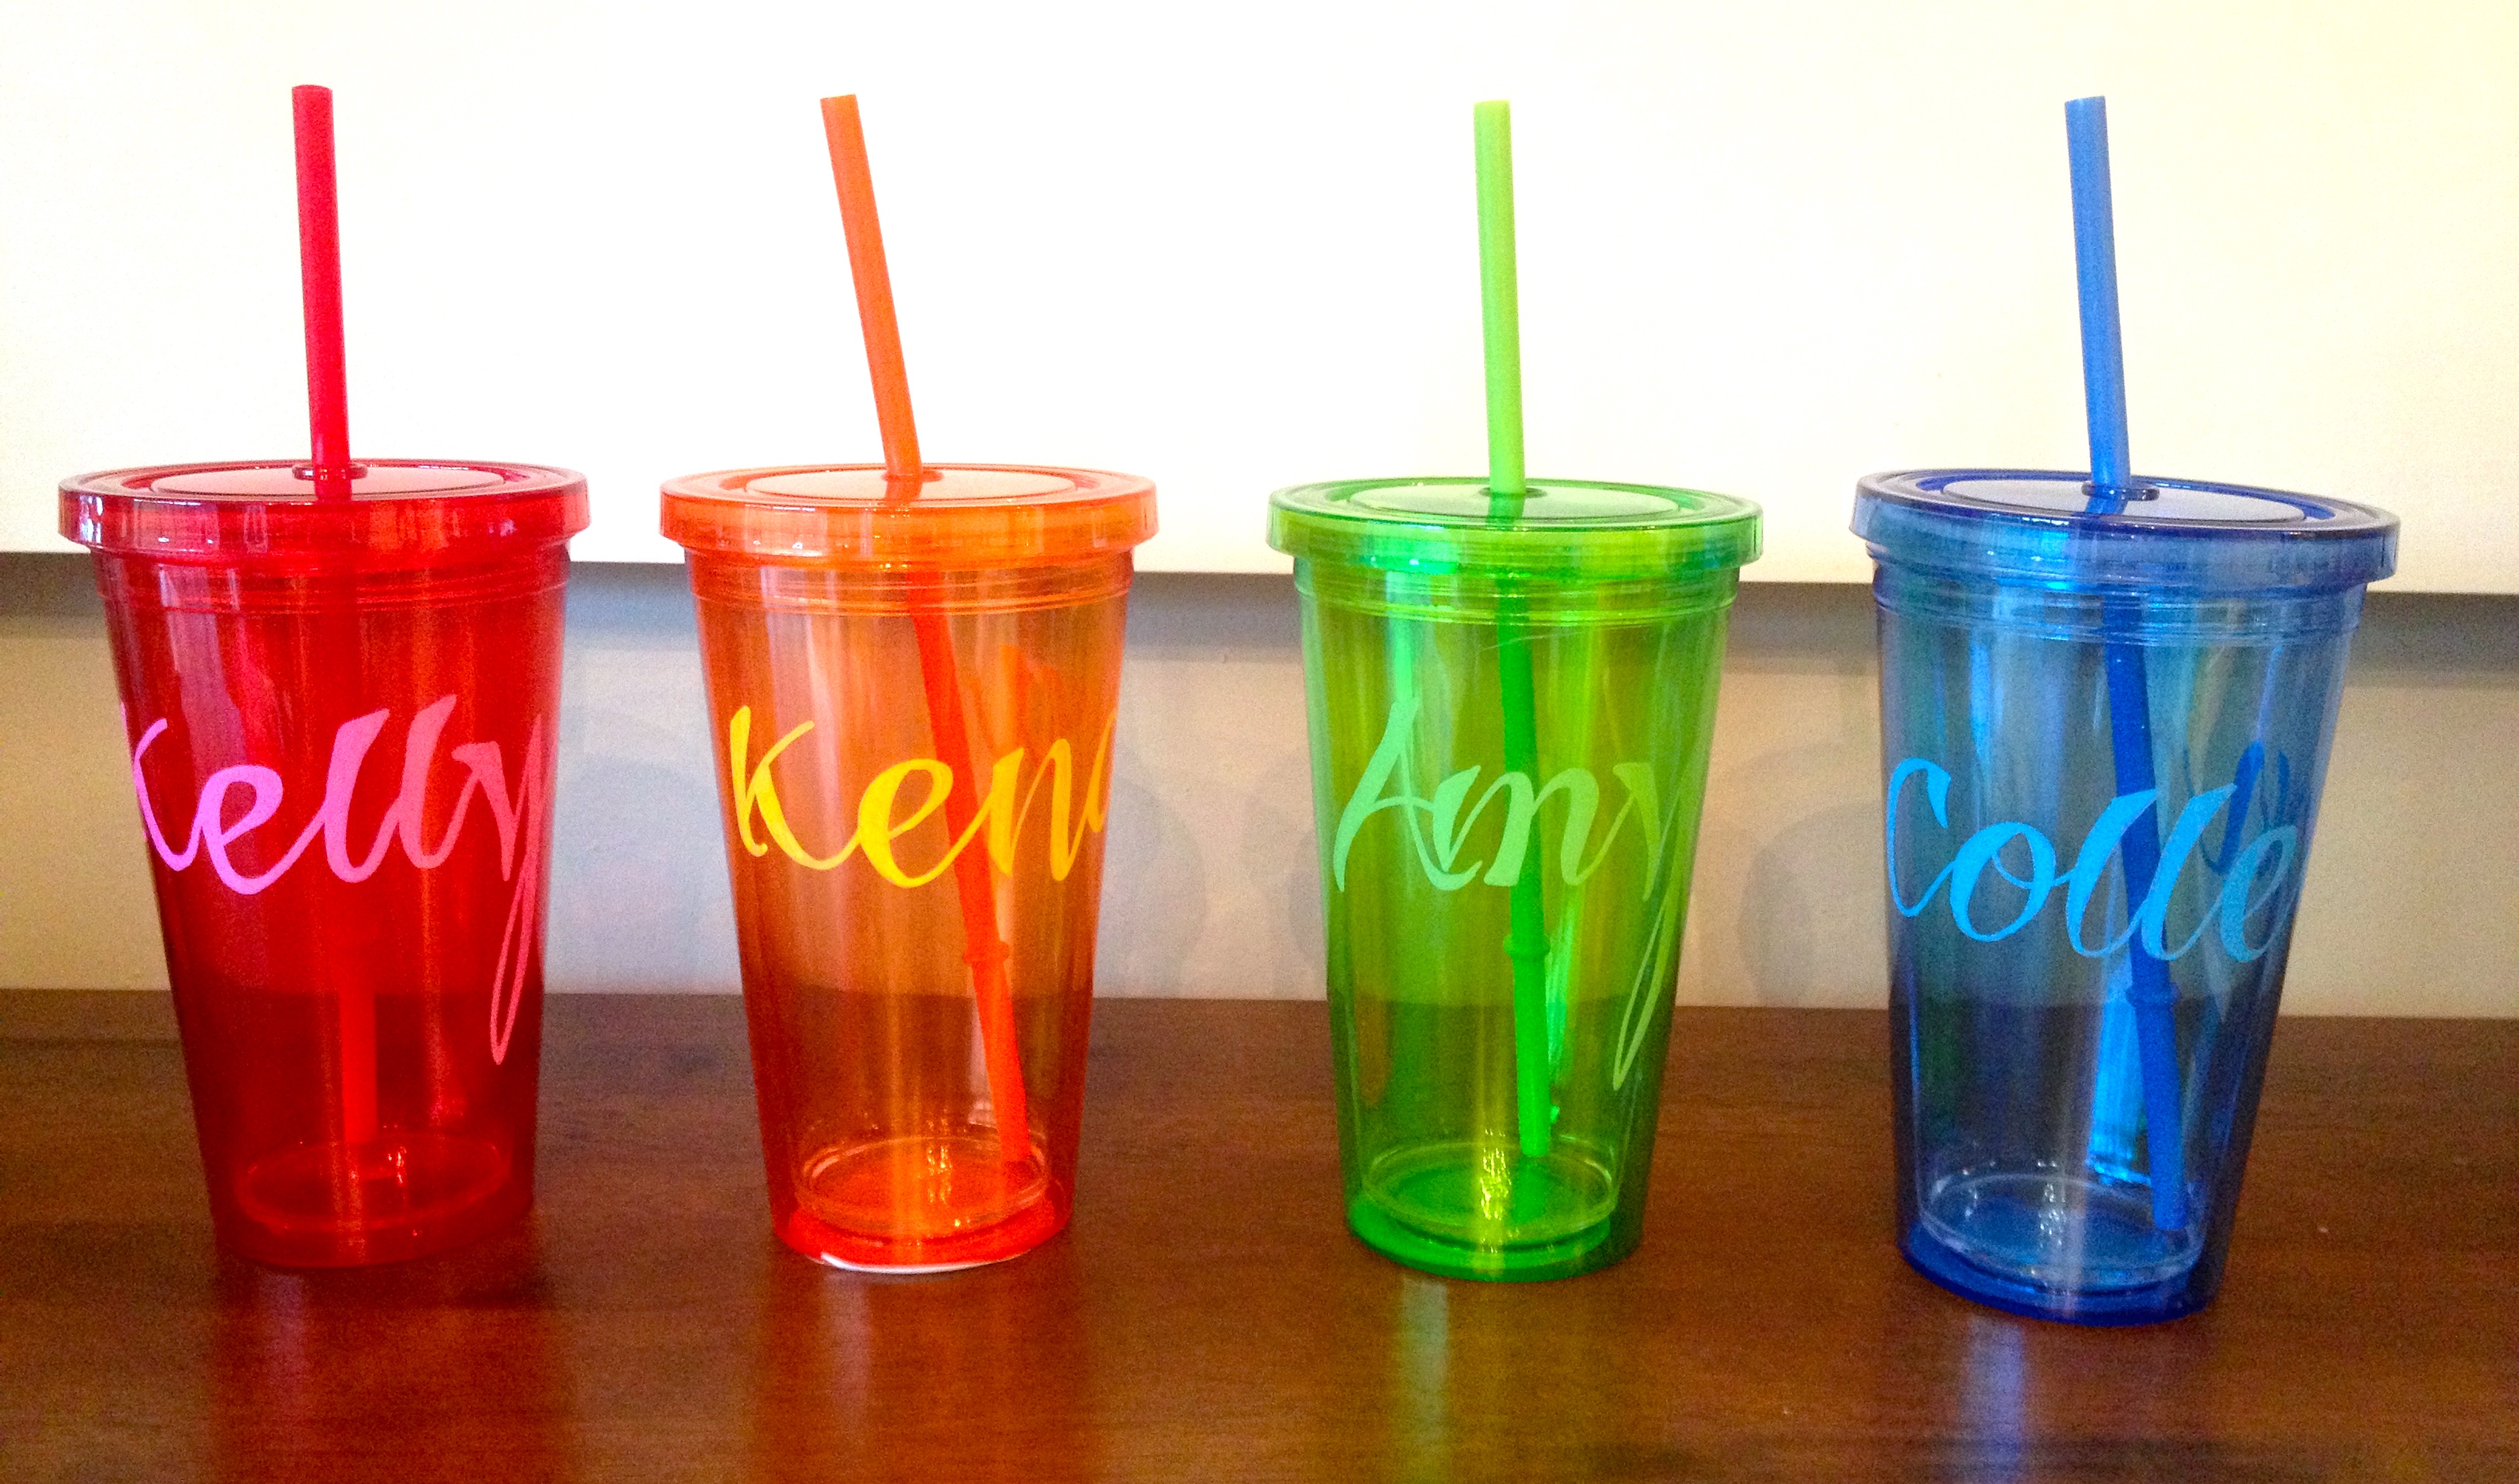
Lastly, if you’re looking for fun and practical gifts for the people attending the party, you should for sure check out my DIY tumbler tutorial. It saves you from buying cups for the weekend, and everyone gets a souvenir to use the entire weekend that they can ALSO take home with them. Genius!
There are so many more fun things you can DIY to make a bachelorette party fun and personalized. But you can’t do everything under the sun; nobody’s got time for that. Even if you just did one or two of the party ideas above, you’ll save a TON of money off of retail, and the bachelorette is guaranteed to love the thought you put into her bash.
Friends with the other bridesmaids? Make a girls night out of it! Have a pre-bachelorette wine-o night (like Sarah and I did) and put everyone to work crafting. As I always say, any excuse for wine is a good one 🙂 Now, with these crafts AND the bachelorette party, you’ll have TWO! You’re welcome…
Not So DIY Bachelorette Supplies
Now ladies, if you’re looking for the kind of decorations we all know and love for bachelorette parties (you know EXACTLY what I’m talking about) you probably don’t want to be having a crafting night centered around them. No, not my idea of fun projects – and probably not yours either!
So here’s a quick list of some fun and CHEAP “naughty” decorations you can buy that will arrive in a jiff (if you’re running out of time).
- “Naughty” straws
- “Naughty” Ring Toss Game
- Pin the “MR” on the MAN – Game
- Inflatable Blowup Manhood
- Ring Shaped Shot Glasses
- Super Fun “Naughty” Candy
I know, I know. These aren’t so original. So why am I putting them on my site? BECAUSE YOU CAME HERE FOR BACHELORETTE PARTY IDEAS, that’s why! I want to make sure I cover every sort of decor you may want/need. So unless you want to spend an evening drawing your own naughty “pin the manhood on the naked man” game (and seeing a step by step tutorial by me how-to), I’ll just leave this one to retail.
But, I do hope this post and my links make it easy for you to find all the things you need – whether personalized or not. By now, even the most novice part planner should be ready to throw the most fun (and decorative) bachelorette party ever!
So just in case you’re printing a list off for your trip to the craft store, here’s an aggregate list of all the supplies you’ll need to DIY the crafts above:
Bride to Be Sash:
- Blank Sash (I used WHITE but they come in all colors)
- Heat Transfer Vinyl (recommended) or Heat Transfer Printable Paper
- I used PINK and GLITTER LAVENDER vinyl
- Silhouette Die Cutting Machine (optional) or scissors
Temporary Tattoos:
- Printable Temporary Tattoo Paper
- Inkjet Printer
- Scissors
- Silhouette Cameo (or other die cutting machine) – optional
Bachelorette Banner:
- Sparkle Cardstock: (4, 12×12” sheets needed)
- Metallic Gold Cardstock: (3, 12×12” sheets needed)
- ⅛” Pink Ribbon
- Small Hole Punch
- Silhouette Cameo Machine (OPTIONAL)
Tassel Garland:
- 4 colors of tissue paper. I used:
- Scissors
- Thin ⅛” Ribbon
- Hot Glue and Glue Gun
Fishing Line Garland (with Hearts):
- Red and Pink Cardstock (optional: patterned cardstock)
- Fishing Line
- Glue gun and hot glue
- Silhouette Cameo (optional – but HIGHLY recommended)
- Scissors (if not using a Cameo)
I am having a shower next weekend for a niece who just secretly got married. I would love to have a sash that says BRIDE but I don’t have any way to make the letters. I do have some stencil letters but not sure how to get them on. Can you give me any ideas. Wasn’t sure if Michaels or Hobby Lobby would have anything that would work. Thanks. Diane